
Torch TensorRT 是 PyTorch 与 NVIDIA TensorRT 的新集成,它用一行代码加速推理。我对 Torch TensorRT 感到兴奋。 PyTorch 是当今领先的深度学习框架,在全球拥有数百万用户。 TensorRT 是一个 SDK ,用于在数据中心运行的 GPU 加速平台上进行高性能、深度学习推理,嵌入式、嵌入式和汽车设备。这种集成通过使用 TensorRT 时简化的工作流程,使 PyTorch 用户具有极高的推理性能。
什么是 Torch-TensorRT
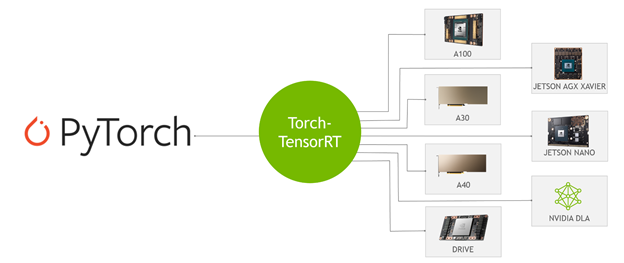
Torch-TensorRT 是 PyTorch 的集成,它利用了 TensorRT 在 NVIDIA GPU 上的推理优化。只需一行代码,它就提供了一个简单的 API ,在 NVIDIA GPU 上可以提供高达 6 倍的性能加速。
这种集成利用了 TensorRT 优化,例如 FP16 和 INT8 降低的精度,同时在 TensorRT 不支持模型子图时提供了对本机 PyTorch 的回退。
Torch-TensorRT 的工作原理
Torch- TensorRT 充当TorchScript的扩展。它优化并执行兼容的子图,让 PyTorch 执行其余的图。PyTorch的全面而灵活的功能集与Torch- TensorRT 一起使用,Torch- TensorRT 解析模型并对图中与TensorRT兼容的部分应用优化。
编译后,使用优化的图形就像运行 TorchScript 模块,用户可以获得更好的 TensorRT 性能。 Torch- TensorRT 编译器的体系结构由兼容子图的三个阶段组成:
- 降低 TorchScript 模块
- 转变
- 处决
降低 TorchScript 模块
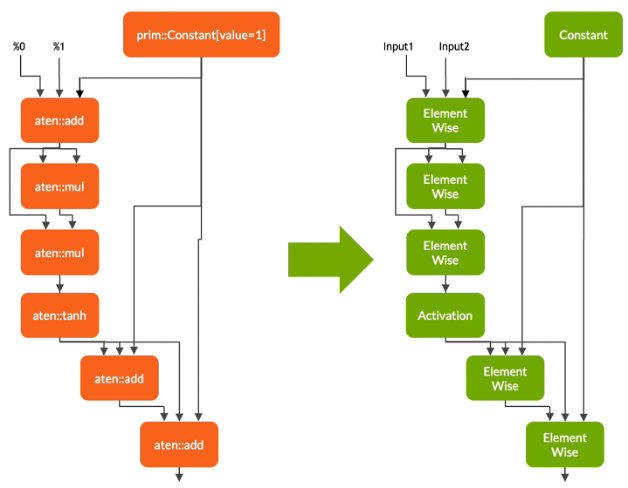
在第一阶段, Torch- TensorRT 降低了 TorchScript 模块,将常见操作的实现简化为更直接映射到 TensorRT 的表示。请务必注意,此降低过程不会影响图形本身的功能。

转变
在转换阶段, Torch- TensorRT 自动识别 TensorRT 兼容的子图,并将其转换为 TensorRT 操作:
- 具有静态值的节点将被计算并映射到常量。
- 描述张量计算的节点转换为一个或多个 TensorRT 层。
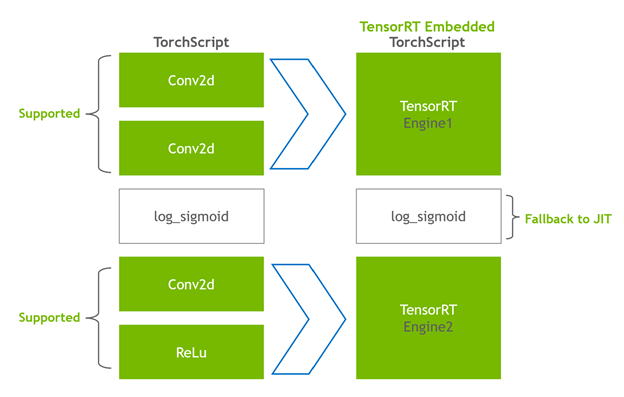
- 其余节点保留在 TorchScript 中,形成一个混合图,作为标准 TorchScript 模块返回。
修改后的模块会随 TensorRT 引擎一起返回给您,这意味着整个模型 – PyTorch 代码、模型重量和 TensorRT 引擎都可以在单个包中进行移植。
处决
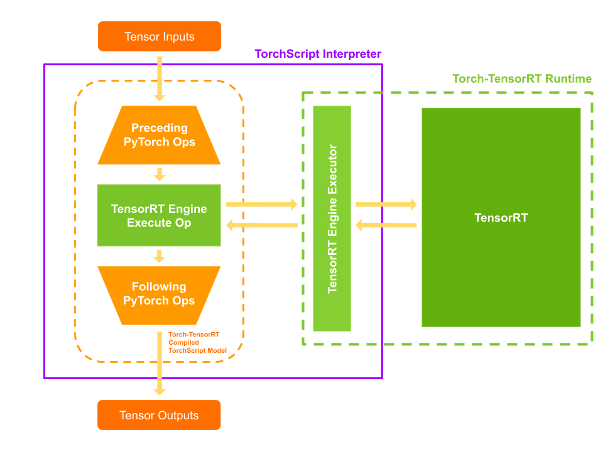
当您执行编译后的模块时, Torch- TensorRT 会将引擎设置为活动并准备好执行。当您执行这个修改后的 TorchScript 模块时, TorchScript 解释器调用 TensorRT 引擎并传递所有输入。引擎运行并将结果推回解释器,就像它是正常的 TorchScript 模块一样。
Torch-TensorRT 特征
Torch- TensorRT 介绍了以下特性:支持 INT8 和稀疏性。
对 INT8 的支持
Torch-TensorRT 通过两种技术扩展了对低精度推断的支持:
- 培训后量化( PTQ )
- 量化感知训练( QAT )
对于 PTQ , TensorRT 使用校准步骤,该步骤使用来自目标域的样本数据执行模型。它跟踪 FP32 中的激活,以校准到 INT8 的映射,从而最大限度地减少 FP32 和 INT8 推理之间的信息损失。 TensorRT 应用程序要求您编写一个校准器类,为 TensorRT 校准器提供样本数据。
Torch- TensorRT 使用 PyTorch 中的现有基础设施,使校准器的实施更加容易。 LibTorch 提供了一个 DataLoader 和 datasetapi ,它简化了输入数据的预处理和批处理。这些 API 通过 C ++和 Python 接口公开,使您更容易使用 PTQ 。有关更多信息,请参阅 培训后量化( PTQ ) 。
对于 QAT , TensorRT 引入了新的 API :QuantizeLayer和DequantizeLayer,它们将 PyTorch 中的量化相关操作映射到 TensorRT 。类似于aten::fake_quantize_per_*_affine的操作在内部通过 Torch- TensorRT 转换为QuantizeLayer + DequantizeLayer。有关使用 Torch TensorRT 优化 Pytork 的 QAT 技术训练的模型的更多信息,请参阅 使用 Torch TensorRT 在 INT8 中部署量化感知训练模型 。
稀疏
NVIDIA 安培结构 在 NVIDIA 引入了第三代张量核 A100 GPU 使用网络权重中的细粒度稀疏性。它们提供了最大的密集数学吞吐量,同时又不牺牲作为深度学习核心的矩阵乘法累积作业的准确性。
- TensorRT 支持在这些张量核上注册和执行一些稀疏层的深度学习模型。
- Torch- TensorRT 扩展了对卷积和完全连接层的支持。
示例:图像分类的吞吐量比较
在本文中,您将通过名为 EfficientNet 的图像分类模型执行推断,并在 PyTorch 、 TorchScript JIT 和 Torch TensorRT 导出和优化模型时计算吞吐量。有关更多信息,请参阅 Torch-TensorRT GitHub 存储库上的端到端示例笔记本。
安装和先决条件
要执行这些步骤,您需要以下资源:
- 具有 NVIDIA GPU 、 compute architecture 7 或更早版本的 Linux 计算机
- 已安装 Docker , 19.03 或更早版本
- 一个 Docker 容器,包含 PyTorch 、 Torch TensorRT 和从 NGC Catalog 中提取的所有依赖项
按照说明运行标记为 nvcr.io/nvidia/pytorch:21.11-py3 的 Docker 容器。
现在 Docker 容器中有了一个 live bash 终端,启动一个 JupyterLab 实例来运行 Python 代码。在端口 8888 上启动 JupyterLab 并将令牌设置为TensorRT。将系统的 IP 地址放在手边,以便在浏览器上访问 JupyterLab 的图形用户界面。
Jupyter lab --allow-root --IP=0.0.0.0 --NotebookApp.token=’TensorRT’ --port 8888
使用端口 8888 在浏览器上导航到此 IP 地址。如果您正在运行此本地系统示例,请导航到Localhost:8888。
在浏览器上连接到 JupyterLab 的图形用户界面后,可以创建新的 Jupyter 笔记本。首先安装 timm ,这是一个 PyTorch 库,其中包含预训练的计算机视觉模型、权重和脚本。从该库中提取EfficientNet-b0模型。
pip install timm
导入相关库并为nn.Module创建 PyTorch nn.Module对象。
import torch
import torch_tensorrt
import timm
import time
import numpy as np
import torch.backends.cudnn as cudnn torch.hub._validate_not_a_forked_repo=lambda a,b,c: True efficientnet_b0 = timm.create_model('efficientnet_b0',pretrained=True)
通过将随机浮点数张量传递给efficientnet_b0对象的forward方法,可以从该模型获得预测。
model = efficientnet_b0.eval().to("cuda")
detections_batch = model(torch.randn(128, 3, 224, 224).to("cuda"))
detections_batch.shape
这将返回一个[1281000]的张量,对应于 128 个样本和 1000 个类。
要通过 PyTorch JIT 和 Torch- TensorRT AOT 编译方法对该模型进行基准测试,请编写一个简单的基准测试实用程序函数:
cudnn.benchmark = True def benchmark(model, input_shape=(1024, 3, 512, 512), dtype='fp32', nwarmup=50, nruns=1000): input_data = torch.randn(input_shape) input_data = input_data.to("cuda") if dtype=='fp16': input_data = input_data.half() print("Warm up ...") with torch.no_grad(): for _ in range(nwarmup): features = model(input_data) torch.cuda.synchronize() print("Start timing ...") timings = [] with torch.no_grad(): for i in range(1, nruns+1): start_time = time.time() pred_loc = model(input_data) torch.cuda.synchronize() end_time = time.time() timings.append(end_time - start_time) if i%10==0: print('Iteration %d/%d, avg batch time %.2f ms'%(i, nruns, np.mean(timings)*1000)) print("Input shape:", input_data.size()) print('Average throughput: %.2f images/second'%(input_shape[0]/np.mean(timings)))
现在可以对该模型执行推断了。
使用 PyTorch 和 TorchScript 进行推理
首先,采用 PyTorch 模型,计算批量为 1 的平均吞吐量:
model = efficientnet_b0.eval().to("cuda")
benchmark(model, input_shape=(1, 3, 224, 224), nruns=100)
可以对 TorchScript JIT 模块重复相同的步骤:
traced_model = torch.jit.trace(model, torch.randn((1,3,224,224)).to("cuda")])
torch.jit.save(traced_model, "efficientnet_b0_traced.jit.pt")
benchmark(traced_model, input_shape=(1, 3, 224, 224), nruns=100)
PyTorch 和 TorchScript JIT 报告的平均吞吐量类似。
用 Torch-TensorRT 进行推理
要使用 Torch- TensorRT 以混合精度编译模型,请运行以下命令:
trt_model = torch_tensorrt.compile(model, inputs= [torch_tensorrt.Input((1, 3, 224, 224))], enabled_precisions= { torch_tensorrt.dtype.half} # Run with FP16
)
最后,对 Torch- TensorRT 优化模型进行基准测试:
benchmark(trt_model, input_shape=(1, 3, 224, 224), nruns=100, dtype="fp16")
基准结果
以下是我在批量为 1 的 NVIDIA A100 GPU 上获得的结果。

总结
只需一行优化代码, Torch- TensorRT 即可将模型性能提高到 6 倍。它确保了 NVIDIA GPU 的最高性能,同时保持了 PyTorch 的易用性和灵活性。
有兴趣在你的模型上试一试吗?从 PyTorch NGC 容器下载 Torch- TensorRT ,以通过 TensorRT 优化加速 PyTorch 推理,且无需更改代码。