HPC development environments are typically complex configurations composed of multiple software packages, each providing unique capabilities. In addition to the core set of compilers used for building software from source code, they often include a number of specialty packages covering a broad range of operations such as communications, data structures, mathematics, I/O control, and analysis and optimization tools.
Setting up an HPC development environment can be a time-consuming and error-prone process. It’s often a challenge to take code built in one environment and run it in another. To overcome these development and deployment challenges, we built the NVIDIA HPC SDK, which is a comprehensive suite of C, C++, and Fortran compilers, libraries, and tools built for GPU-accelerating HPC modeling and simulation applications.
In this post, we show you how you can leverage the HPC SDK in two distinct ways:
- Downloading the HPC SDK container available from the NGC catalog and building your HPC application within a containerized environment
- Building your HPC application natively, on the cloud, using the HPC SDK virtual machine image (VMI).
Why containers?
Before discussing the use cases, here are the benefits of containers from developer’s perspective. Containers allow you to package a software application, libraries, and other runtime dependencies into a single image. This way, the application environment is both portable and consistent, and agnostic to the underlying host system software configuration. Containers also eliminate the need to install complex software environments and allow you to build applications on the system without any assistance from system administrators. Finally, containers are typically easier for users which can help speed up the adoption of new capabilities.
Containers provide you with several additional benefits during development. You can isolate and replicate critical bugs during development. Containers allow you to test the early versions of your application on different hardware and OS configurations. By containerizing, you can also deliver early versions to customers for testing and feedback. This ensures that your customers can test your software for functionality, scalability, and performance without going through the tedious process of re-creating the exact setup.
Accelerating HPC workflows with NVIDIA NGC Catalog
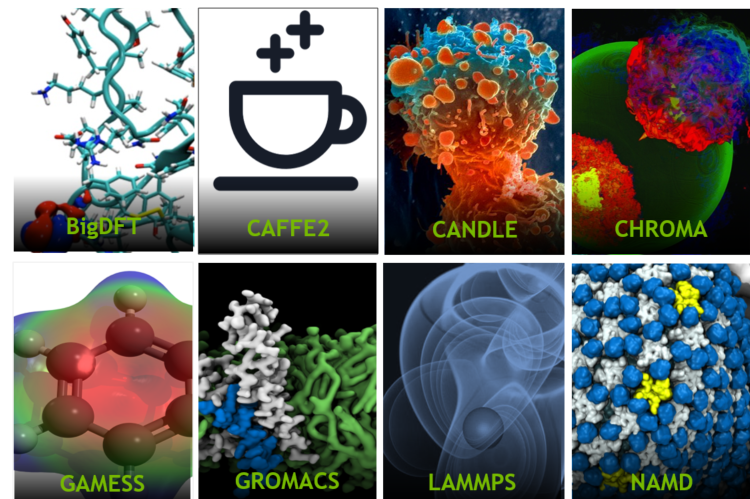
The NVIDIA NGC catalog offers a comprehensive selection of GPU-optimized HPC software application containers including molecular dynamics, CryoEM, visualization, and computational docking.
By working closely with the HPC developer community, NVIDIA ensures that the containers are always up to date and contain the latest versions of the applications. This provides you with best performance and scalability available. It enables you to extract maximum value from your existing hardware infrastructure.
We secure the containers by testing them for Common Exposures and Vulnerabilities (CVEs), crypto, and metadata, and ensure that they can run on both Docker and Singularity runtimes. They are also tested on multiple-GPU and multi-node systems for scalability and for portability to run on-premises, on the cloud, or at the edge.
The NGC catalog enables researchers to focus on their research and gather faster insights by running optimized, precompiled software applications. It empowers system administrators to deploy and manage applications seamlessly on their production systems.
HPC SDK container
With the addition of the HPC SDK container on the NGC catalog, we are now able to address the expanding needs of HPC application developers.
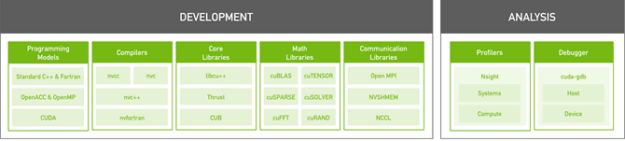
The HPC SDK integrates the compilers, libraries, and tools that HPC developers need into a single, easy-to-use package. C, C++, and Fortran compilers support GPU acceleration with standard C++ and Fortran language constructs, OpenACC directives, and CUDA. Optimized GPU-accelerated math libraries maximize the performance of the most common HPC algorithms, and optimized communications libraries enable standards-based multi-GPU and scalable systems programming. GPU performance profiling and debugging tools are included to assist with code optimization, and containerization tools enable easy deployment either on-premises or in the cloud. The HPC SDK provides the tools and technologies for building cross-platform, performance-portable, and scalable HPC applications.
The following sections explore two ways that you can use the HPC SDK to build a simple HPC application. The examples use CloverLeaf, a magnetohydrodynamic mini-app from the AWE in the UK. This version has been optimized for GPUs using OpenACC.
Use case: Building an HPC application with the HPC SDK container from NGC
In this section, we show you how to use the HPC SDK container available on the NGC Catalog to build the CloverLeaf application locally. The advantage of this is that you can deploy the containerized application either on your on-premises system or a cloud-based GPU instance. We show how you can build both on Docker and Singularity runtimes.
Start a Docker environment
To start an interactive Docker development environment, run the following command:
$ sudo docker run --rm -it --runtime=nvidia --user $(id -u):$(id -g) --volume $(pwd):/source --workdir /source nvcr.io/nvidia/nvhpc:20.9-devel-centos7
Because containers are ephemeral, this command mounts the source code directory from the host as /source inside the container (--volume) and defaults to this directory when the container starts (--workdir). This assumes that the command to start the container is run from the location where the CloverLeaf source code was checked out. Any changes to the source code or builds made from inside the container are stored in the source directory on the host and persist even when the container exits.
By default, the user inside a Docker container is root. The --user option modifies this so the user inside the container is the same as the user outside the container. Without this option, object files and other files created inside the container in the /source directory would be owned by root.
The other options set Docker to clean up the container when the container exits (--rm), to enable NVIDIA GPUs (--runtime=nvidia), and to make this an interactive session (-it).
Start a Singularity environment
To start an interactive Singularity development environment, run the following command:
$ singularity shell --nv docker://nvcr.io/nvidia/nvhpc:20.9-devel-centos7
Unlike Docker, starting a Singularity container does not require superuser privileges. Also, the user inside a Singularity container is the same as the user outside the container and the user’s home directory, current directory, and /tmp are automatically mounted inside the container.
The only additional option needed is --nv to enable NVIDIA GPU support. This assumes the command to start the container is run from the location where the CloverLeaf source code was checked out. If the CloverLeaf source is located somewhere else, start the container using the following command:
$ singularity shell --nv -B <path-to-source>/CloverLeaf-OpenACC:/source --pwd /source docker://nvcr.io/nvidia/nvhpc:20.9-devel-centos7
Build CloverLeaf
From the shell inside the Docker or Singularity container, run the following commands to build CloverLeaf and run it with the default small dataset:
make COMPILER=PGI
mpirun -n 1 clover_leaf
By default, CloverLeaf is configured to build for Pascal generation GPUs (that is, compute capability 6.0) devices. Running CloverLeaf on non-Pascal GPUs generates an error like the following:
This file was compiled: -ta=tesla:cc60
Rebuild the application with -ta=tesla:cc70 to use NVIDIA Tesla GPU 0
The clover_leaf binary most likely will not run on the host outside the container due to library dependencies that are only satisfied inside the container. To distribute the resulting binary outside a container, you could link the libraries statically. Or the necessary libraries could be redistributed with the binary. For more information, see the HPC SDK Container Guide.
Many HPC applications have a lot more dependencies than the CloverLeaf application used in this example. HPC Container Maker helps you to build a containerized version of your application with minimal effort.
Use case: Building an HPC application natively using the HPC SDK Azure Cloud VMI
In this section, we discuss how to launch a VMI with attached GPUs and how to build and run Fortran applications using the CloverLeaf application, a lightweight HPC application with minimal dependencies and libraries. We chose Azure Cloud to showcase this example. The HPC SDK VMI is also available on Google Cloud Platform (GCP) and Amazon Web Services (AWS).
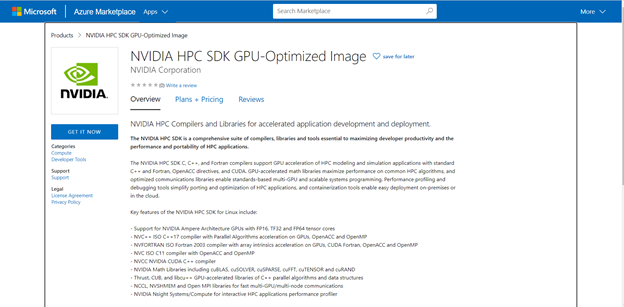
Launch the VM for the HPC SDK available in the Azure Marketplace.
Next, locate and create a VMI for the HPC SDK. Choose Create a resource.
On the Search the Marketplace page, enter NVIDIA HPC SDK GPU-Optimized Image. The search should find and return the required image.
Go through the setup wizard, using our configuration tips. On the Basics tab, enter the relevant details for your VMI:
- Subscription—Enter the appropriate value, such as NV-Software.
- Resource group
- Virtual machine name—Enter a meaningful name, such as CloverLeaf-GPU.
- Region—Choose one close to your geographical area by taking into factors such as compliance and data residency, service availability, and costs. In this case, we’ve chosen (Europe) UK South. Not all regions have all VM sizes. If a region doesn’t have your specific hardware requirement, you may have to choose alternative resources or regions.
- Image—This field should already be set to the HPC SDK VMI. You must decide on the hardware requirements for your work.
Choose Size, Select size.
The Family column shows whether a resource has a GPU attached to it. Navigate to the N-series and expand the section. Choose a size that provides the necessary generation and capabilities of CPU and GPU hardware. For this example, we chose NC24s_v3 because it has 24 vCPUs, and you want to run on 24 MPI tasks. It also has V100s attached, which is implied by the v3 suffix. The v2 suffix implies P100. Highlight this resource and choose Select.
On the Virtual Machine Settings tab, you should create a secure way to authenticate your login, so keep SSH public keys enabled. You can generate new keys for the instance, we recommend using an existing key if you have one. Select SSH public key source. Copy and paste your public key from the shell or terminal that you’re using to connect to the VMI using SSH. Typically, you can find your public key in the file ~/.ssh/id_rsa.pub.
For User name, enter id_rsa so that it matches the name of the SSH keys.
On the Disks tab, choose Create and attach a new disk. This allows you to create some permanent storage for work that you can use when you start a new VMI. Accept the default values.
Step through the remaining tabs and keep the default values. The Review + create tab performs an initial check of your setup. If validation fails, it highlights where there are issues with the options selected.
Choose Create. The Deployment window is displayed. Wait until the deployment has completed, which may take a few minutes.
Choose Go to Resource. To generate the command to connect using SSH to the created VMI, choose Connect, SSH. In Step 4 earlier, there was an example SSH command to log in. You must put in the path to your SSH key as designated. For example:
ssh -i ~/.ssh/id_rsa id_rsa@IP Address
The first time that you log into the VM, reply Yes to the SSH command to continue.
The lscpu command lists the CPU hardware characteristics:
Architecture:        x86_64
CPU op-mode(s):      32-bit, 64-bit
Byte Order:          Little Endian
CPU(s):              24
On-line CPU(s) list: 0-23
Thread(s) per core:  1
Core(s) per socket:  12
Socket(s):           2
NUMA node(s):        2
Vendor ID:           GenuineIntel
CPU family:          6
Model:               79
Model name:          Intel(R) Xeon(R) CPU E5-2690 v4 @ 2.60GHz
Stepping:            1
CPU MHz:             2593.991
BogoMIPS:            5187.98
Hypervisor vendor:   Microsoft
Virtualization type: full
L1d cache:           32K
L1i cache:           32K
L2 cache:            256K
L3 cache:            35840K
NUMA node0 CPU(s):   0-11
NUMA node1 CPU(s):   12-23
The HPC SDK and required libraries should all be in place. To test the environment, run a Fortran MPI application using the following command:
nvfortran -V
nvfortran 20.7-0 LLVM 64-bit target on x86-64 Linux -tp skylake
NVIDIA Compilers and Tools
Copyright (c) 2020, NVIDIA CORPORATION.  All rights reserved.
Run the following command:
mpirun -V
mpirun (Open MPI) 3.1.5
Report bugs to the Open MPI Getting Help
Start with the traditional Hello World! test, expanded to include MPI:
program helloworld
  use mpi
  implicit none
  integer rank, size, ierror, tag, status(MPI_STATUS_SIZE)
  call MPI_INIT(ierror)
  call MPI_COMM_SIZE(MPI_COMM_WORLD, size, ierror)
  call MPI_COMM_RANK(MPI_COMM_WORLD, rank, ierror)
  print*, 'Rank', rank, ': Hello world!'
  call MPI_FINALIZE(ierror)
end program helloworld
Write the code in helloworld.f90 and compile with the following command:
mpif90 helloworld.f90 -o helloworld.exe
Run with the following command:
mpirun -np 24 ./helloworld.exe
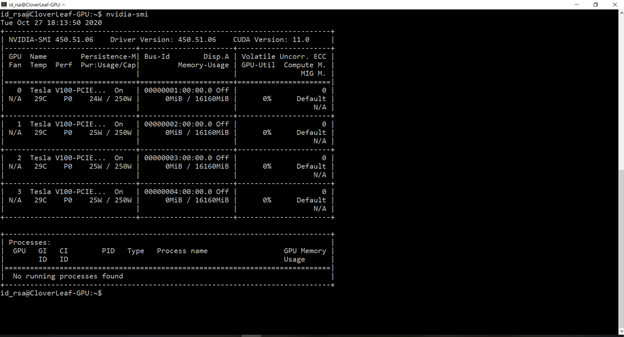
The code should output one print per task with task number. To look at the GPU resources, run one or both of the following commands:
nvidia-smi or nvaccelinfo
Figure 7 shows that you have four V100s.
Now, go to a more substantial example to run on CPU and GPU. This command downloads an MPI/OpenACC version of the CloverLeaf mini-app. You can use all git commands and push changes back to your git repository.
git clone https://github.com/UK-MAC/CloverLeaf_OpenACC.git
Build the code first for the CPU. Run the following command:
cd CloverLeaf_OpenACC
This version does not use OpenMP in the main compute node, but you compile it just to show how to use it. The code outputs the threads selected but does not use them.
make OMP=-mp=nonuma
Run it across the CPU, just to make sure it is all working:
OMP_NUM_THREADS=4 mpirun -np 6 ./clover_leaf
The code should self-validate.

Now, test the GPU. For this mini-app, you must modify the Makefile to update it for use with the newer GPUs. The easiest way to do this is to take cc35 out of the Makefile. The binary is then compatible with all GPUs. Open the file with a text editor:
vi Makefile
Find the following line:
FLAGS_PGI = -fastsse -Mipa=fast -Mlist -acc -Minfo=acc -ta=nvidia,cc35
Change it to the following:
FLAGS_PGI = -fastsse -Mipa=fast -Mlist -acc -Minfo=acc -ta=nvidia
Build the code for GPU by setting the compiler to be PGI. This application was originally ported to GPUs using the PGI compilers. The PGI compilers were subsumed and rebranded as part of the HPC SDK.
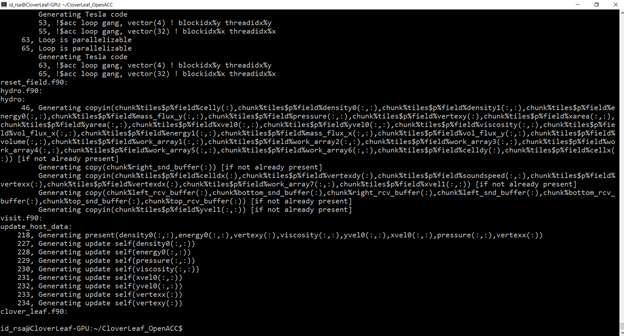
make COMPILER=PGI MPI_COMPILER=mpif90
This writes out information from the compiler on the acceleration that it is generating. Figure 9 shows an example of partial output.
Now, run the code on a single GPU with the following command:
OMP_NUM_THREADS=1 mpirun -np 1 ./clover_leaf
If you log in with another window, you can run nvidia-smi -l to see the GPU working. You must increase the run time in the clover.in file so that it doesn’t complete too quickly, or you may not see the GPU process running.
end_step=1000
      end_time=1000.0
Or, set the NV_ACC_NOTIFY environment variable to produce verbose GPU output in the terminal where you are running the code:
NV_ACC_NOTIFY=1 OMP_NUM_THREADS=1 mpirun -np 1 ./clover_leaf
To run on multiple GPUs, you must set all the GPUs to exclusive mode. Each MPI task is then assigned to a different GPU. This requires root permissions so make sure to use the sudo command preface or the command won’t take effect:
sudo nvidia-smi -c EXCLUSIVE_PROCESS
To switch back, run the following command:
sudo nvidia-smi -c DEFAULT
Stay with exclusive mode for now, and run the following command:
OMP_NUM_THREADS=1 mpirun -np 4 ./clover_leaf
If you have nvidia-smi -l running in another terminal or have NV_ACC_NOTIFY set, then you should see multiple devices being used.
So, you have successfully started a VMI and then compiled and run an HPC mini-app on all its GPUs. When you are finished, you can log out, but the VMI is still running. In fact, you can log back in and verify that. Don’t forget to end a session when you have finished with the VMI; otherwise, you will keep being billed for your instance.
However, when you delete the instance, you also delete the storage associated with it. This may well be fine for benchmarking. If you have a longer-term project, then you need persistent storage so that different VM instances can be used for ongoing work. This also allows you to install code repositories and code dependencies such as NetCDF or copy data only one time.
Now, you use the Disk created in the setup to keep your code and data. The following command shows the available disks:
lsblk
NAME    MAJ:MIN RM  SIZE RO TYPE MOUNTPOINT
sda       8:0    0  2.9T  0 disk
└─sda1    8:1    0  2.9T  0 part /mnt
sdb       8:16   0   32G  0 disk
├─sdb1    8:17   0 31.9G  0 part /
├─sdb14   8:30   0    4M  0 part
└─sdb15   8:31   0  106M  0 part /boot/efi
sdc       8:32   0    1T  0 disk ⇐ This is the attached disk
sr0      11:0    1  628K  0 rom
In this case, sdc is the disk that you created at setup. It might have a slightly different name, but it is similar and won’t be partitioned. The first time that you use this disk, you must partition it. Root permission is required.
sudo parted /dev/sdc --script mklabel gpt mkpart xfspart xfs 0% 100%
sudo mkfs.xfs /dev/sdc1
sudo partprobe /dev/sdc1
lsblk
NAME    MAJ:MIN RM  SIZE RO TYPE MOUNTPOINT
sda       8:0    0  2.9T  0 disk
└─sda1    8:1    0  2.9T  0 part /mnt
sdb       8:16   0   32G  0 disk
├─sdb1    8:17   0 31.9G  0 part /
├─sdb14   8:30   0    4M  0 part
└─sdb15   8:31   0  106M  0 part /boot/efi
sdc       8:32   0    1T  0 disk
└─sdc1    8:33   0 1024G  0 part ⇐ The disk is now partitioned
sr0      11:0    1  628K  0 rom
Mount it in a convenient location:
sudo mkdir ~/Permanent_Storage
sudo mount /dev/sdc1 sudo mkdir ~/Permanent_Storage
To allow non-sudo operations to access the mounted space, you must change the permissions.
Use the following command, where id_rsa is your usid value.
sudo chown -hR id_rsa ~/Permanent_Storage
Copy your working directory to this disk. If you mount the disk to any VM instance, you can access it:
cp ~/CloverLeaf_OpenACC ~/Permanent_Storage
Next time that you create a new VMI, you must mount it again after logging on:
sudo mount /dev/sdc1 ~/Permanent_Storage
sudo chown -hR id_rsa ~/Permanent_Storage
Now, you can delete the instance and leave your work intact. On the webpage from where the VMI was launched, choose Overview in the left pane. To destroy the VMI, choose Delete on the top pane. You are asked to confirm this.
Summary
The NVIDIA HPC SDK brings together a powerful set of tools to accelerate your HPC development and deployment process. Start building your HPC application by pulling the HPC SDK container from the NGC catalog, or start building your codes with the HPC SDK VMI available on Microsoft Azure and other major cloud service providers.