
如果您能够通过自然语言与计算机通信,让计算机在 Bash 终端中执行任务,而无需手动编写任何命令,该怎么办?借助 NVIDIA Nemotron Nano v2,您只需大约 200 行 Python 代码和极少的依赖项,就能在 一个小时内 从零开始轻松构建一个自然语言驱动的 Bash 代理。
本文将逐步介绍核心组件及注意事项,帮助您轻松跟进行文脉络。我们将从零开始构建所有内容。作为额外亮点,博客还将展示 LangGraph 如何进一步简化整体设计。
我们来深入了解一下。
模型与代码的快速链接
有哪些前提条件?
- NVIDIA Nemotron Nano 9B v2(可部署在本地或云端)
- 本地部署要求:
- 20GB 磁盘空间
- 配备至少 24GB VRAM 的 NVIDIA GPU
- 本地部署要求:
- 支持 Bash 的操作系统,例如 Ubuntu、Mac OS 或适用于 Linux 的 Windows 子系统 (WSL)
- Python v3.10+ 环境,并安装以下软件包:
-
openai(用于调用 LLM 端点) - 可选的 LangGraph 奖励组件:
langchain-openai和langgraph
-
- 建议预留一小时的空闲时间用于部署
您最终会获得什么:计算机通过代理进行操作
以下是您在本教程中将构建的智能体所进行的实际交互:
['/home/sandbox' 🙂] Make a new directory called "system-info," then create a file called "info.txt" and populate it with current system config (disk space, memory), then briefly summarize the contents.

    ▶️   Execute 'mkdir system-info'? [y/N]: y
    ▶️   Execute 'touch system-info/info.txt'? [y/N]: y
    ▶️   Execute 'df -h >> system-info/info.txt'? [y/N]: y
    ▶️   Execute 'free -h >> system-info/info.txt'? [y/N]: y
    ▶️   Execute 'cat system-info/info.txt'? [y/N]: y

[🤖] Here's a summary of the system information in `system-info/info.txt`:

**Disk Space**
- Total: 984 GB (`overlay`), 2.6 TB (`/home/sandbox`)
- Used: ~518 GB (56%) on `/`, ~2.1 TB (83%) on `/home/sandbox`
- Available: ~416 GB (42%) on `/`, ~432 GB (17%) on `/home/sandbox`

**Memory**
- Total: 62 GB RAM
- Used: 20 GB
- Free: 14 GB
- Swap: 63 GB available (0 GB used)

Let me know if you'd like to refine this further.图例: *:用户消息 *:智能体响应 **:命令执行确认
从聊天机器人到人工智能代理
与采用请求和回复模式的聊天机器人不同,AI 智能体以高级目标作为输入,能够自主进行推理、规划并执行任务以实现这些目标。这一过程的关键推动力是工具调用 (a.k.a. 函数调用):智能体可通过调用外部工具或 API 来执行具体操作,确认操作结果,并据此规划后续步骤,而不仅限于生成文本回复。
我们正在构建的 Bash 计算机使用代理便是一个典型的代理实例:您提供高层指令,该代理通过调用工具来决定执行哪些 Bash 命令以完成任务。这一智能体规模足够小,约 200 行代码即可从零实现,却体现了更复杂智能体所共有的基本原理。
每个现代智能体的核心都依赖于大语言模型(LLM),它能够理解用户意图并将其转化为具体行动。该 LLM 需具备高效的推理能力、快速响应性能,以支持复杂目标的实现。NVIDIA Nemotron Nano 9B v2 正是这样一款模型:体积紧凑,却拥有强大的推理能力,能够在保持快速交互的同时实现高效运行,并且部署简单。这些特性使其非常适用于我们正在构建的轻量级智能体。
如果您刚刚入门,希望了解 AI 智能体的四个核心组件,请查阅此博客。
有哪些重要注意事项?
首先,我们来回顾一下构建智能体时需要重点关注的事项:
- 通过工具调用使用 Bash:需要将 Bash CLI 作为工具提供给智能体,使其能够执行命令并接收输出(例如命令的执行结果,包括成功或失败状态以及具体的输出内容)。同时,必须跟踪当前的工作目录,这一点至关重要,因为智能体需要在文件系统中进行导航,并确保每个 Bash 命令都在正确的目录下执行。
- 命令安全:必须防止智能体执行不安全或具有破坏性的命令。为此,我们实施了允许命令的白名单机制(例如
ls、cat和grep),确保智能体只能在安全且可预测的范围内操作。此外,还引入了确认机制:在执行任何命令前,系统会提示用户进行审批。这种人类在环的设计使用户能够完全掌控终端中实际执行的内容。 - 错误处理:构建可靠的代理系统时,必须充分考虑各种故障情形。对于 Bash 代理而言,命令可能因语法错误、文件缺失或输出异常等原因而失败。智能体应能够捕获这些错误,理解其含义,并据此选择适当的后续操作。
系统包含哪些组件?
考虑到这些因素后,架构变得十分简洁。该系统包含两个主要组件:
- Bash 类: 作为 Python
subprocess模块的轻量级封装,用于管理当前工作目录、执行 allowlist 中的命令,并将命令的执行结果或错误信息返回给智能体。 - 智能体: 基于 NVIDIA Nemotron 模型,能够理解用户意图并决策相应操作,同时在多轮对话中保持上下文连贯。智能体的行为由精心设计的系统提示引导,该提示明确了其作为 Bash 助手的角色定位,设定了操作边界,并列出了允许使用的命令。
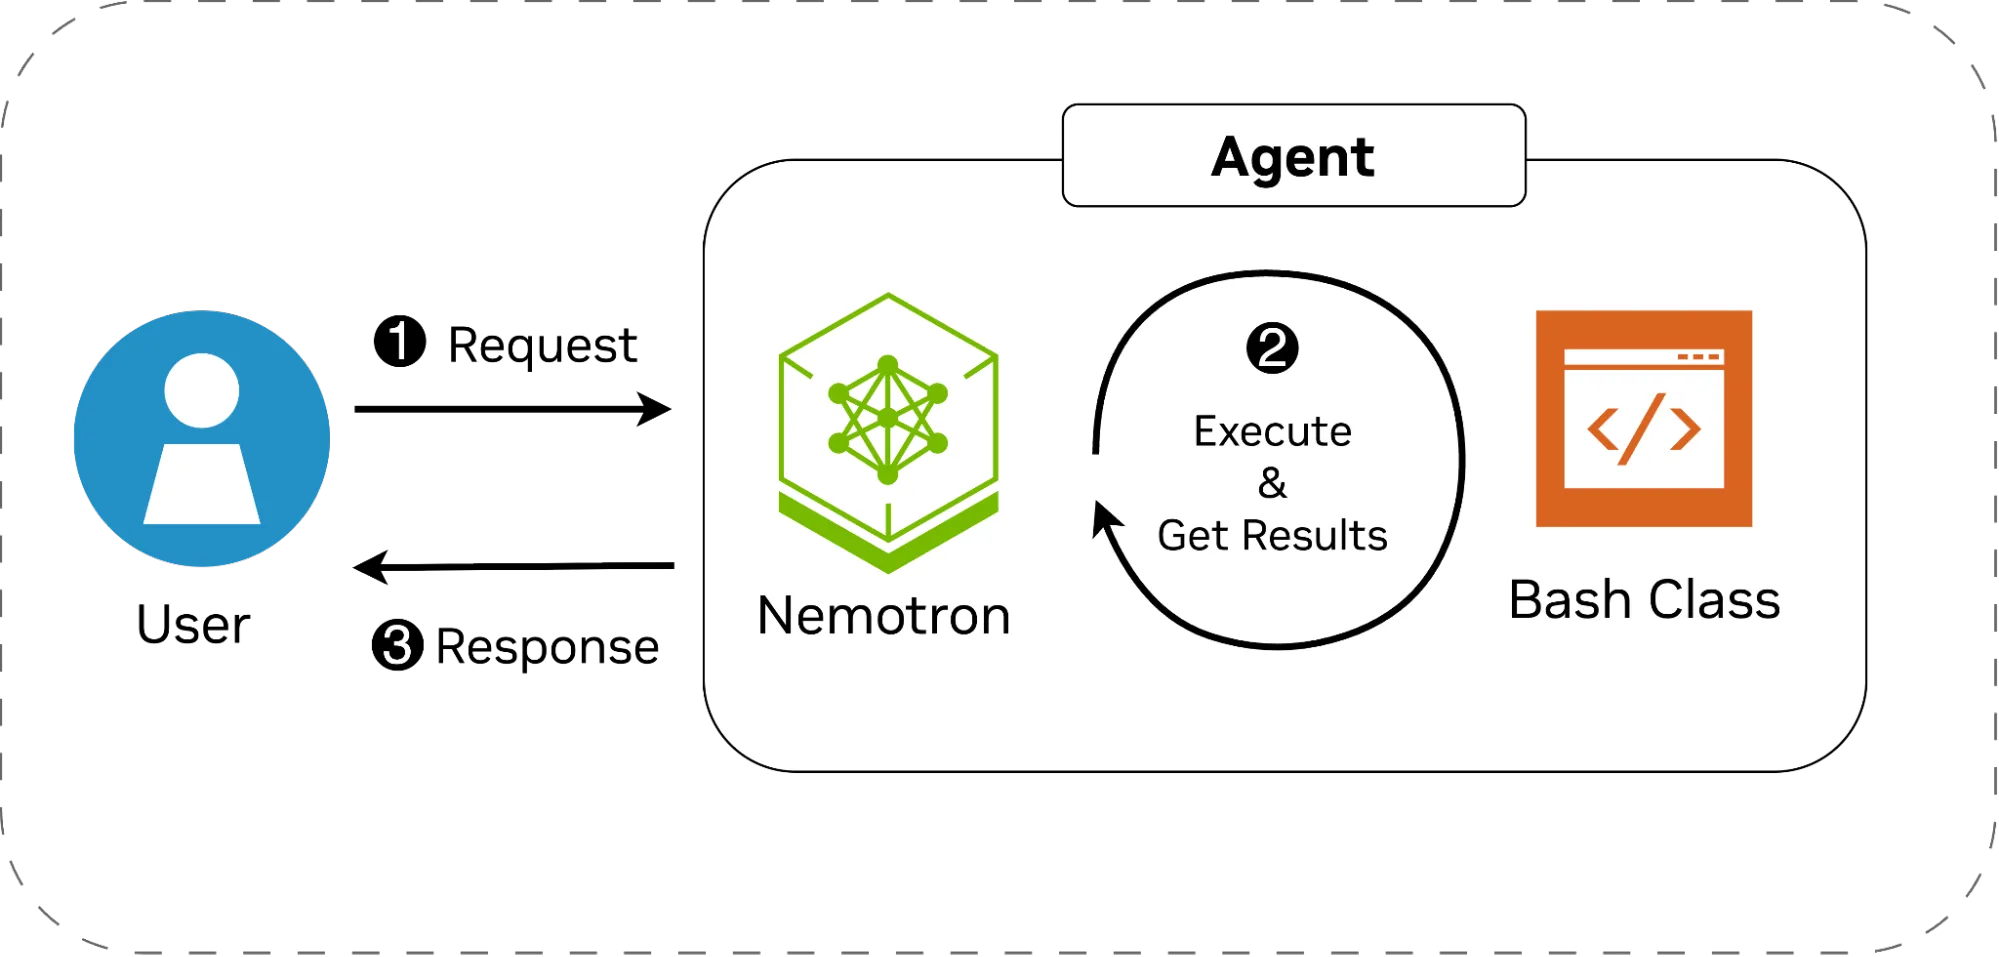
下图展示了系统的架构。工作流程如下:
- 用户发出高级指令,例如更改目录、复制文件或查看文档内容。
- Nemotron 会解析该请求,将其拆解为具体的操作步骤,并在需要执行命令时调用 Bash 类。某些任务可能无需实际执行命令即可完成,而另一些任务则可能涉及多个连续的命令操作。每次命令执行后,模型会接收并分析输出结果,据此判断后续操作或确定是否终止流程。
- 无论任务最终成功完成还是因错误而中断,智能体都会将执行结果返回给用户,并等待接收下一条指令。
我们将首先从零开始实现这两个组件,随后在本博客中介绍如何利用 LangGraph 将它们连接起来,从而进一步简化配置过程。
Bash 类
我们创建一个简单的类,用于存储允许的命令列表以及当前工作目录。请参阅下文,了解本课程的摘要片段。
class Bash:
    """
    An implementation of a tool that executes Bash commands
    """

    def __init__(self, cwd: str, allowed_commands: List[str]):
        self.cwd = cwd  # The current working directory
        self._allowed_commands = allowed_commands  # Allowed commands

    def exec_bash_command(self, cmd: str) -> Dict[str, str]:
        """
        Execute the bash command after getting confirmation from the user
        """
        if cmd:
            # Check the allowlist
            allowed = True

            for cmd_part in self._extract_commands(cmd):
                if cmd_part not in self._allowed_commands:
                    allowed = False
                    break

            if not allowed:
                return {"error": "Parts of this command were not in the allowlist."}

            return self._run_bash_command(cmd)
        return {"error": "No command was provided"}

    def to_json_schema(self) -> Dict[str, Any]:
        """
        Convert the function signature to a JSON schema for LLM tool calling.
        """
        return {
            "type": "function",
            "function": {
                "name": "exec_bash_command",
                "description": "Execute a bash command and return stdout/stderr and the working directory",
                "parameters": {
                    "type": "object",
                    "properties": {
                        "cmd": {
                            "type": "string",
                            "description": "The bash command to execute"
                        }
                    },
                    "required": ["cmd"],
   },
            },
        }

    def _run_bash_command(self, cmd: str) -> Dict[str, str]:
        """
        Runs the bash command and catches exceptions (if any).
        """
        stdout = ""
        stderr = ""
        new_cwd = self.cwd

        try:
            # Wrap the command so we can keep track of the working directory.
            wrapped = f"{cmd};echo __END__;pwd"
            result = subprocess.run(
                wrapped, shell=True, cwd=self.cwd,
                capture_output=True, text=True,
                executable="/bin/bash"
            )
            stderr = result.stderr
            # Find the separator marker
            split = result.stdout.split("__END__")
            stdout = split[0].strip()

            # If no output/error at all, inform that the call was successful.
            if not stdout and not stderr:
                stdout = "Command executed successfully, without any output."

            # Get the new working directory, and change it
            new_cwd = split[-1].strip()
            self.cwd = new_cwd
        except Exception as e:
            stdout = ""
            stderr = str(e)

        return {"stdout": stdout, "stderr": stderr, "cwd": new_cwd}
此类公开两个公共函数:
exec_bash_command(cmd: str) -> Dict[str, str], which the agent can call to execute commands. It returns a dictionary withstdout,stderr, and the updated working directory, or an error if the command is invalid or not allowed. These signals let the agent adapt when something goes wrong.to_json_schema(self) -> Dict[str, Any], which is used for telling the LLM how to use this tool (LangGraph doesn’t need this).
执行前,函数会依据允许列表对命令进行检查。实际执行过程由私有函数 _run_bash_command() 处理,该函数在内部调用 Python 的 subprocess.run()。通过异常处理块,可妥善应对各类故障情况。为跟踪目录变化(例如智能体使用 cd 命令时),系统会向每个命令附加唯一的文本标记及 pwd。执行完成后,系统将在输出中查找该标记,提取新的工作目录,并在将执行结果及当前工作目录返回给智能体之前,更新工具的状态。
智能体
对于智能体,我们使用 Nemotron 作为初始推理引擎,并将 exec_bash_command() 注册为可调用的命令执行工具。模型的行为由系统提示决定(如下所示),该提示明确了模型作为 Bash 助手的角色,列出了允许使用的命令,并指导模型在何种情况下以及如何协助用户或调用工具。尽管我们的 Bash 类执行机制已设置命令白名单,系统提示仍会进一步强化这一规则,这种做法有助于保持模型行为的对齐性。此外,提示中通过 /think 标志启用思考模式,从而提升模型的推理能力。
SYSTEM_PROMPT = f"""/think
You are a helpful Bash assistant with the ability to execute commands in the shell.
You engage with users to help answer questions about bash commands, or execute their intent.
If user intent is unclear, keep engaging with them to figure out what they need and how to best help
them. If they ask question that are not relevant to bash or computer use, decline to answer.

When a command is executed, you will be given the output from that command and any errors. Based on
that, either take further actions or yield control to the user.

The bash interpreter's output and current working directory will be given to you every time a
command is executed. Take that into account for the next conversation.
If there was an error during execution, tell the user what that error was exactly.

You are only allowed to execute the following commands:
{LIST_OF_ALLOWED_COMMANDS}

**Never** attempt to execute a command not in this list. **Never** attempt to execute dangerous commands
like `rm`, `mv`, `rmdir`, `sudo`, etc. If the user asks you to do so, politely refuse.

When you switch to new directories, always list files so you can get more context.
"""
智能体循环(从零开始构建)
构建智能体循环非常简单。我们初始化 OpenAI 客户端,并维护对话的历史记录,以此作为内存或状态。在循环内部:
- 接收用户输入,并结合系统提示将其发送至模型。
- 获取模型响应后,将其存入对话历史记录,并检查是否存在工具调用:
- 若存在工具调用,则需先向用户确认是否执行;
- 在获得批准后,运行
exec_bash_command(),将执行结果返回并获取模型的下一轮响应; - 若未获批准,则通知模型相应情况。
- 若不存在工具调用,则直接展示模型的回复,并将控制权交还给用户。
- 该流程将持续循环,直至应用程序终止。
为保持代码整洁,我们定义一个用于存储对话历史的抽象类(Messages 类),以及另一个通过客户端向模型发送请求并获取响应的抽象类(LLM 类)。借助这些抽象,整个智能体循环变得简洁且直观:
bash = Bash(...)
# The model
llm = LLM(...)
# The conversation history, with the system prompt
messages = Messages(SYSTEM_PROMPT)

# The main agent loop
while True:
    # Get user message.
    user = input(f"['🙂] ").strip()
    messages.add_user_message(user)

    # The tool-call/response loop
    while True:
        response, tool_calls = llm.query(messages, [bash.to_json_schema()])
        # Add the response to the context
        messages.add_assistant_message(response)

        # Process tool calls
        if tool_calls:
            for tc in tool_calls:
                function_name = tc.function.name
                function_args = json.loads(tc.function.arguments)

                # Ensure it's calling the right tool
                if function_name != "exec_bash_command" or "cmd" not in function_args:
                    tool_call_result = json.dumps({"error": "Incorrect tool or function argument"})
                else:
                    if confirm_execution("cmd"):
                        tool_call_result = bash.exec_bash_command(function_args["cmd"])
                    else:
                        tool_call_result = {"error": "The user declined the execution of this command."}

                messages.add_tool_message(tool_call_result, tc.id)
        else:
            # Display the assistant's message to the user (without the thinking part).
            print(f"\n[🤖] {response.strip()}")
            break
请注意内部 while 循环,该循环是必要的,因为智能体可能需要多次调用工具才能完成任务。这对应图 1 中的步骤 2。
额外优势:基于 LangGraph 的智能体循环
借助 LangGraph,智能体循环的实现变得更加简洁。通过使用该库中的 create_react_agent() ,我们能够轻松管理循环流程,连接模型、工具与对话状态,并由库自动处理工具调用及结果传递。它还提供了结构化的错误处理机制,使智能体能够在出现故障时做出响应,或在可控的流程中进行重试,而无需手动干预。与我们从头构建的版本类似,系统提示词定义了 Bash 助手的角色,并确保命令的安全执行;同时,小型辅助程序封装了 bash.exec_bash_command() ,以支持人类在环中的确认操作。这一精简的配置即可构建出一个功能完备的智能体,能够准确理解用户意图、调用适当工具,并以交互方式返回结果。
摘要代码段如下所示:
from langgraph.prebuilt import create_react_agent
from langgraph.checkpoint.memory import InMemorySaver
from langchain_openai import ChatOpenAI

class ExecOnConfirm:
    """
    A wrapper around the Bash class to implement human-in-the-loop
    """

    def __init__(self, bash: Bash):
        self.bash = bash

    def _confirm_execution(self, cmd: str) -> bool:
        """Ask the user whether the suggested command should be executed."""
        return input(f"    ▶️   Execute '{cmd}'? [y/N]: ").strip().lower() == "y"

    def exec_bash_command(self, cmd: str) -> Dict[str, str]:
        """Execute a bash command after confirming with the user."""
        if self._confirm_execution(cmd):
            return self.bash.exec_bash_command(cmd)
        return {"error": "The user declined the execution of this command."}

# Instantiate the Bash class
bash = Bash(...)
# Create the agent
agent = create_react_agent(
    model=ChatOpenAI(model=...),
    tools=[ExecOnConfirm(bash).exec_bash_command],  # Wrap for human-in-the-loop
    prompt=SYSTEM_PROMPT,
    checkpointer=InMemorySaver(),
)
# Create the user/agent interaction loop
while True:
    user = input(f"[🙂] ").strip()
    # Run the agent's logic and get the response.
    result = agent.invoke({"messages": [{"role": "user", "content": user}]}, config=...)
    # Show the response (without the thinking part, if any)
    response = result["messages"][-1].content.strip()

    if "</think>" in response:
        response = response.split("</think>")[-1].strip()

    if response:
        print(f"\n[🤖] {response}")
接下来的步骤是什么?
现在,您只需编写几行代码,即可构建自己的计算机使用代理。在此尝试实验:添加自定义命令,调整系统提示,观察智能体如何响应变化。经过一段时间的探索后,您会发现,相同的原则能够自然地延伸至更复杂的多智能体系统。
加入 NVIDIA 开发者论坛的讨论,分享您的实验成果,提出您的疑问,并告诉我们您接下来计划构建的项目。
通过订阅NVIDIA 新闻并关注 NVIDIA AI 在LinkedIn、X、Discord和YouTube上的官方账号,及时获取NVIDIA Nemotron的最新资讯。
- 浏览视频教程与直播,充分运用 NVIDIA Nemotron。
- 访问我们的 Nemotron 开发者页面,掌握开启更开放、更智能的单次计算推理模型所需的核心知识。
- 前往 build.nvidia.com,探索 Hugging Face 和 NIM 微服务,以及 Blueprints 上推出的全新开放 Nemotron 模型与数据集。
- 分享您的见解,并为影响 Nemotron 未来发展的功能提出建议或参与投票。


