
验证 AI 系统需要基准测试(模拟现实世界条件的数据集和评估工作流程),以便在部署前衡量其准确性、可靠性和安全性。缺少这些测试,结果只能靠猜测。
但在医疗健康、金融和政府等受监管领域,数据稀缺与隐私限制使得构建基准变得极为困难。现实世界的数据往往受保密协议约束,分散于各个孤立系统之中,或因标注成本过高而难以获取。其结果是,创新进程受阻,评估工作沦为猜测。例如,政府机构在部署用于公民服务(如报税、申请福利或办理许可证)的AI助手时,亟需可靠的评估基准,同时又必须避免泄露真实公民记录中的个人身份信息(PII)。
本博客介绍了一种由 AI 驱动且注重隐私保护的评估工作流,可用于各行各业,对大语言模型(LLM)的安全性与效率进行基准测试。我们将以医疗健康领域的示例来说明该流程,但相同的方法也适用于任何对数据隐私有高要求的领域。您将了解如何利用 NVIDIA NeMo Data Designer 在几分钟内生成特定领域的合成数据集,以及如何借助 NVIDIA NeMo Evaluator 构建可复现的基准测试,整个过程无需暴露任何真实数据记录。
模型和代码的快速链接
- NeMo Data Designer 微服务
- NeMo Evaluator 微服务
- NVIDIA Nemotron 模型 Hugging Face 或 NVIDIA Build 上的 NVIDIA NIM API.
最终成果:隐私保护型数据评估工作流
此博客演示了如何构建保护隐私的评估工作流,以确保敏感数据得到妥善保护。
您将学习如何:
- 根据结构化提示和领域限制条件,生成符合安全与隐私要求的逼真分类标注。
- 对合成数据进行评分与筛选,以评估其质量。
- 利用跨多个 GPU 的自动化基准测试,评估大语言模型(LLM)的预测性能。
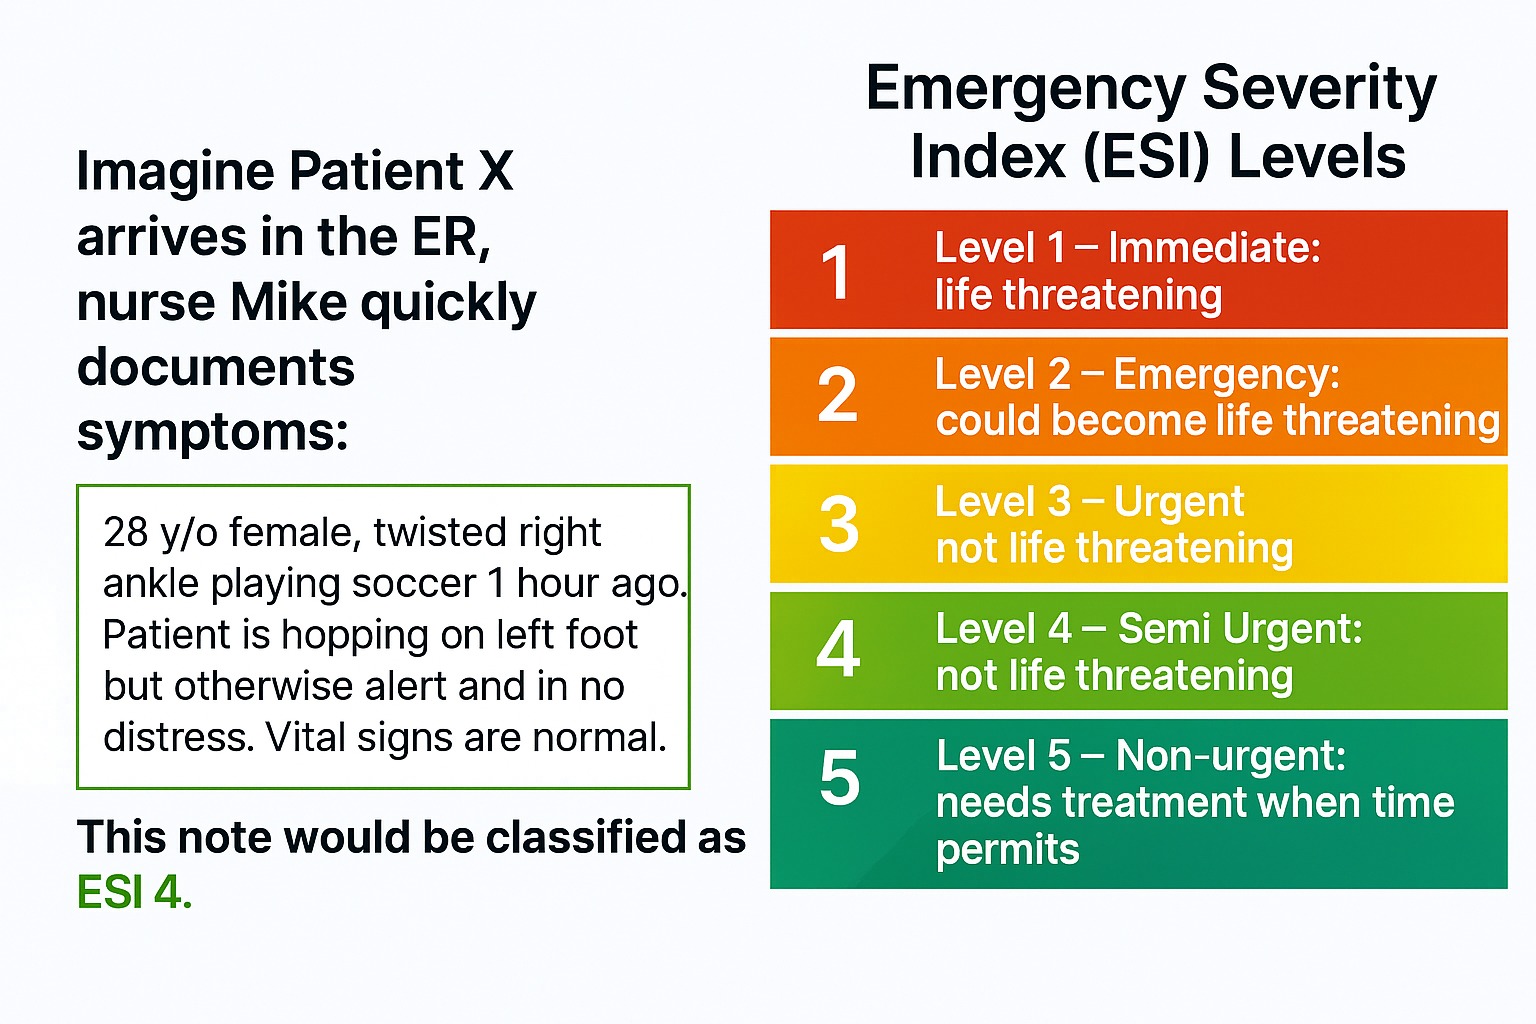
为了说明这一过程,我们将采用一个真实示例——预测急诊室分诊记录的紧急严重程度指数(ESI),同时不泄露任何患者信息。
示例:用于急诊分诊预测的合成数据
急诊科的工作压力很大。每一秒都至关重要,而准确的分诊决定了患者能否立即获得救治还是需要等待。AI 可以通过分析临床笔记来预测 ESI 水平,从而加快优先级判定,并减轻临床医生的工作负担(见下图 1)。但构建这样的系统并不简单。限制包括:
- 数据访问: 真实分类标注属于机密信息,受到《健康保险流通与责任法案》(HIPAA) 及其他隐私法规的保护。医院无法直接共享患者记录用于模型训练或评估。即使存在可用的数据集,这些数据集通常也存在不完整、不一致的问题,或受限于机构间协议。
- 注释成本:使用 ESI 级别对数千条数据进行标注需要依赖临床专业知识。人工标注过程缓慢、成本高昂,且容易因不同标注者而产生差异。对许多开发者而言,仅这一步骤就可能导致项目延期数月。
- 数据稀缺:在现实世界的数据集中,罕见病例和边缘案例的样本数量不足,导致构建具有良好泛化能力的模型十分困难。若缺乏足够的代表性样本,模型可能出现偏差或性能不佳,这在急诊护理等生命攸关的场景中是不可接受的。
这些挑战带来了一个矛盾:AI 有能力改变分诊模式,但构建和验证这些系统所需的数据却难以获取。这正是合成数据与自动化评估工作流程发挥作用之处。

合成数据的重要性
合成数据已迅速发展,成为构建可靠 AI 系统的重要资源。与现实世界数据不同,合成数据能够生成可能发生的情形,覆盖罕见的边缘案例和多样化场景,同时严格遵循隐私法规。它可在领域专家和高级复合 AI 系统的指导下,生成特定领域的高质量样本。在隐私、合规性及数据稀缺性限制现实世界数据获取的行业中,合成数据实现了突破,使团队能够安全高效地训练和验证模型。
与传统数据采集不同,生成合成数据的过程显著缩短了开发周期,开发者如今可在几小时内(而非几个月)创建或更新数据集与基准,从而推动更快速的创新并提升 AI 解决方案的响应速度。
与传统数据采集不同,生成合成数据的过程显著缩短了开发周期,开发者如今可在几小时内(而非几个月)创建或更新数据集与基准,从而推动更快速的创新并提升 AI 解决方案的响应速度。

如何开始:
第 1 步:利用 NeMo Data Designer 生成合成数据
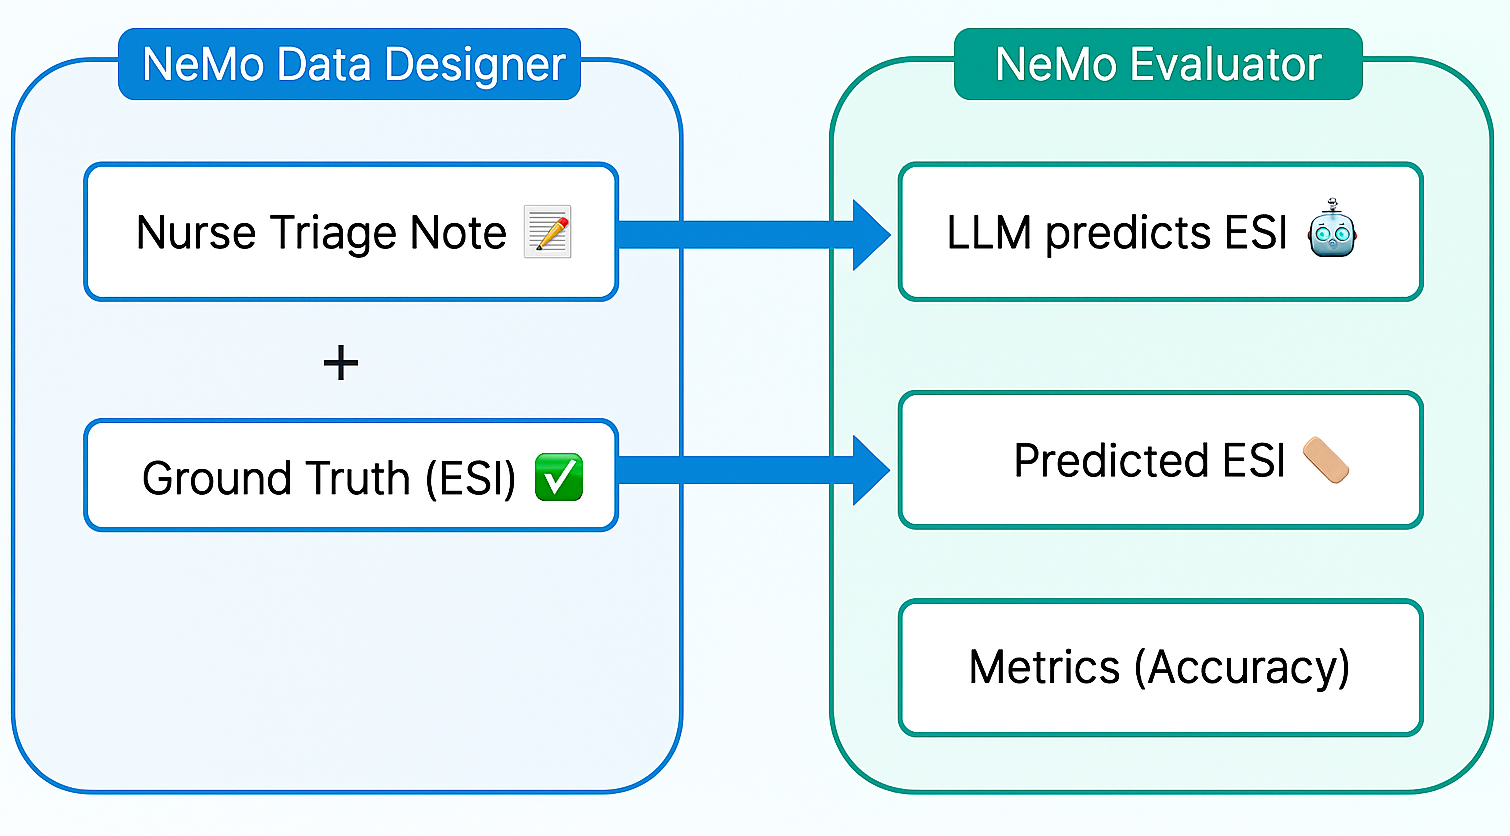
我们使用 NeMo Data Designer 生成了数千份合成的护士分诊记录,并为其添加了真实的 ESI 标注,从而避免了等待真实世界数据的过程。为确保生成内容的真实性,我们设定了结构化提示与约束条件,以模拟真实的临床用语及各类边缘情况。在进入下一阶段前,我们对生成的数据进行了验证,确保其在术语使用和关键信息可信度方面保持一致,防止引入潜在偏差。
主要特性:
- 结构化提示与域约束,实现逼真效果
- 利用大语言模型作为评委打分,筛选高质量示例
- 上传兼容 Hugging Face 的数据集,实现便捷集成
首先,我们初始化 NeMo Data Designer 客户端和模型配置。这里,我们建立与 NeMo Data Designer 服务的连接,并定义将执行任务的 LLM。默认情况下,微服务配置为使用 build.nvidia.com 作为模型提供方。这使您能够从广泛的 NVIDIA Nemotron 开放模型中进行选择,这些模型经过优化并封装为 NVIDIA NIM。
from nemo_microservices.data_designer.essentials import *

# 1. Connect to the Client
data_designer_client = NeMoDataDesignerClient(base_url="http://localhost:8080")

# 2. Define Model Configs
# You can find available Model IDs at build.nvidia.com

# Configuration for the 'Writer', e.g. nvidia/nvidia-nemotron-nano-9b-v2
generator_config = ModelConfig(
    provider="nvidiabuild",
    alias="content_generator",
    model="<ENTER_GENERATOR_MODEL_ID>",
    inference_parameters=InferenceParameters(temperature=0.7, max_tokens=8000)
)

# The "Judge" evaluates quality, e.g. openai/gpt-oss-120b
judge_config = ModelConfig(
    provider="nvidiabuild",
    alias="judge",
    model="<ENTER_JUDGE_MODEL_ID>",
    inference_parameters=InferenceParameters(temperature=0.1, max_tokens=4096)
)

# 3. Initialize the Builder
config_builder = DataDesignerConfigBuilder(model_configs=[generator_config, judge_config])
接下来,我们定义用于生成合成分类注释的“种子”数据。通过采样器,我们创建一系列随机属性,例如 ESI 级别、特定临床场景、患者详细信息以及笔记的写作风格,这些属性随后将被注入到 LLM 提示中。
config_builder.add_column(
    SamplerColumnConfig(
        name="record_id",
        sampler_type=SamplerType.UUID,
        params={"short_form": True, "uppercase": True}
    )
)

config_builder.add_column(
    SamplerColumnConfig(
        name="esi_level_description",
        sampler_type=SamplerType.CATEGORY,
        params=CategorySamplerParams(values=["ESI 1: Resuscitation", "ESI 2: Emergency", ...),
    )
)

config_builder.add_column(
    SamplerColumnConfig(
        name="clinical_scenario",
        sampler_type=SamplerType.SUBCATEGORY,
        params=SubcategorySamplerParams(
            category="esi_level_description",
            values={
                "ESI 1: Resuscitation": ["Cardiac arrest", "Severe respiratory distress", ...],
                "ESI 2: Emergency": ["Chest pain", "Stroke symptoms", ...],
                # ... define lists for ESI 3, 4, and 5
            },
        ),
    )
)

config_builder.add_column(
    SamplerColumnConfig(
        name="patient",
        sampler_type=SamplerType.PERSON,
        params=PersonSamplerParams(age_range=[18, 70]),
    )
)

config_builder.add_column(
    SamplerColumnConfig(
        name="writing_style",
        sampler_type=SamplerType.CATEGORY,
        params=CategorySamplerParams(values=["Draft", "Adequate", "Polished"]),
    )
)
我们使用 LLMTextColumn 生成实际的分类注释。通过将结构化提示词与 Jinja 模板相结合,不仅能够注入采样值(例如年龄和场景),还能实施严格的格式限制(例如“CC:”和“HPI:”)。这有助于确保模型模仿忙碌护士的沟通方式,而非生成通用描述。
# Generate the realistic triage note
config_builder.add_column(
    LLMTextColumnConfig(
        name="content",
        model_alias="content_generator",
        prompt=(
            "You are an experienced triage nurse. Write a realistic triage note. "
            "The note is for a {{ patient.age }} y/o {{ patient.sex }}. "
            "Triage classification: '{{ esi_level_description }}'. "
            "Reason for visit: '{{ clinical_scenario }}'. "
            "Desired writing style: '{{ writing_style }}'. "
            "Structure the note with 'CC:' and 'HPI:'. "
            "Respond with ONLY the note text."
        ),
    )
)
为确保质量,我们立即对生成的数据进行分级。通过添加一个 LLMJudgeColumn,用于评估“临床一致性”和“复杂性”的标注,从而能够在后续过滤掉存在幻觉或过于简单的示例。
# Define a rubric for Clinical Coherence
clinical_coherence_rubric = Score(
    name="Clinical Coherence",
    description="Evaluates if clinical details align with the ESI level.",
    options={
        "5": "Perfect alignment; clinically plausible.",
        "1": "Clinically incoherent.",
        # ... intermediate scores
    }
)

# Define a rubric for Complexity
esi_level_complexity_rubric = Score(
    name="ESI Level Complexity",
    description="Evaluates difficulty to infer the ESI level from the note.",
    options={
        "Complex": "Note contains subtle or conflicting information",
        "Moderate": "Note requires some clinical inference",
        "Simple": "Note uses clear indicators that make the ESI level obvious."
    }
)

# Add the Judge Column
config_builder.add_column(
    LLMJudgeColumnConfig(
        name="triage_note_quality",
        model_alias="judge",
        prompt="You are an expert ER physician. Evaluate this triage note...",
        scores=[clinical_coherence_rubric, esi_level_complexity_rubric],
    )
)
现在 SDG 工作流程已经确定,我们先运行一次小规模预览,以检查合成生成的数据。
# Generate 10 examples to verify configuration
preview = data_designer_client.preview(config_builder, num_records=10)
preview.display_sample_record()
满足条件后,即可启动完整的生成任务(例如生成 100 或 1000 条记录)。
# Submit batch job
job_results = data_designer_client.create(config_builder, num_records=100)
job_results.wait_until_done()
dataset = job_results.load_dataset()
这种方法使开发者能够在几分钟内将标注样本从数百个扩展到数千个,同时无需透露任何真实的患者数据。
第 2 步:使用 NVIDIA NeMo 评估器评估模型性能
获得合成数据集后,我们使用 NeMo Evaluator 对大语言模型的预测结果与真实情况进行基准测试。NeMo Evaluator 提供统一的 API,能够自动执行标准化测试和自定义基准测试,兼顾测试效率与结果可复现性。在该工作流中,我们采用基于字符串匹配的自定义准确率指标,用于验证模型输出是否包含正确的标签。此外,我们将评估流程集成到 CI/CD 工作流中,确保每次模型更新都会触发自动验证,从而实现持续性的质量保障,而非一次性测试。
在运行评估之前,我们需要将经过过滤的合成数据集上传至Evaluator服务可访问的数据存储(例如Hugging Face)。同时,按照复杂性级别对数据进行划分,以便分析模型在更具挑战性任务中的表现。
from huggingface_hub import HfApi

# ... filtering logic to separate dataset by complexity (Simple, Moderate, Complex) ...

# Loop through complexity levels and upload to Hugging Face
for level, df in df_complexities.items():
    repo_id = f"triage-eval/nurse-triage-notes-{level}"
    file_name = f"dataset_{level}.jsonl"

    # Save to JSONL and upload
    df.to_json(file_name, orient="records", lines=True)

    hf_api.upload_file(
        path_or_fileobj=file_name,
        path_in_repo=file_name,
        repo_id=repo_id,
        repo_type="dataset",
        # ...
    )

    print(f"Uploaded dataset for complexity: {level}")
我们定义一个配置对象,用于指示评估器执行的具体任务。在此,我们通过完成任务来指定自定义评估类型,并提供一个提示模板,要求模型扮演专业护士角色,仅输出 ESI 级别。
至关重要的是,我们将指标定义为字符串匹配,用于检查模型的输出是否包含正确的真值标签(例如,“ESI 2:紧急”)。此处,我们定义指标为字符串检查,用于检查模型的输出是否包含正确的真值标签(例如,“ESI 2:紧急”)。
EVALUATOR_CONFIG = {
    "eval_config": {
        "type": "custom",
        "tasks": {
            "triage_classification": {
                "type": "completion",
                "params": {
                    "template": {
                        "messages": [
                            {"role": "system", "content": "You are an expert ER triage nurse..."},
                            {"role": "user", "content": "Triage Note: {{item.content}}..."}
                        ],
                    }
                },
                # Define success metric: Does the output contain the ground truth?
                "metrics": {
                    "accuracy": {
                        "type": "string-check",
                        "params": {
                            "check": ["{{sample.output_text}}", "contains", "{{item.esi_level_description}}"]
                        }
                    }
                },
                "dataset": { "files_url": None } # Placeholder, filled dynamically later
            }
        }
    },
    # ... target_config for the model endpoint
}
随后,我们将对不同模型(例如 Qwen 和 NVIDIA Nemotron)以及不同复杂程度的数据集进行迭代测试。将每个组合的作业提交至 NeMo Evaluator 客户端,并打印出准确率分数。
MODEL_SPECS = [
    {"name": "Qwen3-8B", "model_id": "Qwen/Qwen3-8B", ...},
    {"name": "Nemotron Nano 9B", "model_id": "nvidia/nvidia-nemotron-nano-9b-v2", ...}
]

# Run evaluation for every model on every complexity level
for complexity in ["simple", "moderate", "complex"]:
    for spec in MODEL_SPECS:

        # 1. Update config with specific model and dataset URL
        config = copy.deepcopy(EVALUATOR_CONFIG)
        config['eval_config']['tasks']['triage_classification']['dataset']['files_url'] = files_url_dict[complexity]
        config['target_config']['model']['api_endpoint']['url'] = spec['url']

        # 2. Submit Job
        job = client.evaluation.jobs.create(
            target=config['target_config'],
            config=config['eval_config']
        )

        # 3. Wait for results
        results = client.evaluation.jobs.results(job.id)
        accuracy = results.tasks['triage_classification'].metrics['accuracy'].value

        print(f"Model: {spec['name']} | Complexity: {complexity} | Accuracy: {accuracy:.2%}")
通过这种方式构建评估,我们不再局限于单一的聚合准确度分数,而是获得了对模型行为的细致洞察。现在,我们能够准确识别模型在哪些情况下表现困难——例如,它可能在处理“简单”分类任务时表现完美,但在“复杂”场景中却会生成虚构的细节。
此自动循环可将评估从手动的一次性事件转变为持续的验证引擎。无论您是更换模型架构还是调整提示模板,该工作流都能确保每一项更改都基于真实数据进行严格基准测试,从而为临床 AI 智能体 的生产部署提供充分信心。
要点
数据稀缺和隐私法规不再是创新的障碍。正如我们所展示的,您现在能够构建可靠的、特定领域的评估基准,而无需公开任何真实的患者或客户记录。
通过结合用于生成的 NeMo Data Designer 与用于验证的 NVIDIA NeMo Evaluator,您可以将缓慢的手动模型基准测试流程转变为高效的自动化工作流程。在 GitHub 上通过 Notebook 开始使用。
准备好深入了解了吗?
- 使用 NeMo 微服务平台或开源的 NeMo Data Designer 库,探索 NeMo Data Designer 以生成适用于您领域的逼真合成数据集。
- 试用 NeMo Evaluator 微服务,实现评估流程的自动化。查看演示,逐步掌握使用方法。NeMo Evaluator 也可在 GitHub 上作为开源工具包获取。
- 在 Hugging Face 上体验开放的 NVIDIA Nemotron 模型,或通过 NVIDIA Build 的 NIM API 进行微调与高级特定领域推理。
欢迎访问我们的 Nemotron 开发者页面,获取开启更开放、更智能的每计算推理模型所需的核心信息。


