GPU Gems
GPU Gems is now available, right here, online. You can purchase a beautifully printed version of this book, and others in the series, at a 30% discount courtesy of InformIT and Addison-Wesley.
The CD content, including demos and content, is available on the web and for download.
Chapter 22. Color Controls
Kevin Bjorke
NVIDIA
Color correction is part of almost all print and film imaging applications. Color correction can be used to move color images from one color space to another (say, from Adobe RGB to sRGB); to stylize images (creating illusions such as faded film, cross-processing, or other stylistic variations); to combine art elements from different sources (such as matching color palettes between different video sources, or models made by different artists); or to give broad coherence and mood to entire parts of a game or scene without changing the underlying models and textures.
Most of the imagery we see on television, in magazines, and in movies has undergone very careful color correction and control. Understanding how the process works can help developers give real-time applications equivalent visual richness.
22.1 Introduction
In all forms of color correction, we want to change the color of individual pixels. Color corrections generally come in two flavors: per-channel corrections, which alter red, green, and blue components individually; and color-mixing operations, in which the value of each output channel may be an operation based on the red, green, and blue components simultaneously.
The mathematics of color corrections can be compactly and easily described in a shader. Just as important, they can be controlled effectively with common tools used widely by computer artists and programmers. In this chapter, we rely on Adobe Photoshop to let artists create control resources, which can then be applied in real time via pixel shaders.
22.2 Channel-Based Color Correction
Photoshop provides a number of channel-based correction tools. Features such as the Levels and the Curves tools are channel based. They offer a method to change the intensity of each individual channel in an image or all three channels as a single entity.
22.2.1 Levels
Figures 22-1 and 22-2 show a typical application of the Levels command in Photoshop (in this case, enhancing contrast and shifting the overall gamma). The artist can control the overall contrast, gamma, and dynamic range of the entire image, or she can manipulate those properties for each color channel independently.
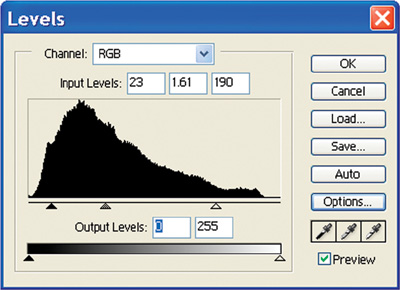
Figure 22-1 Adjusting Image Gamma and Overall Dynamic Range Using Photoshop Levels
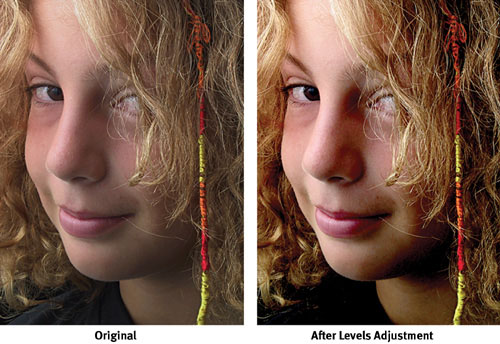
Figure 22-2 Before and After Levels Adjustments
For each channel, we can apply the following formula:
outPixel = (pow(((inPixel * 255.0) - inBlack) / (inWhite - inBlack), inGamma) *
                (outWhite - outBlack) +
            outBlack) /
           255.0;
Here, inBlack, inGamma, and inWhite are the "Input Levels" values, and outBlack and outWhite are the values marked in the "Output Levels" boxes in Figure 22-1. (For more on processing gamma values, see Chapter 26, "The OpenEXR Image File Format.")
Figure 22-2 shows the adjustment applied equally to all three color channels, but we can also adjust each channel individually.
For a production pipeline using a high-level shading language, an artist or art director could define the color correction by first opening a screen capture from the game or other image source in Photoshop, then applying the correction as a new layer in Photoshop. The writer of the shader could then open the image in Photoshop and copy the corrected values from the Levels dialog box and paste them as the inputs for the color-correction code.
In practice, the formula can often be simplified. The 1/255 intensity normalizations can be removed by predividing the terms used in Photoshop before passing them on to the shader. Default Levels values (such as 0–255 output values, or a gamma of 1.0) can simply be skipped.
If levels are applied to individual channels, the inputs can be defined as vector data, but results can only partially be calculated as vectors, unless the gamma terms for all channels match. If not, then three different pow() functions will be required.
22.2.2 Curves
Photoshop's Levels tool is useful because it is simple for the artist to understand and for the shader programmer to implement. Often, however, the artist may desire more precise control, or more unusual, nonlinear effects. The Curves tool in Photoshop provides more arbitrary remapping of the color channels; it is the color-correction tool of choice among many print and photographic professionals.
Using Curves, the input-output mapping of color channels can be defined by an arbitrary cubic spline or can be drawn freehand. This flexibility provides extreme generality, but it makes it difficult for coders to write a single algebraic expression to define the many possible relationships.
Figures 22-3 and 22-4 show a usage typical of an advertising imagery. A graphic designer or artist has processed an RGB image using a complex series of color curves in the Curves dialog box. In this case, curves have been applied in two ranks: the red, green, and blue curves are applied by Photoshop in addition to an overall curve applied to RGB equally.

Figure 22-3 Photoshop Curves to Re-create a Cross-Processing Effect
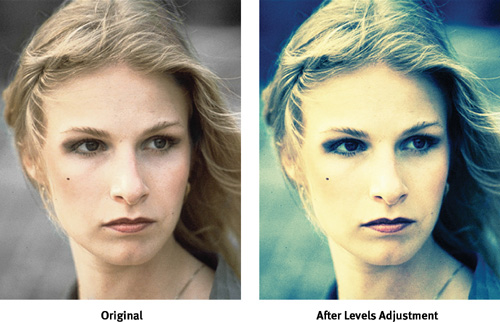
Figure 22-4 Fake Cross-Processing
The result, in this case, emulates the appearance of chemical cross-processing—specifically, the false-color appearance created by processing E6 film in C41 chemistry. Such manipulations have been popular in print, movies, and television for many years.
Although we could potentially duplicate the math performed by Photoshop, there is a much easier way to obtain results with a shader that exactly matches complex channel manipulations such as these. Because we know that there exist one-to-one mappings between the input values of each color channel and the final output values for the same channel, we can represent these mappings as a 1D map, which we can apply as a "dependent" texture.
For best results, a 1x256 texture map should be defined, although smaller maps can often be used effectively. Before creating the map, the artist must first define the color transformation, typically by applying adjustment layers to existing still images using the Curves tool in Photoshop. Once the adjustments are defined, they can be saved to disk as an Adobe ".acv" Curve file.
Now to make the texture:
- Create a new 1x256-pixel RGB image in Photoshop.
- Set the foreground and background colors to white and black, respectively.
- Using the Gradient tool, apply a gradient ramp from the leftmost pixel to the rightmost pixel in the image, ranging from black on the left to white on the right. (Save this gradient as a reference: you may need it later.)
- Now apply your saved ".acv" Curves file to the gradient file. If you have applied different adjustments to each color channel, the previously gray ramp will now show color banding. Figure 22-5 shows an example.

Figure 22-5 Grayscale RGB and Modified RGB Ramps
- Save the new, colored ramp image in a form appropriate for texture mapping in your program (such as DDS or Targa formats).
We can now apply the following lines of shader code to the input color, using this correction texture map, to arbitrarily re-create any color alterations performed with the Curves tool (the same method can also be applied to Levels, if desired).
float3 InColor = tex2D(inSampler, IN.UV).xyz;
float3 OutColor;
OutColor.r = tex1D(ColorCorrMap, InColor.r).r;
OutColor.g = tex1D(ColorCorrMap, InColor.g).g;
OutColor.b = tex1D(ColorCorrMap, InColor.b).b;
In other words, we use the grayscale value of each original red, green, and blue pixel to determine where in the ramp texture we will look; then the ramp texture itself defines the remapping to the new colors defined by our complex Curves adjustment(s). See Figure 22-6.
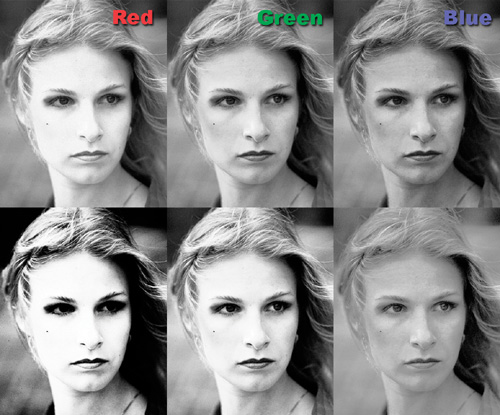
Figure 22-6 Channel-by-Channel Results of the Red, Green, and Blue Remappings
22.3 Multichannel Color Correction and Conversion
Occasionally, we need to mix color channels together, such as when adjusting hue (that is, the rotation through 3D color space), when converting from one color space to another, or when converting from color to grayscale.
For generality, one can imagine extending the previous technique to three dimensions, providing a full mapping for any possible pixel into a large 256x256x256 3D map. Such a map size would demand too much memory for many modern-day graphics cards, but not all, and the code is astonishingly minimal:
float3 InColor = tex2D(inSampler, IN.UV).xyz;
float3 OutColor = tex3D(colorSpaceSampler, inColor);
As you can see, the code is simple. The only real-world limitation is the lack of common tools for creating such RGB-to-RGB 3D texture maps.
Fortunately, most color-space conversions are quite uniform and can be expressed efficiently as dot products and 3x3 matrix multiplications.
22.3.1 Grayscale Conversion
Consider the common conversion from RGB color to a grayscale. There are several approaches available: We can choose one color channel, or evenly blend all three channels, or mix the three RGB channels by varying weights to achieve a final grayscale result. The third choice, blending by weights, is generally accepted as the best, and it can be set to match the sensitivity of typical human eyesight.
We can express this blending with a dot product:
float grayscale = dot(float3(0.222, 0.707, 0.071), inColor);The values (0.222, 0.707, 0.071) represent the relative scales for red, green, and blue, respectively. These numbers follow an international industrial color standard called ITU Rec 709 (there are actually a number of alternate formulations). Note that the components of the float3 vector used for this conversion sum to 1.0—this makes the conversion nominally "energy conserving," though in fact you can assign almost any values and get different interesting results, much as you can with the Photoshop Color Mixer tool.
In particular, a standardized conversion such as the one just described means that the brightness of pure colors may be limited—bright pure blues, for example, will never appear as more than a dark 7 percent gray. For artistic reasons, therefore, we may often want to vary the weights of our grayscale conversions, so that important colors aren't needlessly suppressed.
We can also use the results of such a grayscale conversion as a texture index to create alternative color mappings, using color-lookup textures similar to the one used in the previous section. Consider this mapping:
float grayscale = dot(float3(0.222, 0.707, 0.071),
                      inColor); // set the texture's edge-addressing to "clamp"
float3 OutColor = tex1D(ColorCorrMap, grayscale);
Using a grayscale-to-color-gradient mapping in this way permits us to create a wide variety of false-color and toned-print effects, both naturalistic (such as duotones or tritones) and highly stylized (such as robot vision or infrared "heat signatures" à la the movie Predator).
22.3.2 Color-Space Conversions
Converting between different color spaces can be done by calculating a different dot product for each resultant color channel—in other words, multiplying the input RGB values by a 3x3 matrix.
float3x3 conversionMatrix;
// plus some code to insert values into this matrix . . .
float3 newColor = mul(conversionMatrix, inColor);
The code sample shows converting inColor to newColor according to the contents of conversionMatrix. Many conversion matrices are standardized: for example, the conversions from RGB colors to CIE colors, from video YIQ signals to RGB, or from color standards such as Adobe RGB to other standards such as sRGB. The "Color Space FAQ" (Bourgin 1994) is a good source of information on many standard conversions used in video. An excellent online source containing matrix values for most common industrial color spaces (such as those used in Photoshop color profiles) is Autiokari 2003. (Conversions from subsampled signals can also be assisted by texturing hardware—see Chapter 24 of this book, "High-Quality Filtering.")
Custom color conversions are also sometimes needed when doing 3D shading based on physical measurements from tools such as a gonioreflectometer. The color shifts may be needed to adjust between the color sensitivities of the original sensors and the output colors of a typical computer display. For maximum reproduction fidelity of the original, real-world BRDF of a given surface, this final adjustment can be crucial.
It's easy to experiment with rotations and scales of the 3D color cube using a DCC tool. For example, if you're using Cg, make a dummy 3D node and, using the appropriate Cg plug-in, attach the node's world-space matrix to a Cg shader such as this one:
float4 colorCubePS(vertexOutput IN, sampler2D ColorTex, float3x3 RGBxform)
    : COLOR
{
  float3 texColor = tex2D(ColorTex, IN.UV);
  float3 result = mul(RGBxform, texColor);
  return float4(result, 1.0);
}
The results are shown in Figure 22-7.
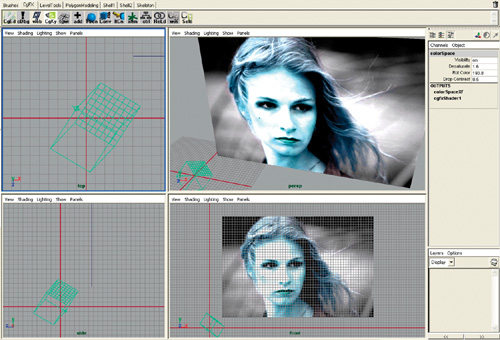
Figure 22-7 Color-Cube Transforms Previewed in a DCC Application
This technique allows you simply to grab the null object and scale or rotate it freely to try different effects. Besides the "psychedelic" aspects of random scaling and dragging, try the following settings for control over saturation, brightness, and color-wheel rotation:
- For brightness overall, scale around (0, 0, 0).
- For saturation, scale against the diagonal vector (1, 1, 1)—so that if the color cube were fully desaturated, it would simply degenerate to a line through the origin and (1, 1, 1).
- For rotating the color cube, rotate around that same diagonal-vector direction (1, 1, 1).
- For altering overall contrast, scale around any point in the color cube. Scaling around (0.5, 0.5, 0.5) will change the overall contrast relative to midgray; scaling around (1, 1, 1) will change the saturation against white. Desaturating to any other color is equally straightforward.
Any number of these operations can be concatenated, preferably in the CPU application, before being passed to the fragment shader.
22.4 References
Albers, Josef. 1987. The Interaction of Color, revised ed. Yale University Press.
Autiokari, Timo. 2003. "CIE_XYZ and CIE_xyY." Web site article. http://www.aim-dtp.net/aim/technology/cie_xyz/cie_xyz.htm
Bourgin, David. 1994. "Color Space FAQ." Web site page. http://www.neuro.sfc.keio.ac.jp/~aly/polygon/info/color-space-faq.html
Fraser, Bruce. 2003. Real World Color Management. Peachpit Press.
Hummel, Rob. 2002. American Cinematographer Manual, 8th ed. American Society of Cinematographers.
Margulis, Dan. 2002. Professional Photoshop, 4th ed. Wiley.
Poynton, Charles. 2003. Web site. http://www.poynton.com. Poynton's Web site contains a wealth of useful color-related digital information. Poynton contributed to many of the color standards now in use.
Copyright
Many of the designations used by manufacturers and sellers to distinguish their products are claimed as trademarks. Where those designations appear in this book, and Addison-Wesley was aware of a trademark claim, the designations have been printed with initial capital letters or in all capitals.
The authors and publisher have taken care in the preparation of this book, but make no expressed or implied warranty of any kind and assume no responsibility for errors or omissions. No liability is assumed for incidental or consequential damages in connection with or arising out of the use of the information or programs contained herein.
The publisher offers discounts on this book when ordered in quantity for bulk purchases and special sales. For more information, please contact:
U.S. Corporate and Government Sales
(800) 382-3419
corpsales@pearsontechgroup.com
For sales outside of the U.S., please contact:
International Sales
international@pearsoned.com
Visit Addison-Wesley on the Web: www.awprofessional.com
Library of Congress Control Number: 2004100582
GeForce™ and NVIDIA Quadro® are trademarks or registered trademarks of NVIDIA Corporation.
RenderMan® is a registered trademark of Pixar Animation Studios.
"Shadow Map Antialiasing" © 2003 NVIDIA Corporation and Pixar Animation Studios.
"Cinematic Lighting" © 2003 Pixar Animation Studios.
Dawn images © 2002 NVIDIA Corporation. Vulcan images © 2003 NVIDIA Corporation.
Copyright © 2004 by NVIDIA Corporation.
All rights reserved. No part of this publication may be reproduced, stored in a retrieval system, or transmitted, in any form, or by any means, electronic, mechanical, photocopying, recording, or otherwise, without the prior consent of the publisher. Printed in the United States of America. Published simultaneously in Canada.
For information on obtaining permission for use of material from this work, please submit a written request to:
Pearson Education, Inc.
Rights and Contracts Department
One Lake Street
Upper Saddle River, NJ 07458
Text printed on recycled and acid-free paper.
5 6 7 8 9 10 QWT 09 08 07
5th Printing September 2007
- Contributors
- Copyright
- Foreword
- Part I: Natural Effects
-
- Chapter 1. Effective Water Simulation from Physical Models
- Chapter 2. Rendering Water Caustics
- Chapter 3. Skin in the "Dawn" Demo
- Chapter 4. Animation in the "Dawn" Demo
- Chapter 5. Implementing Improved Perlin Noise
- Chapter 6. Fire in the "Vulcan" Demo
- Chapter 7. Rendering Countless Blades of Waving Grass
- Chapter 8. Simulating Diffraction
- Part II: Lighting and Shadows
-
- Chapter 9. Efficient Shadow Volume Rendering
- Chapter 10. Cinematic Lighting
- Chapter 11. Shadow Map Antialiasing
- Chapter 12. Omnidirectional Shadow Mapping
- Chapter 13. Generating Soft Shadows Using Occlusion Interval Maps
- Chapter 14. Perspective Shadow Maps: Care and Feeding
- Chapter 15. Managing Visibility for Per-Pixel Lighting
- Part III: Materials
- Part IV: Image Processing
- Part V: Performance and Practicalities
-
- Chapter 28. Graphics Pipeline Performance
- Chapter 29. Efficient Occlusion Culling
- Chapter 30. The Design of FX Composer
- Chapter 31. Using FX Composer
- Chapter 32. An Introduction to Shader Interfaces
- Chapter 33. Converting Production RenderMan Shaders to Real-Time
- Chapter 34. Integrating Hardware Shading into Cinema 4D
- Chapter 35. Leveraging High-Quality Software Rendering Effects in Real-Time Applications
- Chapter 36. Integrating Shaders into Applications
- Part VI: Beyond Triangles
- Preface