NVIDIA CUDA 仍然是 GPU 加速计算的基础,为从科学模拟到大规模 AI 训练的一切提供支持。
但是,编写正确、可维护和高性能的 CUDA 代码可能具有挑战性:显存错误隐藏在显而易见的视野中,如果没有正确的仪器,性能瓶颈可能是不可见的,手动滚动的 GPU 算法几乎无法与优化库的效率相匹配。幸运的是,现代 CUDA 工具链已经显著成熟,其中许多挑战现在都有简单直接的解决方案。
在本博文中,我们将介绍 NVIDIA 提供的用于调试、基准测试和改进代码的工具。每次只需更改少量行,我们就能使示例代码更安全、更易于维护和更快。
本博文将介绍六个渐进步骤:
- 如何通过采用现代 CCCL API 和 Compute Sanitizer 轻松找到索引错误
- 如何使用 NVTX 改进 Nsight Systems 基准测试
- 如何在块和设备级别使用 CUB 的优化算法
- 如何通过池化容器管理 GPU 显存
- 如何使用固定容器加速主机到设备的传输
- 如何通过为每个线程分配自己的流和异步传输来并行化 GPU 工作
作为本博文的配套内容,我们提供了在 Google Colab 上运行的代码和选项。
起点:图像处理工作流示例
从红色、绿色和蓝色图像的输入流开始,将数据从 CPU 传输到 GPU。然后将 RGB 转换为灰度。
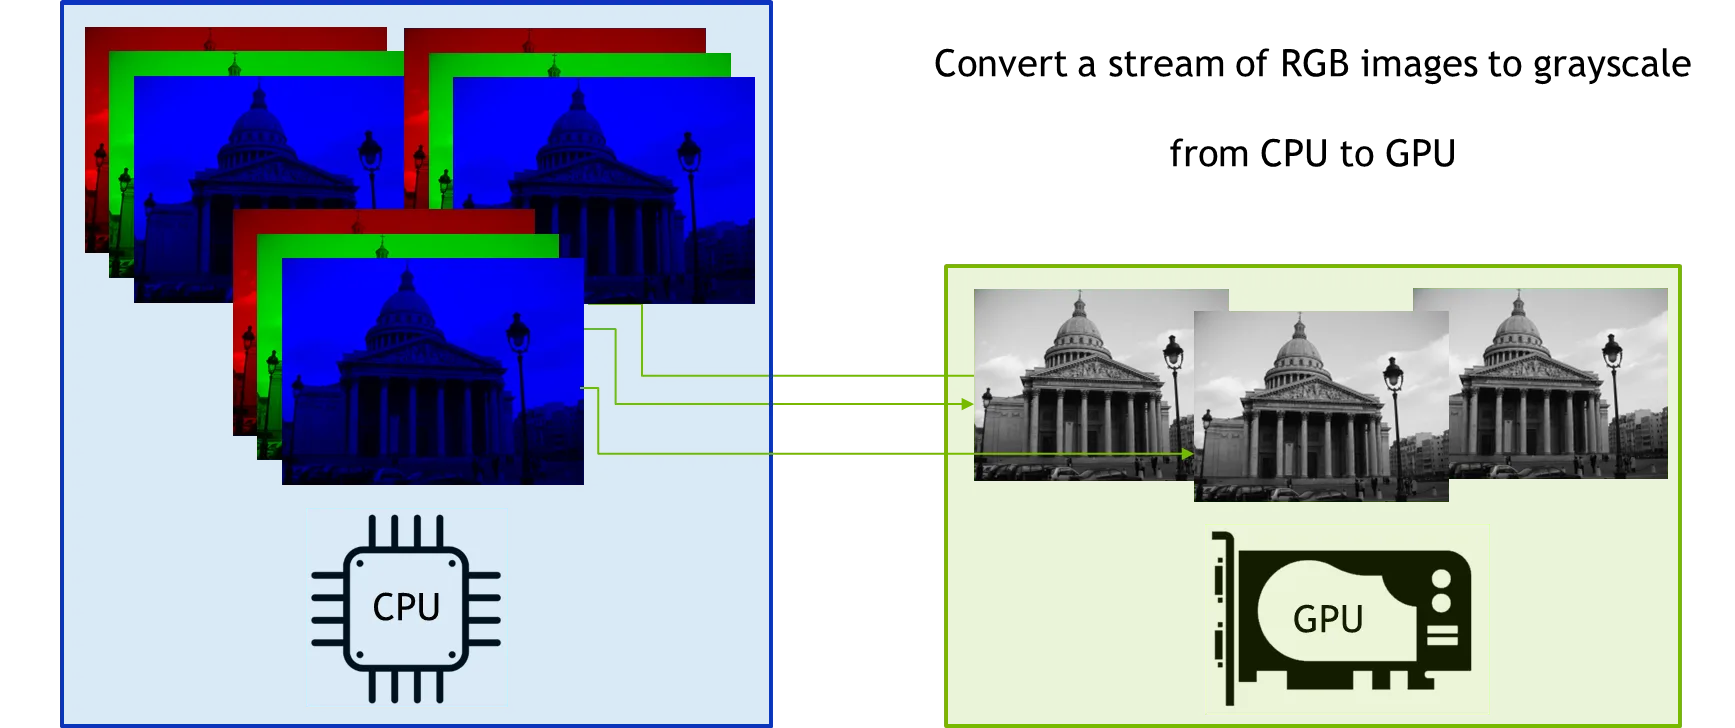
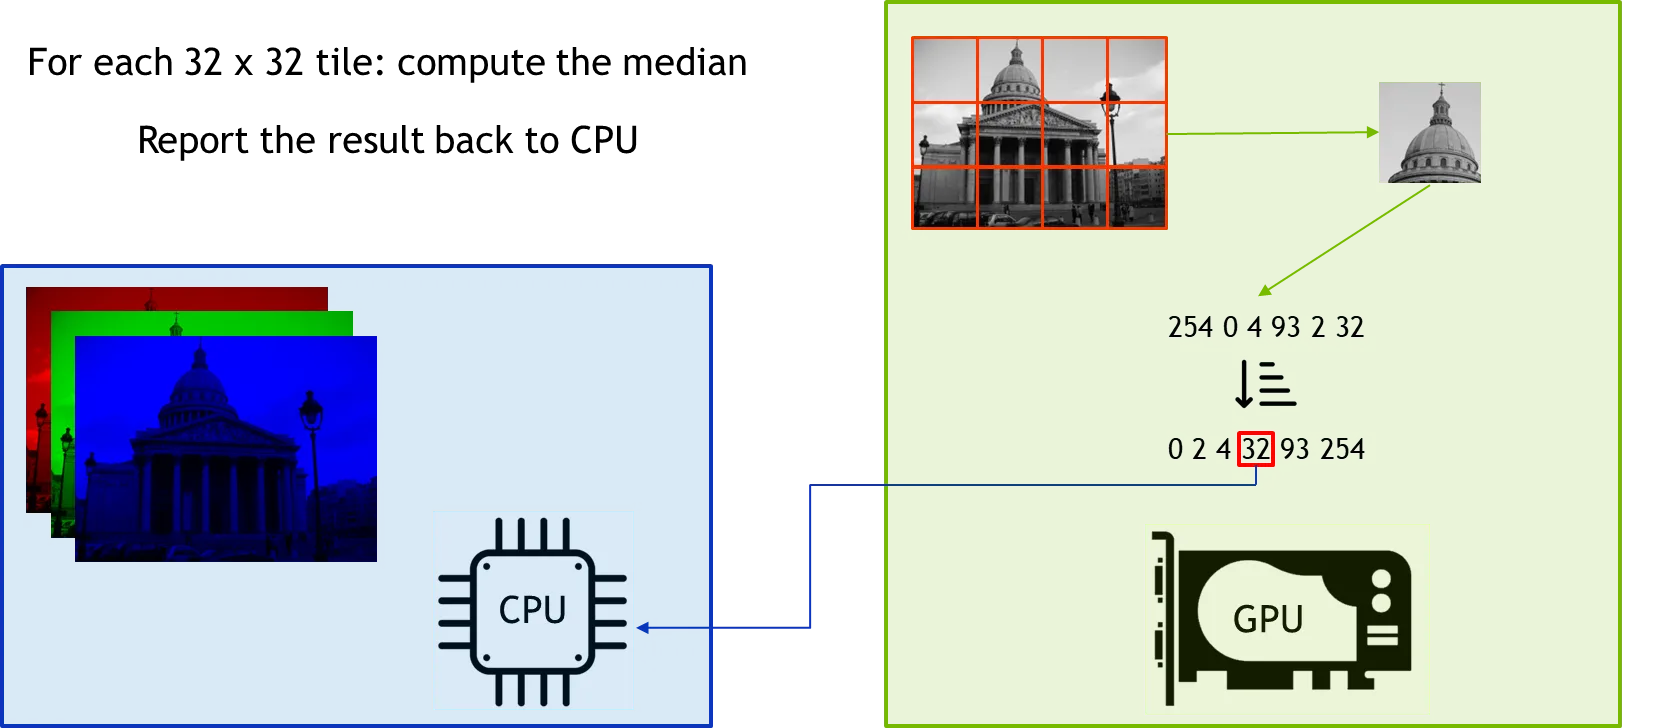
然后,对于图像中的每个 32 x 32 像素图块,通过对像素进行排序并选择中间值来计算中值。最后,将每个图块的中位数复制回 CPU。
基础代码示例
以下是完整的起始代码。本博文中的每个步骤都会改进。
#define CUDA_CHECK_ERROR(call) do { \
    cudaError_t err = call; \
    if (err != cudaSuccess) { \
        std::cerr << "CUDA error in " << __FILE__ << " at line " << __LINE__ << ": " \
                  << cudaGetErrorString(err) << std::endl; \
        std::exit(EXIT_FAILURE); \
    } \
} while (0)
// Alias for an image pixel
using pixel_t = uint8_t;
// Kernel converting the red, green and blue images into a single gray image
__global__ void computeRGBToGray(const pixel_t* d_image_r, const pixel_t* d_image_g, const pixel_t* d_image_b, pixel_t* d_image_gray, int width, int height) {
    // Compute the thread global index in the grid
    const int x = threadIdx.x + blockIdx.x * blockDim.x;
    const int y = threadIdx.y + blockIdx.y * blockDim.y;
    // Boundary check selecting only threads within the image boundary
    if (x < width && y < height) {
        // Compute the thread index in the image
        const int i = x + y * width;
        // Convert from rgb to grayscale and store the result in global memory
        d_image_gray[i] = static_cast<pixel_t>(0.299f * d_image_r[i] + 0.587f * d_image_g[i] + 0.114f * d_image_b[i]);
    }
}
// Kernel computing the median of each tile in the grayscale image
template <int TILE_WIDTH, int HISTO_SIZE>
__global__ void computeMedian(pixel_t *d_image_gray, pixel_t *d_median, int width, int height) {
    // Compute the thread global index in the grid
    const int x = threadIdx.x + blockIdx.x * blockDim.x;
    const int y = threadIdx.y + blockIdx.y * blockDim.y;
    // Boundary check selecting only threads within the image boundary
    if (!(x < width && y < height))
        return;
    // Allocate the shared memory in which we will store the tile
    __shared__ pixel_t tile[TILE_WIDTH * TILE_WIDTH];
    // Compute the thread index in the image
    const int index = x + y * width;
    // Load the tile's grayscale value from global memory into shared memory
    tile[index] = d_image_gray[index];
    // Synchronize to make sure all threads have loaded their data
    __syncthreads();
    // Sort the tile array using a single threaded bubble sort
    if (threadIdx.x == 0 && threadIdx.y == 0) {
        for (int i = 0; i < TILE_WIDTH * TILE_WIDTH; ++i)
            for (int j = i + 1; j < TILE_WIDTH * TILE_WIDTH; ++j)
                if (tile[i] > tile[j])
                    cuda::std::swap(tile[i], tile[j]);
        // Each thread block stores the median, found in the middle index after sorting, in the global median array
        const int medianIndex = (TILE_WIDTH * TILE_WIDTH) / 2;
        d_median[blockIdx.x + blockIdx.y * gridDim.x] = tile[medianIndex];
    }
}
int main() {
    // Define all the example constants
    constexpr auto TILE_WIDTH = 32;
    constexpr auto HISTO_SIZE = 256;
    constexpr auto NB_TILE_X = 250;
    constexpr auto NB_TILE_Y = NB_TILE_X;
    constexpr auto IMAGE_LENGTH = TILE_WIDTH * NB_TILE_X;
    constexpr auto IMAGE_SIZE = IMAGE_LENGTH * IMAGE_LENGTH;
    constexpr auto NB_IMAGES = 3;
    constexpr auto INIT_VALUE = 4;
    // Allocate the CPU memory to store the images tiles medians and for the red, green, blue and grayscale images
    std::vector<std::vector<pixel_t>> h_images_r(NB_IMAGES, std::vector<pixel_t>(IMAGE_SIZE, 4));
    std::vector<std::vector<pixel_t>> h_images_g(NB_IMAGES, std::vector<pixel_t>(IMAGE_SIZE, 4));
    std::vector<std::vector<pixel_t>> h_images_b(NB_IMAGES, std::vector<pixel_t>(IMAGE_SIZE, 4));
    std::vector<std::vector<pixel_t>> h_images_gray(NB_IMAGES, std::vector<pixel_t>(IMAGE_SIZE, 0));
    std::vector<std::vector<pixel_t>> h_medians(NB_IMAGES, std::vector<pixel_t>(NB_TILE_X * NB_TILE_Y));
    // Run the image processing pipeline for each image, in parallel
    #pragma omp parallel for
    for (int i = 0; i < NB_IMAGES; ++i)
    {
        pixel_t *d_image_r, *d_image_g, *d_image_b, *d_image_gray, *d_median;
        // Allocate the GPU memory for each container
        CUDA_CHECK_ERROR(cudaMalloc(&d_image_r, IMAGE_SIZE * sizeof(pixel_t)));
        CUDA_CHECK_ERROR(cudaMalloc(&d_image_g, IMAGE_SIZE * sizeof(pixel_t)));
        CUDA_CHECK_ERROR(cudaMalloc(&d_image_b, IMAGE_SIZE * sizeof(pixel_t)));
        CUDA_CHECK_ERROR(cudaMalloc(&d_image_gray, IMAGE_SIZE * sizeof(pixel_t)));
        CUDA_CHECK_ERROR(cudaMalloc(&d_median, (NB_TILE_X * NB_TILE_Y) * sizeof(pixel_t)));
        // Copy the memory of each container from CPU to GPU
        CUDA_CHECK_ERROR(cudaMemcpy(d_image_r, h_images_r[i].data(), IMAGE_SIZE * sizeof(pixel_t), cudaMemcpyHostToDevice));
        CUDA_CHECK_ERROR(cudaMemcpy(d_image_g, h_images_g[i].data(), IMAGE_SIZE * sizeof(pixel_t), cudaMemcpyHostToDevice));
        CUDA_CHECK_ERROR(cudaMemcpy(d_image_b, h_images_b[i].data(), IMAGE_SIZE * sizeof(pixel_t), cudaMemcpyHostToDevice));
        // Launch a GPU kernel to convert the RGB images to grayscale
        dim3 blockSize(TILE_WIDTH, TILE_WIDTH);
        dim3 gridSize(cuda::ceil_div(IMAGE_LENGTH, blockSize.x), cuda::ceil_div(IMAGE_LENGTH, blockSize.y));
        computeRGBToGray<<<gridSize, blockSize>>>(d_image_r, d_image_g, d_image_b, d_image_gray, IMAGE_LENGTH, IMAGE_LENGTH);
        CUDA_CHECK_ERROR(cudaGetLastError());
        // Launch the GPU kernel to compute the median of every tile in the image
        computeMedian<TILE_WIDTH, HISTO_SIZE><<<gridSize, blockSize>>>(d_image_gray, d_median, IMAGE_LENGTH, IMAGE_LENGTH);
        CUDA_CHECK_ERROR(cudaGetLastError());
        // Copy the GPU median memory back to the CPU
        CUDA_CHECK_ERROR(cudaMemcpy(h_medians[i].data(), d_median, (NB_TILE_X * NB_TILE_Y) * sizeof(pixel_t), cudaMemcpyDeviceToHost));
        // Free the GPU memory
        CUDA_CHECK_ERROR(cudaFree(d_image_r));
        CUDA_CHECK_ERROR(cudaFree(d_image_g));
        CUDA_CHECK_ERROR(cudaFree(d_image_b));
        CUDA_CHECK_ERROR(cudaFree(d_image_gray));
        CUDA_CHECK_ERROR(cudaFree(d_median));
    }
    return 0;
}
此代码首先定义两个内核:
computeRGBToGray加载红色、绿色和蓝色输入图像的值,以将其转换并写入灰度输出图像。computeMedian计算输入灰度图像每个图块的中位数。每个线程块将图块从全局内存加载到共享内存。然后,使用单个线程对数组进行排序,并写入在全局输出中值数组中的中间索引 (对应中值) 处找到的值。
在正文中,定义示例中使用的常量后,CPU 内存将分配给每张图像和中间值。
然后,使用 OpenMP 为这三张图像分别并行运行图像处理工作流。工作流首先在 GPU 上分配所需显存,然后再将数据从 CPU 传输到 GPU。之后启动两个核函数,将 RGB 转换为灰度,并计算中值。最后,在释放内存之前,将中间值结果复制回 CPU。
此代码有几个问题需要逐步解决。
1. Compute Sanitizer 和 CCCL API:轻松发现错误并编写更安全的代码
我们先来运行代码。
code_steps$ ./build/0_base_error_example
CUDA error in 0_base_error_example.cu at line 105: an illegal memory access was encountered
虽然代码中有一些错误检查,但当您收到类似“非法内存访问”的错误消息时,您应该首先使用 computer – sanitizer 进行进一步调查。
使用 NVIDIA 功能正确性检查套件 Compute Sanitizer,我们可以直接识别难以发现的错误:
$ compute-sanitizer ./build/0_base_error_example
========= COMPUTE-SANITIZER
========= Invalid __shared__ write of size 1 bytes
=========     at void computeMedian<(int)32, (int)256>(unsigned char *, unsigned char *, int, int)+0x170 in 0_base_error_example.cu:55
=========     by thread (0,3,0) in block (20,0,0)
=========     Access at 0x6440 is out of bounds
运行上述操作直接表明,代码在 0_base_error_example.cu 的第 55 行存在超出限制的共享写入问题。
tile[index] = d_image_gray[index];
该行使用全局索引错误地加载共享内存中的数据。由于共享内存是在线程块级别定义的,因此我们需要更改索引。为避免索引错误,我们在 CCCL 中引入了新的 API,以区分全局索引和块级索引。要使用它,您首先需要使用新的 cuda::launch API 启动内核:
auto config = cuda::make_config(cuda::block_dims(...), cuda::grid_dims(...));
cuda::launch(stream, config, kernel_name<decltype(config)>, input)
然后,在内核中使用新的索引 API:
template <typename Configuration>
__global__ void kernel_name(Configuration config, ...) {
    // Retrieve and expand each global index
    const auto [x, y, z] = cuda::gpu_thread.index(cuda::grid, config);

    // Retrieve the block index structure (containing block_idx.x, .y, .z)
    const auto block_idx = cuda::gpu_thread.index(cuda::block, config);
}
如果不使用 computing – sanitizer 或新 API,也可以使用 cuda::std::span 或其 n 维变体 cuda::std::mdspan 而不是原始指针来直接发现此错误。cuda::std::span 和 cuda::std::mdspan 是连续内存的非拥有视图,有助于抽象出确切的容器。通过 span 访问数据比通过原始指针更安全,部分原因是在调试模式下,越界访问将触发断言。
内核应更新为:
// Alias for a 2-dimensional mdspan
template <typename T>
using span_2d = cuda::std::mdspan<T, cuda::std::dims<2>>;

template <typename Configuration>
__global__ void computeMedian(..., span_2d<const pixel_t> d_image_gray, ...)
如果您在运行代码时进行了这些更改,您将获得以下内容:
$ ./build/1_span
libcudacxx/include/cuda/std/__mdspan/mdspan.h:436: operator(): block: [16,0,0], thread: [0,30,0] Assertion `mdspan: operator() out of bounds access` failed.
还应使用 cuda::shared_memory_mdspan 保护共享内存中的内存访问,如下文代码段所示:
__shared__ pixel_t shared[TILE_WIDTH * TILE_WIDTH];
cuda::shared_memory_mdspan tile_2d(shared, TILE_WIDTH, TILE_WIDTH);
现在,您可以运行,一切都应正常执行,而不会出现错误。
使用新的启动 API 及其索引机制,跨原始指针,而计算清理器、越界访问要么不发生,要么立即被捕获。有关 compute-sanitizer 的更多信息,请参阅Efficient CUDA Debugging:How to Hunt Bug with NVIDIA Compute Sanitizer (高效 CUDA 调试:如何使用 NVIDIA Compute Sanitizer 追踪错误) 。
2. Nsight Systems 和 NVTX:正确地对代码进行基准测试
现在,该代码没有错误,可以使用 NVIDIA Nsight Systems 进行基准测试。它允许您可视化程序时间轴:了解每个函数何时被调用以及调用时长。
为简化时间轴可视化,我们使用 NVTX 包装每个有趣的代码部分:
void image_compute(...)
{
  // NVTX range for the scope of the whole function
  nvtx3::scoped_range fun_scope("Image compute");

 // NVTX range that is pushed and then popped for a specific code section
  nvtxRangePushA("Kernel median");

  // Launch the GPU kernel to compute the median of every tile in the image
  ...

  // Pop the range at the end of the specific code section
  nvtxRangePop();
}
这会生成以下结果:
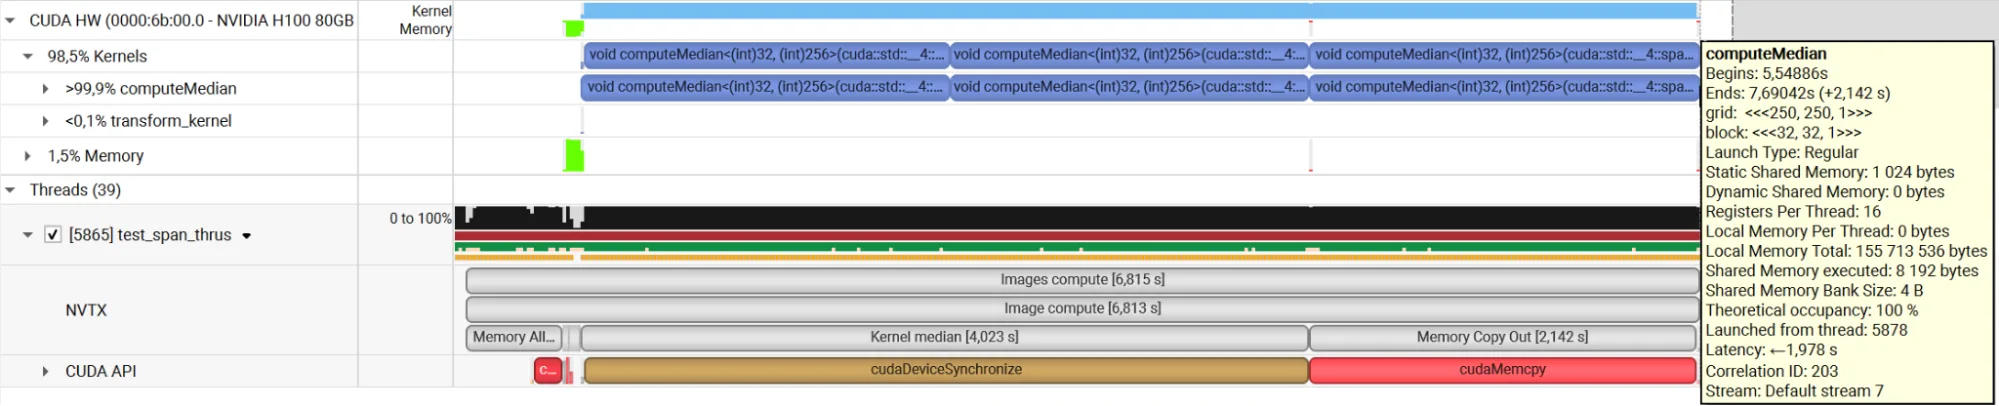
在以上图 3 分析器输出的 GPU 硬件 (CUDA HW) 部分中,据悉 GPU 主要忙于处理内核 (占 GPU 时间的 98.5%) ,而显存运算仅占 GPU 时间的 1.5%。
在两个内核中,计算中值的内核会占用大部分运行时间,且每张图像需要 2.1 秒 (请参阅右侧的黄色框,其中显示了 computeMedian 的统计信息,运行时间为 2.142 秒) 。
在 CPU (线程) 部分,我们发现图像计算总共需要 6.8 秒,其中大部分时间用于计算三个灰度图像的中间值。
我们现在知道要优化的第一个运算,以便产生最大的影响。有关 Nsight Systems 的更多信息,请参阅使用 NVIDIA Nsight Systems 优化 CUDA 内存传输。有关 NVTX 的更多信息,请参阅CUDA Pro 提示:使用 NVTX 生成自定义应用程序配置文件时间轴。
3. CUB:直接在 GPU 上使用 Express 算法
在处理常见算法时,编写自定义内核容易出错,并且极有可能导致实现效率低下。无论对于设备端模式还是内核内基元,建议尽可能使用 CUB。
CUB 是通过 CCCL 提供的 NVIDIA 并行算法库。它以多种粒度呈现高度优化的例程:设备级 (cub::Device*) 、块级 (cub::Block*) 和线程束级 (cub::Warp*) 。
对于 RGB 到灰度的步骤,我们可以将自定义内核替换为 cub::DeviceTransform::Transform。它将用户提供的函数应用于输入迭代器的元组,并将结果写入输出迭代器,在 GPU 上执行:
// Use CUB to convert the RGB images to grayscale
cub::DeviceTransform::Transform(
    cuda::std::make_tuple(d_image_r, d_image_g, d_image_b),  // inputs
    d_image_gray,                                            // output
    IMAGE_SIZE,                                              // size
    [] __host__ __device__ (pixel_t r, pixel_t g, pixel_t b) // functor
    {
        return static_cast<pixel_t>(0.299f * r + 0.587f * g + 0.114f * b);
    },
    stream);
对于中间值,手动对并行块级排序进行编程既复杂又缓慢。相反,我们直接在内核中利用 CUB 的块级基数排序:
// Declare and allocate the storage for CUB BlockRadixSort
using BlockRadixSort = cub::BlockRadixSort<...>;
__shared__ typename BlockRadixSort::TempStorage temp_storage;

// Load the tile's grayscale value from global memory
pixel_t thread_keys[1];
thread_keys[0] = d_image_gray(y, x);

// Perform the thread-block-level radix sort
BlockRadixSort(temp_storage).Sort(thread_keys);

// Select the thread found at the middle index
// Write its value which is, after sorting, the median, in the global median array
if (block_idx.x == TILE_WIDTH / 2 && block_idx.y == TILE_WIDTH / 2)
    d_median(grid_block_idx.y, grid_block_idx.x) = thread_keys[0];
作出此更改后,我们再次使用 Nsight Systems 进行基准测试:

计算中值所需的时间现在只有 773 微秒 (同样,在 computeMedian yellow 弹出式图像中查看消耗时间) ,速度提高了 2717 倍。现在,计算全部三张图像的总时间为 635 毫秒,速度提高了 10 倍。
如果我们重新评估当前瓶颈:在内存分配上花费的时间约占总图像计算运行时的 83%。
这可以得到很大的改进。
4. 池化内存容器:便捷、快速的内存管理
使用 cudaMalloc 分配 GPU 显存可能会产生意想不到的负面影响:忘记调用 cudaFree 而造成泄露,以及在代码的关键部分进行昂贵的内存操作。
相反,我们建议使用 CCCL 的异步内存容器 cuda::device_buffer。与 C++ std::vector 类似,一旦容器超出范围,内存将自动取消分配。
此外,内存池支持缓冲区,因此重复分配和取消分配无法支付每次 cudaMalloc/ cudaFree 的全部成本。
为使用 GPU 显存容器,我们会相应地更新代码:
// Resource to handle the GPU memory allocations
cuda::device_memory_pool_ref device_resource = cuda::device_default_memory_pool(cuda::device_ref{0});

// Explained at a later stage, unimportant for now
cuda::stream stream{cuda::device_ref{0}};

// Allocate the GPU memory using uninitialized containers
cuda::device_buffer<pixel_t> d_image_r = cuda::make_buffer<pixel_t>(stream, device_resource, IMAGE_SIZE, cuda::no_init);
...
更改后,我们将再次分析时间轴:
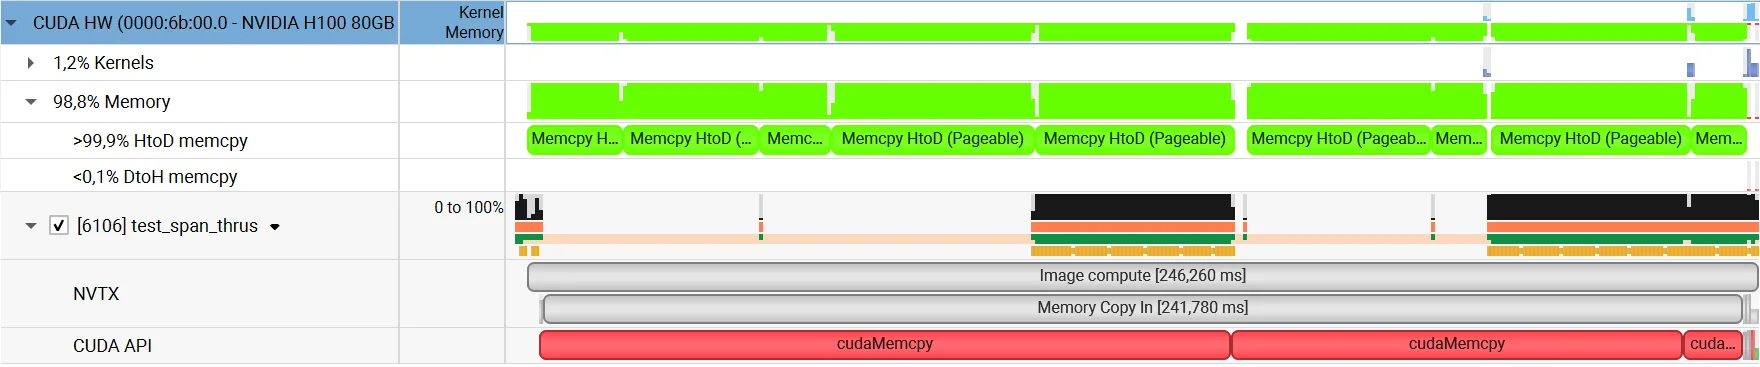
现在,分配内存所花费的时间几乎不复存在;计算图像所需的时间缩短了 2.6 倍。
GPU 时间现在以内存为主。在计算所有图像时,几乎所有时间都花在从 CPU 到 GPU 的三个图像的红色、绿色和蓝色上。
可以大幅加速主机到设备的内存传输。
5. 固定显存:更快的主机到设备显存传输
CPU 数据分配默认可分页,GPU 无法直接访问。CUDA 驱动程序必须首先分配一个临时的锁页或固定主机阵列,将主机数据复制到固定阵列,然后将数据从固定阵列传输到设备内存。
当预先知道 CPU 内存将复制到 GPU 时,建议使用固定内存直接分配。
CCCL 提供了一个固定内存主机容器 cuda::host_buffer,可通过 cuda::make_pinned_buffer 工厂进行构建:
// Allocate the CPU memory to store the image tiles, medians, and for the red, green, blue, and grayscale images
// Those CPU containers, contrary to std::vector, are allocated using pinned memory
std::vector<cuda::host_buffer<pixel_t>> h_images_r(NB_IMAGES, cuda::make_pinned_buffer<pixel_t>(stream, IMAGE_SIZE, ...));
...
作出这些更改后,我们可以再次进行基准测试:
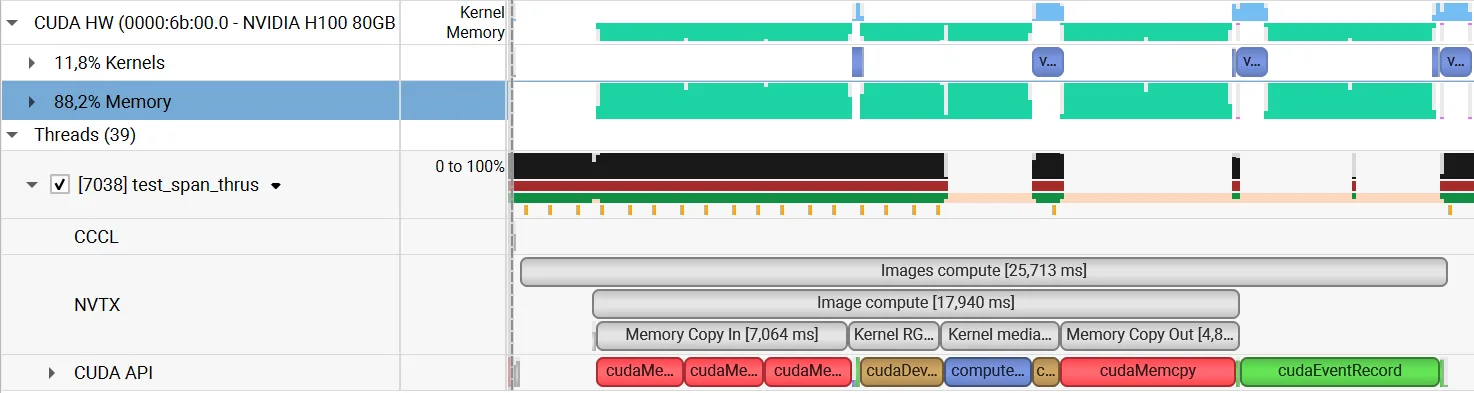
主机到设备内存传输所需的时间已显著缩短;现在计算所有图像只需 25 毫秒,速度提高了 10 倍。
有关固定内存的更多信息,请参阅如何在 CUDA C/ C++ 中优化数据传输。
从一开始,一些读者就注意到了一种惊人的行为:
虽然我们使用不同的 CPU 线程,但所有操作 (内存和内核) 都是在 GPU 上依次执行的。
我们来解决这个问题。
6. 流:在 GPU 上并行处理运算
默认情况下,所有操作 (核函数、内存分配或传输) 均在我们所说的默认流上启动:默认流可被视为 GPU 按顺序执行的任务队列。
在本示例中,我们需要为每个图像/ 线程创建流。CCCL 提供 cuda::stream,这是一个拥有自管理版本的 CUDA 流。它可以在并行的 for 循环中简单构建,因此每个 OpenMP 线程都会获得自己的 GPU 工作队列。
为了有效利用流,我们还需要使用异步 API:CPU 启动的每个 GPU 操作不应等待完成。为了使 GPU 饱和,每个 CPU 线程应尽可能快地启动尽可能多的操作,而无需等待它们首次完成。默认情况下,核函数和 CUB 设备调用已经是异步的,并且会在通过的流上启动。要在主机和设备之间启动异步副本,我们使用新的 CCCL cuda::copy_bytes API。
建议在任何现代 CUDA 代码中永远不要依赖默认流,并始终依赖流。
我们会相应地更新代码:
专用的 init_stream 用于固定主机缓冲区的初始分配。现在,并行 for 循环的每个迭代都为计算管道拥有自己的 cuda::stream:
// Stream used for initial host buffer allocations
cuda::stream init_stream{cuda::device_ref{0}};

...

// Allocate the host pinned buffers on init_stream:
std::vector<cuda::host_buffer<pixel_t>> h_images_r(NB_IMAGES, cuda::make_pinned_buffer<pixel_t>(init_stream, IMAGE_SIZE, ...));

...

// Sync before launching operations on another stream:
init_stream.sync();

#pragma omp parallel for
for (int i = 0; i < NB_IMAGES; ++i)
{
    // One different stream per thread
    cuda::stream stream{cuda::device_ref{0}};

    ...

    // GPU buffer allocations using the stream owned by each thread
    cuda::device_buffer<pixel_t> d_image_r = cuda::make_buffer<pixel_t>(stream, device_resource, IMAGE_SIZE, cuda::no_init);

    ...

    // Copy the memory of each container from CPU to GPU asynchronously using the stream owned by each thread
    cuda::copy_bytes(stream, h_images_r[i], d_image_r);

    ...

    // Use CUB to convert the RGB images to grayscale asynchronously using the per thread stream
    cub::DeviceTransform::Transform(..., stream.get());

    // Launch the GPU kernel to compute the median of every tile in the image using the per thread stream
    cuda::launch(stream, ...);

    // Copy the GPU median memory back to the CPU
    cuda::copy_bytes(stream, d_median, h_medians[i]);

    ...


    // To make sure the copy bytes is finished before accessing results on the host
    stream.sync();
}
作出这些更改后,我们可以最终查看时间轴:

现在,内核和内存复制之间完全重叠。
经过所有改进后,计算全部三张图像的最终时长为 23 毫秒,从 6.8 秒开始。
轮到您了
借助 CUDA 开发者工具箱,我们使代码更安全、更易于维护且速度更快。虽然没有使用底层优化,但代码的速度提高了 300 倍。
自己试用此代码,如果您愿意,也可以在Google Colab上运行。
我们还构建了一个完整的课程来学习如何详细使用这些工具。您可以在 YouTube 上免费获取该模型,以及 Google Colab 上的练习链接。