
开发者现在可以在现有的大型 C++ GPU 代码库中使用 NVIDIA CUDA Tile 编程,使用基于 Tile 的抽象来开发高度优化的 GPU 内核。
NVIDIA CUDA Tile 随 CUDA 13.1 推出,引入了基于图块的 GPU 编程模型。CUDA Tile 作为顶层语言与高级编程语言之间的中间层,可自动利用 NVIDIA 硬件的高级功能(包括 Tensor Core、共享内存和 Tensor 内存加速器),而无需应用程序直接针对这些硬件特性进行编程。
Python 是首个支持基于图块的 GPU 应用程序的编程语言。最新发布的 CUDA 13.3 增加了对使用 C++ 编写图块化核函数的支持,使开发者能够构建高度优化的 GPU 核函数。
什么是 CUDA Tile C++?
CUDA Tile C++ 是基于 CUDA Tile IR 规范构建的 C++ 编程模型,用于表达 CUDA Tile 编程。它使开发者能够使用 C++ 编写平铺的核函数,并采用基于平铺的模型来表示 GPU 核函数,从而替代或补充传统的单指令多线程(SIMT)模型。
回顾一下,在图块模型中:
- 多维数组是主要的数据存储。
- 图块是核函数所使用的数组的一部分。
- 内核是按块并行执行的函数。
- 块是 GPU 的子集;图块上的操作在每个块中的所有线程之间并行化。
CUDA Tile C++ 可自动处理块内的并行性,以及异步、内存移动和 GPU 编程的其他低级细节。CUDA Tile C++ 可移植到不同的 NVIDIA GPU 架构中,使开发者能够使用最新的硬件功能,而无需重写代码。
CUDA 平铺 C++ 向量添加示例
熟悉 CUDA C++ for SIMT 的开发者可能遇到过典型向量加法核函数。假设数据已存储在 GPU 上,则 CUDA SIMT 中的向量加核可获取两个向量,并按元素将其相加,以生成第三个向量。这是编写最简单的 CUDA 核函数之一。如下所示。
__global__ void vecAdd(float* A, float* B, float* C, int vectorLength){ /* calculate my thread index */ int workIndex = threadIdx.x + blockIdx.x*blockDim.x; if(workIndex < vectorLength) { /* perform the vector addition */ C[workIndex] = A[workIndex] + B[workIndex]; }} |
在此内核中,显式指定了每个线程的工作,程序员在启动此内核时,将指定要启动的块和线程的数量。
查看使用 CUDA Tile C++ 编写的等效代码,无需指定每个线程的功能。只需将数据分解为图块,并为这些图块指定数学运算即可。其他一切都可以处理。
CUDA 平铺 C++ 内核如下所示:
#include "cuda_tile.h"__tile_global__ void vectorAdd(float* a, float* b, float* out, size_t n) {/* set up the namespace */ namespace ct = cuda::tiles; using namespace ct::literals;/* attach shape to raw pointers */ auto aSpan = ct::tensor_span{a, ct::extents{n}}; auto bSpan = ct::tensor_span{b, ct::extents{n}}; auto oSpan = ct::tensor_span{out, ct::extents{n}};/* partition each span into tiles of size 8 */ auto aView = ct::partition_view{aSpan, ct::shape{8_ic}}; auto bView = ct::partition_view{bSpan, ct::shape{8_ic}}; auto oView = ct::partition_view{oSpan, ct::shape{8_ic}};/* load the a and b tiles from global memory */ int bx = ct::bid().x; auto aTile = aView.load(bx); // load bx-th tile auto bTile = bView.load(bx);/* add the two tiles together, elementwise */ auto oTile = aTile + bTile;/* store the result tile to the output partition. */ oView.store(oTile, bx); } |
这看起来像一个简单的 vectorAdd 核函数的大量代码。别担心。这个过于冗长的内核用于按顺序显示所有步骤。接下来是使用更少的代码行执行相同操作的简化版本。
- 第一个区别是使用
__tile_global__向编译器表明这是一个平铺式内核。数组指针和数组大小作为参数传递,就像它们在 SIMT 内核中一样。
__tile_global__ void vectorAdd(float* a, float* b, float* out, std::size_t n) { |
- 然后,为
cuda::tiles和ct::literals设置命名空间。
namespace ct = cuda::tiles; using namespace ct::literals; |
- 为三个数组分别使用此代码
ct::tensor_span创建一个张量范围。张量范围本质上是指向内存中多维数组的指针,类似于 C++ 23std::mdspan。张量范围包含有关数组形状 (范围) 以及数组元素布局 (例如,行主或列主) 的信息。ct::extents{}告知张量范围数组的维度。一维数组使用n。
auto aSpan = ct::tensor_span{a, ct::extents{n}};auto bSpan = ct::tensor_span{b, ct::extents{n}};auto oSpan = ct::tensor_span{out, ct::extents{n}} |
- 现在,根据张量范围和图块形状创建分区视图。分区视图是张量范围的封装器,可将数组表示为一系列不重叠的固定大小分区。每个分区的大小由 shape 参数指定,该参数必须是编译时参数。在本示例中,
8_ic是由ct::literals.ct::shape<8>{}定义的整数常量,而ct::shape{8_ic}在此上下文中是等价的。创建的分区视图本质上是原始数组,分为 8 块,即图块大小。
auto aView = ct::partition_view{aSpan, ct::shape{8_ic}};auto bView = ct::partition_view{bSpan, ct::shape{8_ic}};auto oView = ct::partition_view{oSpan, ct::shape{8_ic}}; |
- 通过使用
ct::bid().x.获取 X 维度中的块索引来加载输入图块。如果使用多维块,请同时使用 Y 和 Z 维度。然后加载a和b图块。为方便起见,请使用 auto,但为了明确起见,aTile和bTile的类型为ct::tile<float, ct::shape<8>>>。它们是大小为 8 的一维图块,元素类型为 float。在分区视图中,可以轻松传入块索引。加载函数会自动获取正确的数组块,并将其加载到图块中。
int bx = ct::bid().x;auto aTile = aView.load(bx); auto bTile = bView.load(bx); |
- 添加和存储结果。这是一行代码,在输入图块上执行元素级加法,并将其存储在输出图块中。将该输出图块存储到
oView分区视图中,并按照 X 维度bx中相同的块索引进行索引。
/* add the two tiles together, elementwise. */auto oTile = aTile + bTile;/* store the result tile to the output partition. */oView.store(oTile, bx); |
完整向量添加示例
以下示例展示了如何通过一段完整、可运行的代码,在 C++ 中调用此向量并添加核函数。
为了帮助编译器进行优化,需要注意以下几点。
首先,为获得最佳性能,应仅在核函数运行时通过其各自的指针访问输入和输出数组。若为 true,则数组不会出现锯齿 (使用其他指针或符号访问) 。使用 __restrict__ 装饰器标记数组指针会将此信息传达给编译器。
使用基指针并结合16字节边界对齐的数组,有助于编译器生成更高效的内存访问模式。通过为每个核函数参数调用 ct::assume_aligned<16>,可告知编译器该指针已对齐,并应使用该调用的返回值,以便编译器能充分利用此对齐特性。由 cudaMalloc 或类似 CUDA API 返回的指针始终能满足这一要求,因为它们具有 256 字节的对齐方式,如 此链接 所述。
最后,使用大于 8 的图块大小。对随后的可运行代码进行这些调整,并添加 load_masked 和 store_masked 的用法,后者用于处理可能无法被图块大小整除的数据。
以下是完整的代码,包括内核和主函数。请注意应用的优化和减少的详细程度。
#include <cstdio>#include <cstdlib>#include "cuda_tile.h"__tile_global__ void vectorAdd(float* __restrict__ a, float* __restrict__ b, float* __restrict__ out, size_t n) { namespace ct = cuda::tiles; using namespace ct::literals; a = ct::assume_aligned(a, 16_ic); b = ct::assume_aligned(b, 16_ic); out = ct::assume_aligned(out, 16_ic); int bx = ct::bid().x; /* create partition views for the input tiles and load them */ auto aTile = ct::partition_view{ct::tensor_span{a, ct::extents{n}}, ct::shape{1024_ic}}.load_masked(bx); auto bTile = ct::partition_view{ct::tensor_span{b, ct::extents{n}}, ct::shape{1024_ic}}.load_masked(bx); /* add the two tiles together, elementwise. */ auto oTile = aTile + bTile;/* create the partition view for the output tile and then store the output tile*/ auto oView = ct::partition_view{ct::tensor_span{out, ct::extents{n}}, ct::shape{1024_ic}}; oView.store_masked(oTile, bx);} /* define a macro to check for CUDA errors */#define checkCudaError(X) do {\ auto ret = X;\ if (ret != cudaSuccess) {\ printf("\n error on line %d, CUDART error string : %s", __LINE__, cudaGetErrorString(ret));\ exit(1);\ }\} while (0)int main() { constexpr size_t N = 2ULL << 25; constexpr int TILE_SIZE = 1024; constexpr int BLOCKS = (N + TILE_SIZE - 1) / TILE_SIZE;/* declare and allocate the host arrays */ float* h_a = (float*)malloc(sizeof(float) * N); float* h_b = (float*)malloc(sizeof(float) * N); float* h_out = (float*)malloc(sizeof(float) * N);/* initialize the host arrays */ for (size_t idx = 0; idx < N; ++idx) { h_a[idx] = (float)rand() / RAND_MAX; h_b[idx] = (float)rand() / RAND_MAX; h_out[idx] = -1.0f; }/* declare the device arrays */ float* d_a{nullptr}; float* d_b{nullptr}; float* d_out{nullptr};/* allocate the device arrays */ checkCudaError(cudaMalloc(&d_a, sizeof(float) * N)); checkCudaError(cudaMalloc(&d_b, sizeof(float) * N)); checkCudaError(cudaMalloc(&d_out, sizeof(float) * N));/* copy the host arrays to the device arrays */ checkCudaError(cudaMemcpy(d_a, h_a, sizeof(float) * N, cudaMemcpyHostToDevice)); checkCudaError(cudaMemcpy(d_b, h_b, sizeof(float) * N, cudaMemcpyHostToDevice));/* initialize the device output array to 0 */ checkCudaError(cudaMemset(d_out, -1, sizeof(float) * N));/* launch the kernel */ vectorAdd<<<BLOCKS, 1>>>(d_a, d_b, d_out, N);/* synchronize the device and check for errors */ checkCudaError(cudaDeviceSynchronize());/* copy the device array out back to the host */ checkCudaError(cudaMemcpy(h_out, d_out, sizeof(float) * N, cudaMemcpyDeviceToHost));/* compare the results to host results */ float max_err = 0.0f; for (size_t idx = 0; idx < N; ++idx) { float expected = h_a[idx] + h_b[idx]; max_err = fmaxf(max_err, fabsf(h_out[idx] - expected)); } printf("N: %zu\n", N); printf("Max error: %e\n", max_err); checkCudaError(cudaFree(d_a)); checkCudaError(cudaFree(d_b)); checkCudaError(cudaFree(d_out)); free(h_a); free(h_b); free(h_out);} |
如果您熟悉 SIMT 核函数的启动过程,也会经历类似的过程,但需要进行特定的修改。此内核的启动方式如下:
vectorAdd<<<BLOCKS, 1>>>(d_a, d_b, d_out, N); |
启动图块核函数时,<<<>>> 中的第一个参数是图块数量 (在 SIMT 中,这是线程块的数量) 。第二个参数必须为 1。用于执行核函数的线程数由编译器决定;在启动平铺核函数时,始终将 1 作为此参数。
使用 NVIDIA Ampere 架构或更新版本的 GPU 在计算能力 8.0 上运行 CUDA 13.3 或更高版本时,这些命令会创建以下输出。
调整 -arch sm_120 命令以匹配架构,在使用 cuda_tile.h 时加入 -std=c++20,并加入 --enable-tile 选项以编译平铺内核。
$ nvcc -std=c++20 --enable-tile -arch sm_120 -o vectorAdd vectorAdd.cu$ ./vectorAddN: 67108864Max error: 0.000000e+00 |
这完成了第一个 CUDA Tile C++ 程序。
开发者工具
可以使用 NVIDIA Nsight Compute 以与 SIMT 内核相同的方式分析 Tile C++ 内核。以下命令展示了如何使用 Nsight Compute 创建配置文件。
$ ncu -o VecAddProfile --set detailed ./vectorAdd |
使用 Nsight Compute 的图形版本创建并打开后:
- 从下拉菜单中选择
vectorAdd内核。 - 选择“Details” (详细信息) 选项卡
- 展开“Tile Statistics” (图块统计数据) 报告部分
图 1 显示了 Nsight Compute 生成的配置文件。
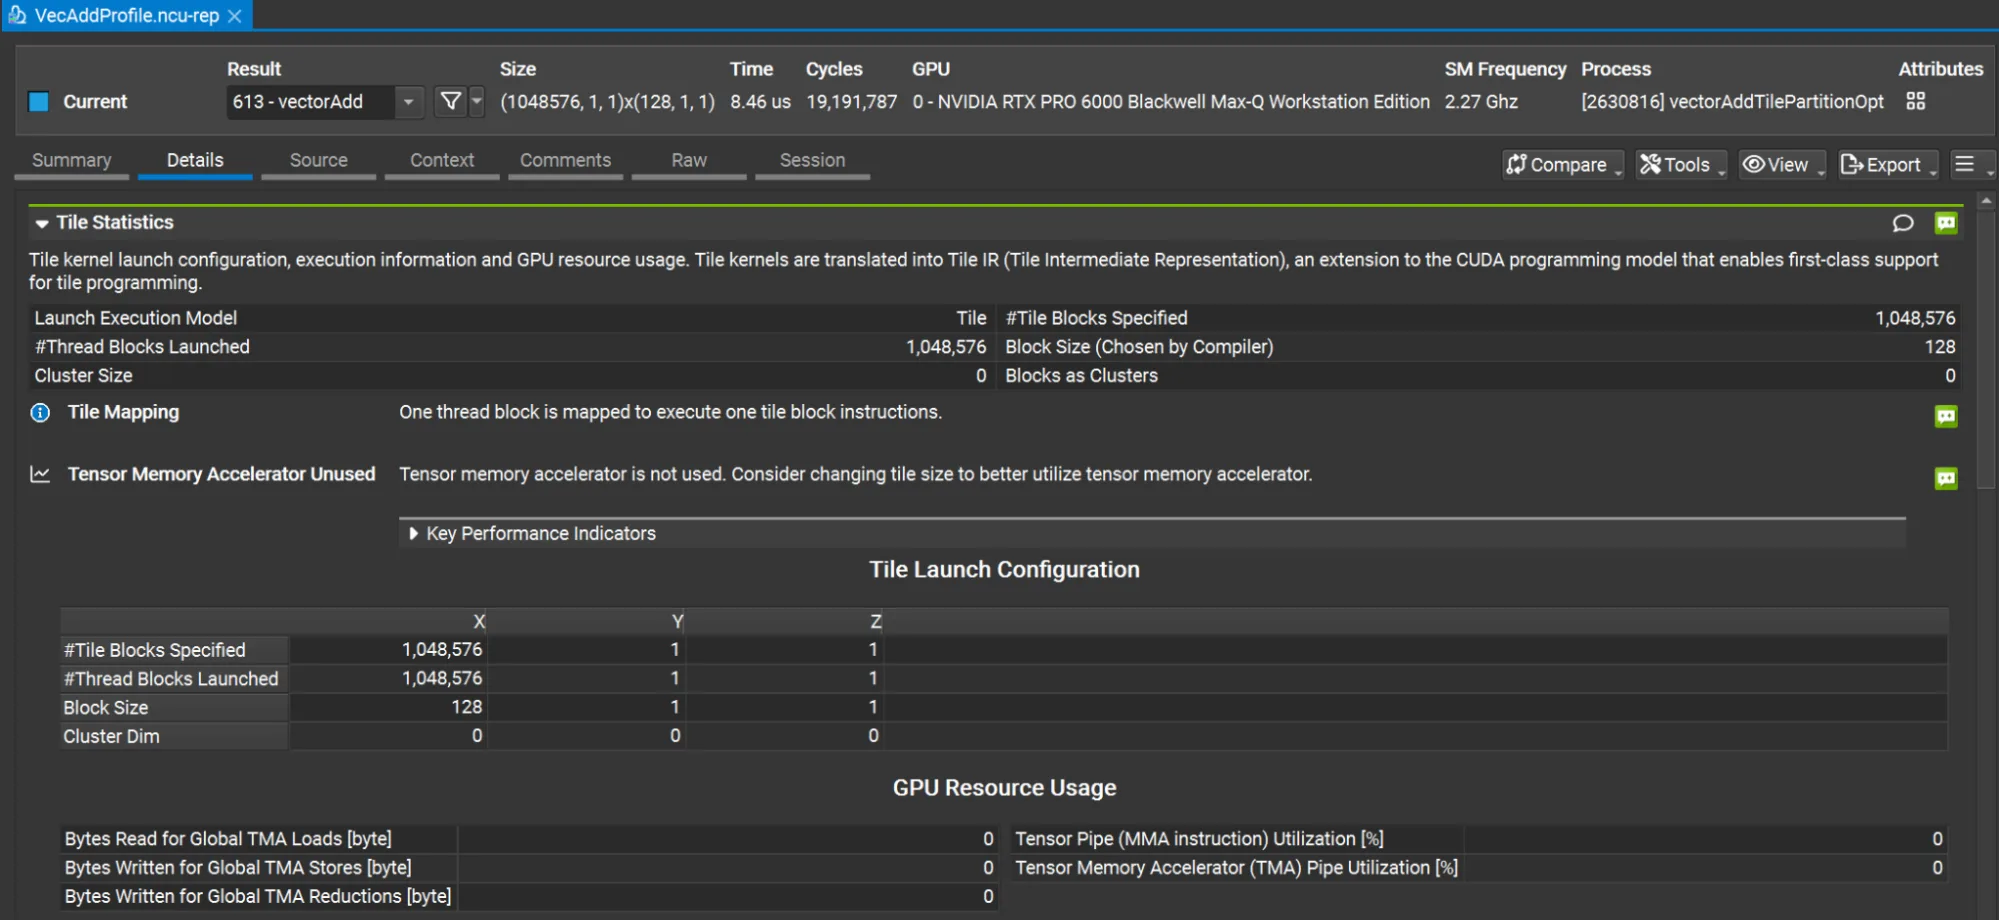
请注意,“图块统计数据”报告部分包括指定的图块块数量、块大小 (由编译器选择) 和其他图块特定信息。
与 CUDA C++ 核函数一样,源页面还支持源代码级别的平铺核函数和性能指标。
矩阵乘法
之前的示例展示了 vectorAdd 加载和存储分区视图的详细信息。此矩阵乘法示例说明了如何使用非常简单的代码来表示矩阵乘法。
此内核执行 MxK 乘 KxN 矩阵乘法,以计算 MxN 矩阵。在此内核中,M = 8、N = 16 和 K 可以是可变的,前提是它是 8 的倍数。设置 K = 24。这些极小的尺寸仅用于说明概念。
接下来是完整的内核,以及亮点概述。
#include "cuda_tile.h"/* this kernel multiplies MxK and KxN matrices, where M=8 and N=16. K is variable but must be divisible by 8.*/__tile_global__ void kernel(float* __restrict__ a, float* __restrict__ b, size_t length, float* __restrict__ c) { namespace ct = cuda::tiles; using namespace ct::literals; a = ct::assume_aligned(a, 16_ic); b = ct::assume_aligned(b, 16_ic); c = ct::assume_aligned(c, 16_ic); auto aShape = ct::extents{8_ic, length}; auto bShape = ct::extents{length, 16_ic}; auto cShape = ct::extents{8_ic, 16_ic}; auto aSpan = ct::tensor_span{a, aShape}; auto bSpan = ct::tensor_span{b, bShape}; auto cSpan = ct::tensor_span{c, cShape}; auto aView = ct::partition_view{aSpan, ct::shape{4_ic, 8_ic}}; auto bView = ct::partition_view{bSpan, ct::shape{8_ic, 4_ic}}; auto cView = ct::partition_view{cSpan, ct::shape{4_ic, 4_ic}}; using f32x4x4 = ct::tile<float, ct::shape<4, 4>>; auto accTile = ct::full<f32x4x4>(0); auto [xBlock, yBlock, dummy] = ct::bid(); for (auto idx : ct::irange(0, 1 + int(length - 1) / 8)) { auto aTile = aView.load_masked(xBlock, idx); auto bTile = bView.load_masked(idx, yBlock); accTile = ct::mma(aTile, bTile, accTile); } cView.store_masked(accTile, xBlock, yBlock);} |
- 使用
ct::extents对象为a, b,和c矩阵创建范围。使用编译或运行时值。M = 8,N = 16,但 K 是可变的。这些参数用于在下一步中创建张量范围。
auto aShape = ct::extents{8_ic, length};auto bShape = ct::extents{length, 16_ic};auto cShape = ct::extents{8_ic, 16_ic}; |
- 创建张量范围。其中包含有关
a、b和c的信息,以便创建分区视图。
auto aSpan = ct::tensor_span{a, aShape};auto bSpan = ct::tensor_span{b, bShape};auto cSpan = ct::tensor_span{c, cShape}; |
- 创建
a、b和c的分区视图,其中a分区为 4 × 8,b视图为 8 × 4。只要正确划分为a和b值,就可以进行调整。这些维度还决定了c视图是 4 × 4。
auto aView = ct::partition_view{aSpan, ct::shape{4_ic, 8_ic}};auto bView = ct::partition_view{bSpan, ct::shape{8_ic, 4_ic}};auto cView = ct::partition_view{cSpan, ct::shape{4_ic, 4_ic}}; |
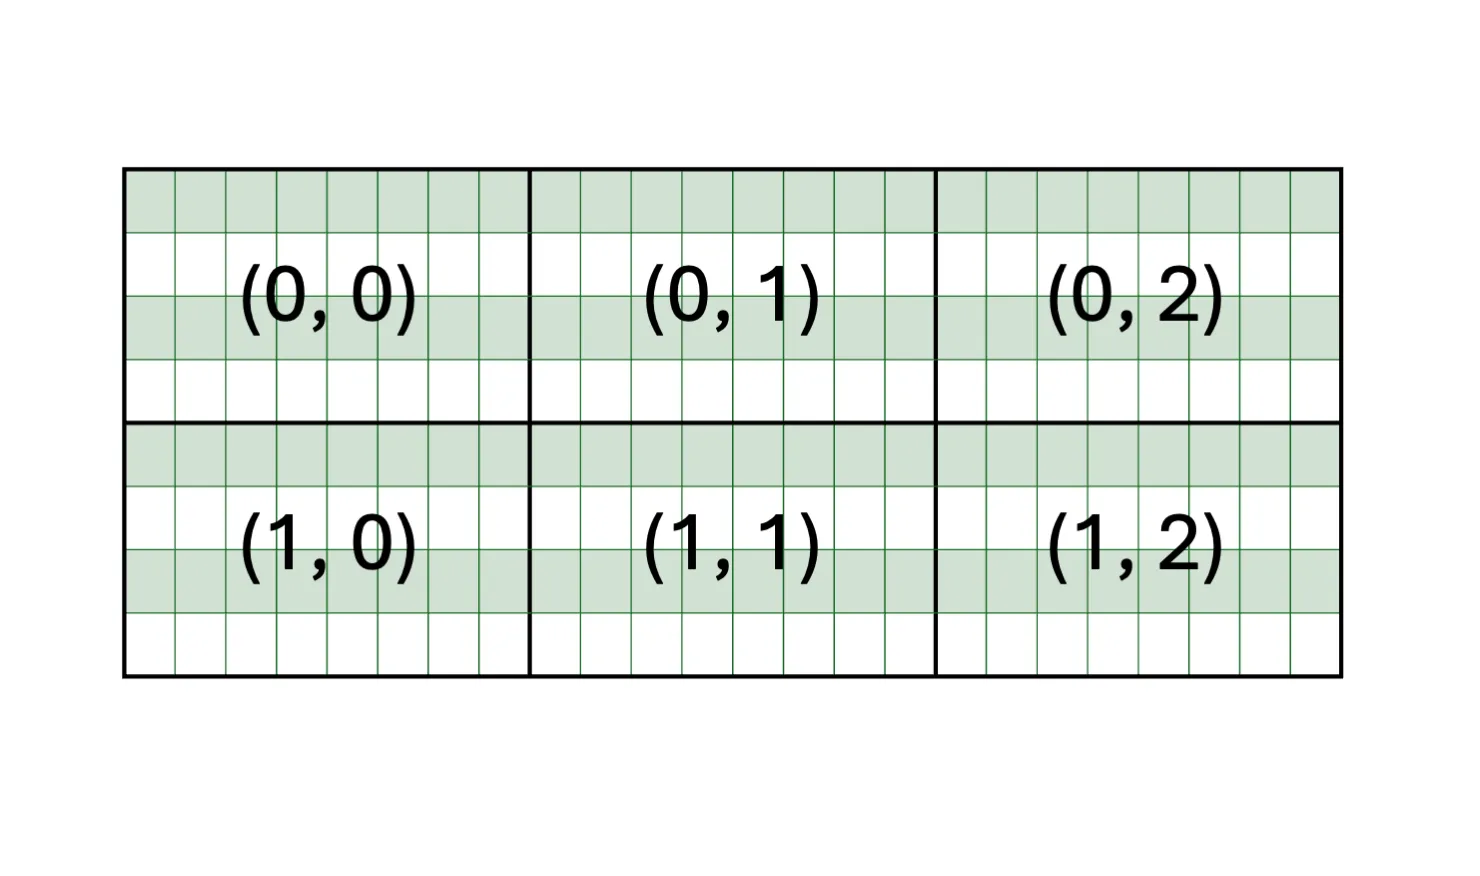
2D 分区以 2 个维度进行索引。a 矩阵为 8* 24,分区视图为 4* 8,如图 2 所示。
aView 和 bView 的分区视图大小也决定了 accTile 的形状,即用于在矩阵乘法期间累积结果的图块。在本示例中,accTile 是一个 4 × 4 图块,与 cView 的形状相匹配。
using f32x4x4 = ct::tile<float, ct::shape<4, 4>>;auto accTile = ct::full<f32x4x4>(0); |
- 使用
ct::bid执行循环,以获取三维中的块索引。循环从 0 迭代到长度/ 8,对应整体 K 维度除以 8。除以 8 与aView的 K 维相匹配,bView为 8。在循环内部,使用load_masked加载a和b中的图块,并调用ct::mma执行矩阵乘法,以accTile累加结果。
auto [xBlock, yBlock, dummy] = ct::bid();for (auto idx : ct::irange(0, int(length / 8))) { auto aTile = aView.load_masked(xBlock, idx); auto bTile = bView.load_masked(idx, yBlock); accTile = ct::mma(aTile, bTile, accTile);} |
- 将
accTile的值存储到c(即cView) 的分区视图中。就是这样。大多数内核代码都涉及到为数据设置视图以及加载/ 存储数据。内核的计算部分很简单。
cView.store_masked(accTile, xBlock, yBlock); |
- 启动内核。考虑到
cView的尺寸,请使用dim3(2,4)。cView是 4 × 4,表示每个块都在计算 C 矩阵的 4 × 4 块。由于C是 8 × 16,因此将cView维度除以 C 矩阵维度。由于 8/ 4 = 2 和 16/ 4 = 4 会使用dim3(2,4)启动核函数。
kernel<<<dim3(2, 4), 1>>>(d_a, d_b, K, d_c); |
立即开始使用 CUDA Tile C++
运行 CUDA Tile C++ 程序需要以下内容:
- 具有 8.x 或更高版本计算能力的 GPU。
- NVIDIA 驱动 R580 或更高版本。如果平铺核函数需要 JIT 编译,则 NVIDIA 驱动程序版本必须等同于或更新与用于生成代码的 CUDA 工具包关联的版本。例如,CUDA 工具包 13.3 需要 R610 或更高版本的驱动程序。
- CUDA 工具包 13.3
基于图块的编程功能现已面向 C++ 开发者开放。立即查阅 文档、API 参考手册,及 CUDA 工具包 13.3,开始编写平铺 C++ 核函数,体验加速计算的新标准。
致谢
感谢 NVIDIA 贡献者 Jaydeep Marathe 和 Ezra Stein。