辅助驾驶开发通常依赖多个相互独立的模型,分别用于轨迹生成、高层级意图预测、场景理解以及数据标注。这种分开的方式使得相关结果难以直接比较,也增加了模型行为分析的难度,同时限制了在整个开发流程中对统一表征的复用。
NVIDIA Alpamayo 2 Super 是一个开放的视觉-语言-动作 (VLA) 推理模型,包含 340 亿参数,旨在加速智能汽车的开发。该模型由 320 亿参数的 NVIDIA Cosmos 3 Super Reasoner,以及一个基于扩散模型、拥有 20 亿参数的 Action Expert 组成,并通过强化学习进行后训练。其中,Reasoner 负责理解多摄像头视频、语言上下文以及运动历史信息;Action Expert 则将模型生成的内部表征转化为未来的自车行驶轨迹。
Alpamayo 2 Super 的感知范围扩展至 360 度全覆盖,最多支持七个摄像头,并能够输出多种互补信息,包括:未来轨迹、因果链推理路径、高层级元动作(Meta-Actions)、基于场景的问答结果,以及推理自动标注。
这种多任务设计为辅助驾驶开发者在开发流程的多个阶段提供了通用的基础。开发者无需在不同阶段分别维护单独的模型,而是可以将同一个基础模型用于离线策略教师、评估工具、数据引擎,或作为新任务定制的起点。
本文将通过实践介绍四种基于 Alpamayo 2 Super 的典型工作流:
- 生成轨迹与因果链推理路径,并在开环与闭环基准测试中评估结果。
- 在生成轨迹的同时预测元动作,例如让行、变道和停车。
- 使用自然语言对多摄像头驾驶场景进行提问,并获取回答。
- 基于自有数据片段生成带有 2D 定位的因果链自动标注。
模型权重已在 Hugging Face 上发布,推理 Notebook 可在 GitHub 上获取。该模型在 OpenMDW-1.1 协议下开放。这是由 Linux 基金会推出的开放模型宽松许可协议,允许对模型进行微调、开发衍生模型以及商业再分发。蒸馏模型可直接用于商业部署,无需再获得 NVIDIA 的额外许可;模型生成的输出内容也不受任何许可协议限制。
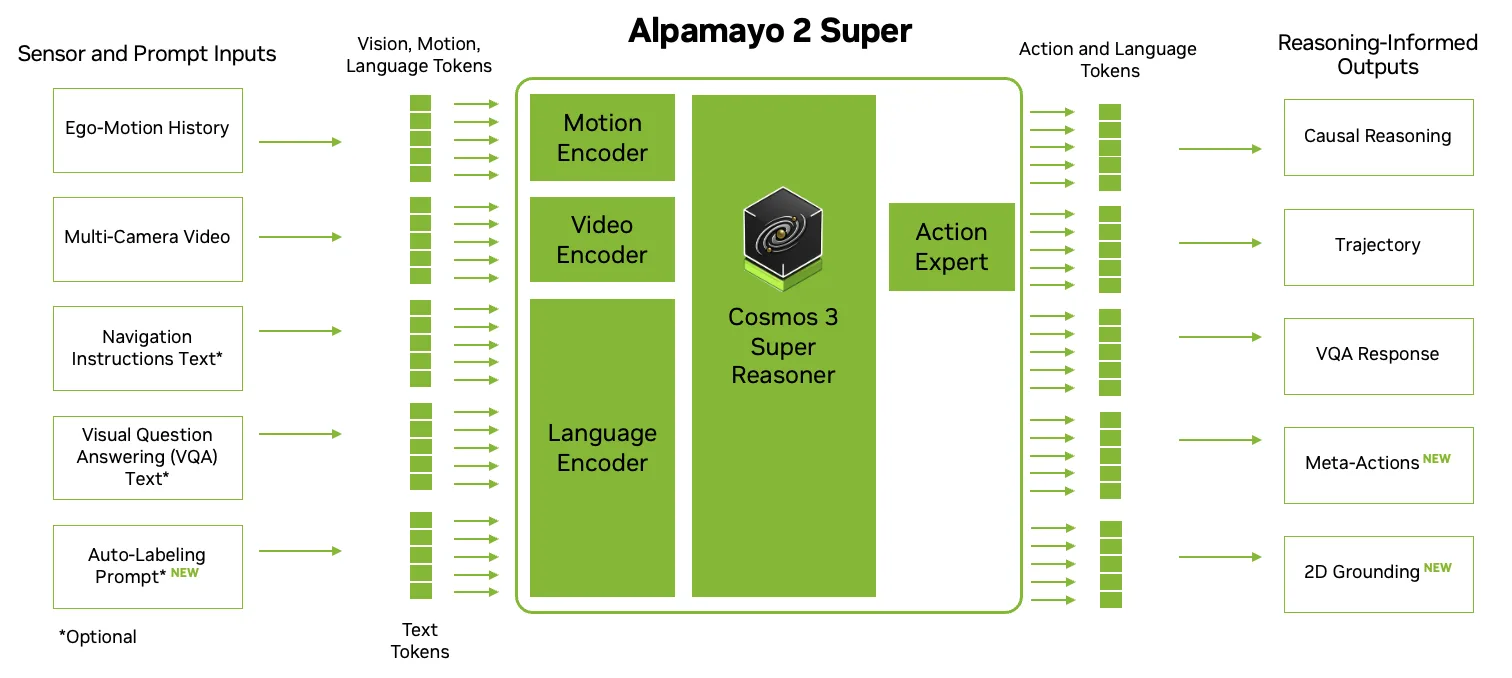 图 1. Alpamayo 2 Super 通过 320 亿参数的 Cosmos 3 Super Reasoner 和 20 亿参数的 Action Expert 处理多模态输入。
规划与逻辑推理
对新场景进行逻辑推理是辅助驾驶中的一个核心问题。无论是穿越施工区域、应对部分被遮挡的行人,处理非常规的路权交互,还是识别突然进入道路的物体,都不仅仅是匹配已有轨迹模式那么简单。一个可靠的驾驶模型需要识别关键的场景上下文,将其与恰当的驾驶决策建立联系,并生成与该决策一致的行动。
轨迹与因果链推理路径是什么?为什么重要?
与其前代模型一致,Alpamayo 2 Super 会同时生成轨迹和因果链推理路径。轨迹描述了自车下一步可能采取的行动,而因果链推理路径则揭示了模型基于所观测到的场景上下文做出该驾驶决策的逻辑。同时提供这两类输出,有助于更直观地理解模型的决策机制,整理复杂案例,将已部署策略与更大规模的教师模型进行对比,并判断问题是源于感知、推理还是动作生成阶段。因果链推理路径可接入 NVIDIA Halos 安全验证流程,从而能够深入了解模型对场景的理解。
这个Alpamayo 2 Super 代码库的推理 Notebook 展示了完整流程:加载环视视频片段、准备自车运动历史,并生成对应的轨迹及其因果链推理路径。核心推理步骤及输出如下所示。
from alpamayo2_super import helper
from alpamayo2_super.load_physical_aiavdataset import load_physical_aiavdataset
from alpamayo2_super.models.alpamayo2_super import Alpamayo2Super
from alpamayo2_super.visualization import plot_inference_result

data = load_physical_aiavdataset(
  "030c760c-ae38-49aa-9ad8-f5650a545d26",
   t0_us=2000000,
)

model = Alpamayo2Super.from_pretrained("nvidia/Alpamayo2-Super", dtype=torch.bfloat16, device_map="cuda:0")
model_inputs = helper.prepare_model_inputs(data, model.config, model.tokenizer)
model_inputs = helper.to_device(model_inputs, "cuda")

torch.cuda.manual_seed_all(42)
with torch.autocast("cuda", dtype=torch.bfloat16):
   pred_xyz, pred_rot, logprob, extra = model.sample_trajectories_from_data(
       data=model_inputs,
       top_p=0.98,
       temperature=0.6,
       num_traj_samples=1,
       diffusion_kwargs={"inference_step": 10},
       return_extra=True,
   )

fig, metadata = plot_inference_result(
   data=data,
   pred_xyz=pred_xyz,
   extra=extra,
)
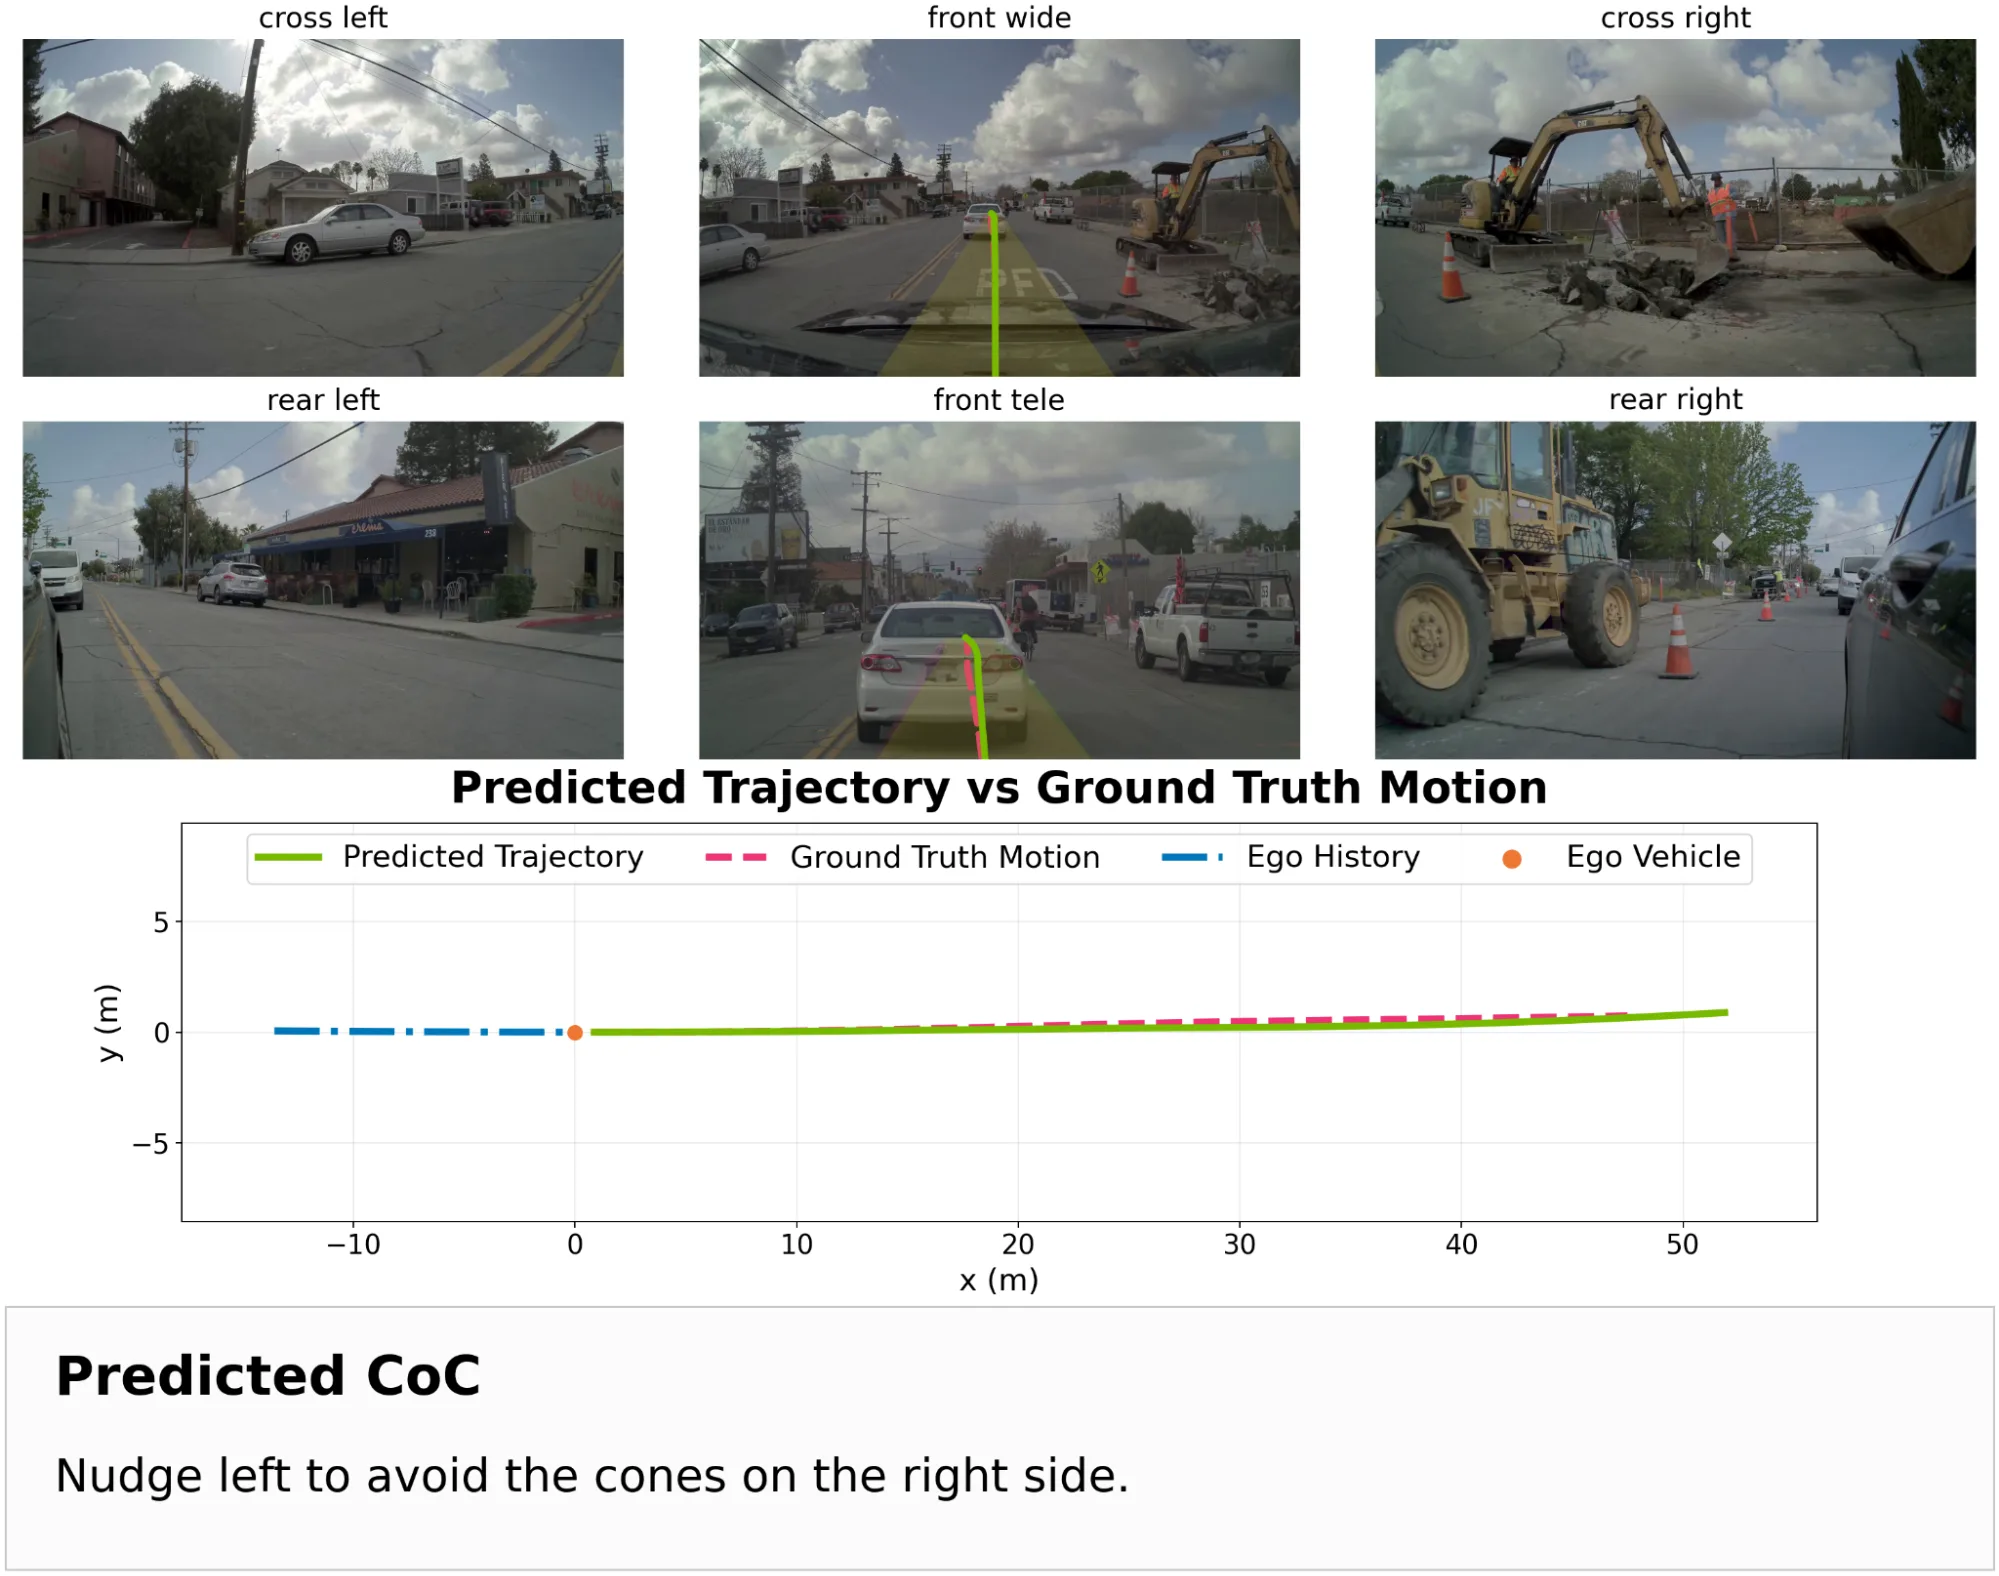 图 2. Alpamayo 2 Super 在复杂场景中的规划表现
评估方法
为了评估模型在推理与轨迹生成方面的表现,可以采用开环评估和闭环评估两种方法。开环评估基于录制的场景,通过将模型生成的轨迹与推理结果与真实标注进行对比来衡量其质量。
Alpamayo 2 Super 在各项评测中取得如下成果:
- 轨迹预测:在物理 AI 辅助驾驶数据集 的 1,434 个高难度样本上,4 秒 minADE_6 达到 0.911 m。
- 辅助驾驶推理:在物理 AI 辅助驾驶推理基准测试上获得433 的得分。
- LingoQA: Alpamayo 2 Super 在 LingoQA 基准测试中获得2 分,在参与评测的 37 个模型中排名第一。其参数规模为 340 亿,得分分别领先 Qwen2.5-VL( 720 亿参数) 17.0 分、Qwen3-VL( 320 亿参数) 7.0 分、Gemini 2.5 Pro 15.1 分,以及 GPT-4o 23.2 分。
minADE_6 值越低,表示轨迹预测越准确;推理得分越高,表示模型表现越好。
然而,开环评估的主要挑战在于,它基于固定的且预先记录的未来轨迹来评估结果,因此无法反映模型执行首个动作之后,整个场景可能发生的连锁变化。
例如,当自车执行变道操作时,开环回放通常仍会让相邻车辆沿其原始记录轨迹继续运动,而不会考虑其对自车行为可能产生的响应。
相比之下,闭环仿真会在场景中逐一执行模型预测的动作,并且当仿真器包含具备反应能力的行为模型时,还能够捕捉周围智能体可能做出的反应。NVIDIA AlpaSim 通过重复执行“观测渲染—策略推理—动作应用”的过程,使开发者能够随时间评估这些闭环效应。
若要在 AlpaSim 评估套件中运行 Alpamayo 2 Super,可使用相应的 shell 命令:
uv run alpasim_wizard deploy=local topology=2gpu driver=alpamayo2
wizard.log_dir=$PWD/tutorial eval.video.video_layouts=[REASONING_OVERLAY]
使用以下 AlpaSim 向导配置:
# Should be used in defaults list, e.g.
# - /driver: alpamayo2
# Type validation happens at driver runtime via OmegaConf.structured merge

defaults:
  - alpamayo_configs    # Camera and simulation configs for 4-cam 10Hz
  - _self_                      # YAML values override schema defaults

# Alpamayo 2 Super Driver Configuration for Alpasim

# Logging level (uses wizard's global setting)
log_level: ${wizard.log_level}

# Model configuration
model:
  model_type: alpamayo2  # Entry-point name in alpasim.models registry
  # HuggingFace model ID (requires cached download or hf authentication in the driver container)
  checkpoint_path: "nvidia/Alpamayo2-Super"
  # # Alternative local path to a pre-downloaded model
  # checkpoint_path: "/mnt/drivers/alpamayo2/Alpamayo2-Super"
  device: "cuda"
  # Enable classifier-free guidance navigation sampling (NOTE: this requires 2 GPUs with at least 70 GB VRAM).
  # Set to true only when sufficient GPU memory is available.
  use_classifier_free_guidance_nav: false

# Server configuration
host: "0.0.0.0"
port: ???

# Inference configuration
inference:
  use_cameras:
     - camera_cross_left_120fov
     - camera_front_wide_120fov
     - camera_cross_right_120fov
     - camera_front_tele_30fov
  max_batch_size: 1  # A2Super is memory intensive, start with batch size 1
  subsample_factor: 1
  context_length: 4  # A2Super uses 4 temporal frames per camera

# Route configuration — A2Super uses language-only navigation, not waypoint commands
route:
  use_waypoint_commands: false

# Output configuration
output_dir: "/mnt/output/driver"

# Trajectory optimization (disabled by default for A2Super)
trajectory_optimizer:
  enabled: false

plot_debug_images: false
在 913 个重建场景上,Alpamayo 2 Super 取得了 1.50 ± 0.13 的 AlpaSim 分数。这一闭环评测结果可对开放环节评测结果形成补充,能够反映碰撞、驶离道路、危险接近以及其他只有在模型策略影响后续观测后才会显现的失效情况。
| 评估类型 | 基准(数据集) | 评估指标 | Alpamayo 2 Super | 参考基线成绩 | 优劣方向 |
| 开环 | 物理 AI 自动驾驶数据集(1,434 个具有挑战性的样本) | minADE_6 @ 6.4 s (m) | 0.911m | Alpamayo 1.5 Nano: 0.916m | 越低越好 |
| 开环 | 物理 AI 自动驾驶推理基准 | 推理得分 | 0.433 | Alpamayo 1.5 Nano: 0.414
GPT-5.5: 0.502 |
越高越好 |
| 开环 | LingoQA | Lingo-Judge得分 | 79.2 | Alpamayo 1.5 Nano: 74.2
Qwen3-VL 32B: 72.2Qwen2.5-VL 72B: 62.2 Gemini 2.5 Pro: 64.1GPT-4o: 56.0 |
越高越好 |
| 闭环 | AlpaSim(基于物理 AI AV NuRec 数据集重建的 910 个场景) | AlpaSim 得分 | 1.50 ± 0.13 | Alpamayo 1.5 Nano: 1.37 ± 0.10 | 越高越好 |
表 1. Alpamayo 2 Super 在长尾驾驶场景中的开环与闭环评估结果
元动作
轨迹能够提供精确的运动描述,但并不总能以简洁方式表达驾驶意图。元动作则从更高层级的决策对规划进行概括,例如让行、变道、停车或加速等。这类输出有助于衔接端到端基础模型与模块化辅助驾驶系统,包括下游规划模块可以直接利用这些决策,评估模块可以检验轨迹几何是否与意图一致,而团队也可以在数据集中检索特定的行为。
生成元动作
元动作 Notebook 展示了如何在示例场景中生成元动作输出。有关支持的元动作完整列表,可参考相关代码列表。核心推理步骤及输出如下所示。
from alpamayo2_super import helper
from alpamayo2_super.load_physical_aiavdataset import load_physical_aiavdataset
from alpamayo2_super.models.alpamayo2_super import Alpamayo2Super
from alpamayo2_super.text_tasks import generate_text, prepare_text_generation_inputs

data = load_physical_aiavdataset(
  "030c760c-ae38-49aa-9ad8-f5650a545d26",
   t0_us=2000000,
)

model = Alpamayo2Super.from_pretrained("nvidia/Alpamayo2-Super", dtype=torch.bfloat16, device_map="cuda:0")
task_inputs = prepare_text_generation_inputs(
   data=data,
   model_config=model.config,
   tokenizer=model.tokenizer,
   task="meta_action",
)
task_inputs = helper.to_device(task_inputs, "cuda")

torch.cuda.manual_seed_all(42)
with torch.autocast("cuda", dtype=torch.bfloat16):
   result = generate_text(
       model,
       task_inputs,
       top_p=0.98,
       temperature=0.6,
       max_new_tokens=512,
   )

cot = result["cot"][0]
meta_action = result["meta_action"][0]
print("Chain-of-Causation:\n", cot)
print("\nMeta-action:\n", meta_action)
评估元动作的准确性
为评估元动作预测的准确性,我们将 Alpamayo 2 Super 的输出与真实标注进行对比,并采用交并比(IoU)来衡量分类性能,分别覆盖横向、纵向及车道相关的三个元动作类别。
在一组包含 9.4 万段、带有真实标签元动作的内部视频片段数据上,Alpamayo 2 Super 在其元动作分类体系中,横向 IoU 为 74.59,纵向 IoU 为 61.91,车道维度 IoU 为 73.55。
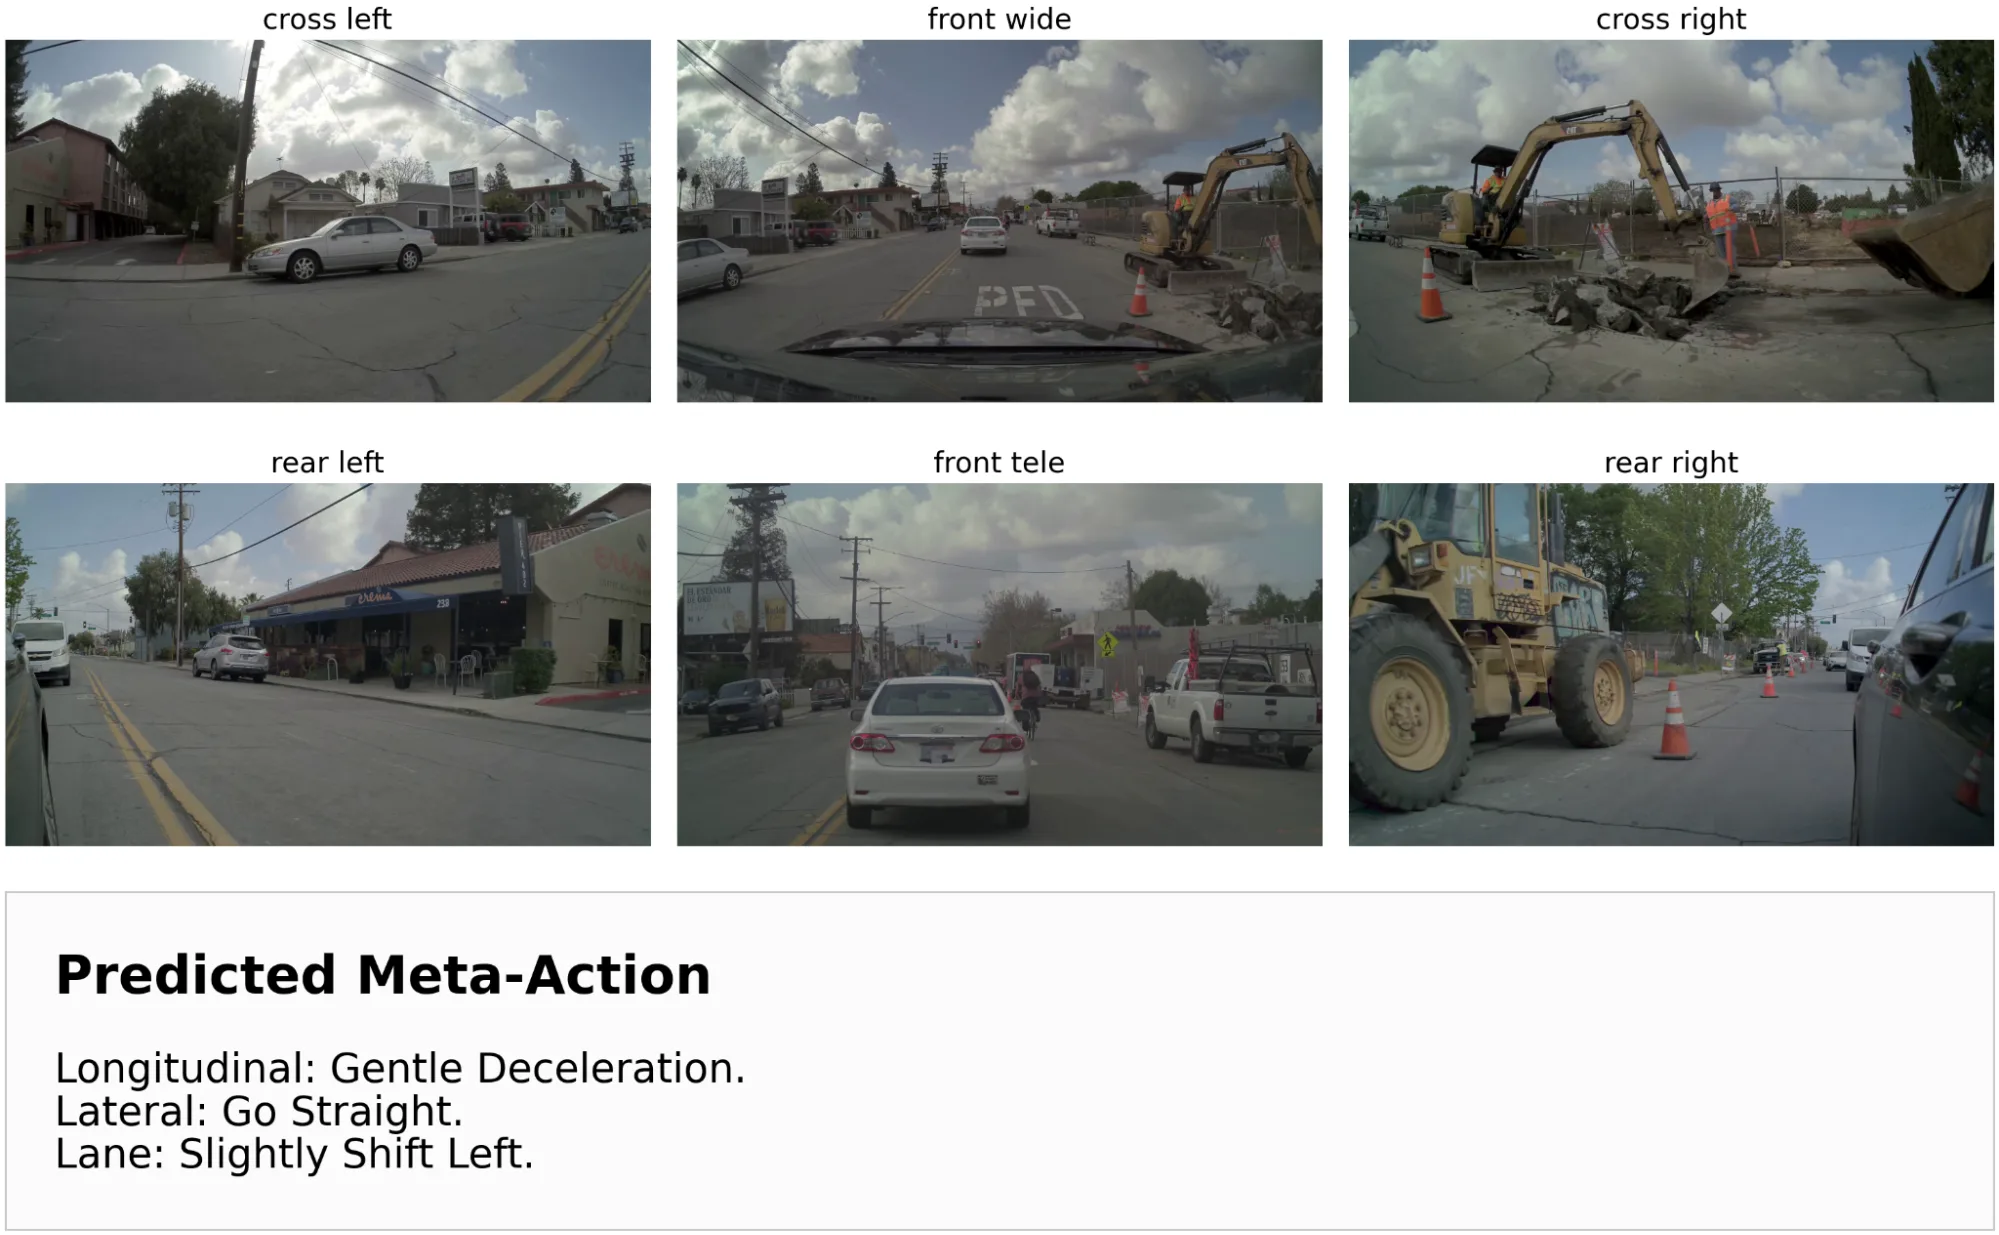 图 3. 对应场景的元动作输出示例
场景理解
规划只是驾驶基础模型的一种应用方式。视觉问答(VQA)则通过自然语言形式,直接体现模型对场景的理解能力。开发者可以询问被遮挡区域中可能存在的元素,它们如何影响驾驶行为,为什么自车应该减速,或有关场景中的其他问题。
视觉问答对于交互式调试与数据处理十分重要。它不仅可以帮助开发者分析策略为何做出特定决策,还可用于在大规模数据片段中构建语义筛选条件,并生成供人工审核的候选标注。借助环视输入,问题还可以覆盖侧向和后方信息,从而弥补仅依赖前视视角模型的局限。
基于视觉问答与 2D 定位的多摄像头场景查询
对于每个视频片段,Alpamayo 2 Super 不仅能够生成答案,还可以通过在相关相机帧中预测 2D 边界框,对所引用的目标进行空间定位。这种定位能力使输出相比纯文本更加实用:审阅者可以核实模型指代的具体对象,自动化检查能够识别缺失或不一致的检测框,而下游模型也可以利用这些更紧密耦合的视觉证据、推理过程与动作信息(例如通过蒸馏)来提升性能。
场景理解与视觉问答 Notebook 展示了如何在相同输入条件下执行视觉问答。核心推理步骤及输出如下所示。
from alpamayo2_super import helper
from alpamayo2_super.load_physical_aiavdataset import load_physical_aiavdataset
from alpamayo2_super.models.alpamayo2_super import Alpamayo2Super
from alpamayo2_super.text_tasks import generate_text, prepare_text_generation_inputs

data = load_physical_aiavdataset(
  "ea4a6729-bf33-4997-905b-cd58774a3580",
   t0_us=7500000,
)

model = Alpamayo2Super.from_pretrained("nvidia/Alpamayo2-Super", dtype=torch.bfloat16, device_map="cuda:0")
task_inputs = prepare_vqa_inputs(
    data=data,
    model_config=model.config,
    tokenizer=model.tokenizer,
    question="Describe the driving scene and identify the key traffic elements that should influence ego behavior.",
)
task_inputs = helper.to_device(task_inputs, "cuda")
with torch.autocast("cuda", dtype=torch.bfloat16):
    result = generate_text(
        model,
        task_inputs,
        top_p=1.0,
        temperature=0.1,
        max_new_tokens=1024,
    )
answer = result["answer"][0]
print(answer)
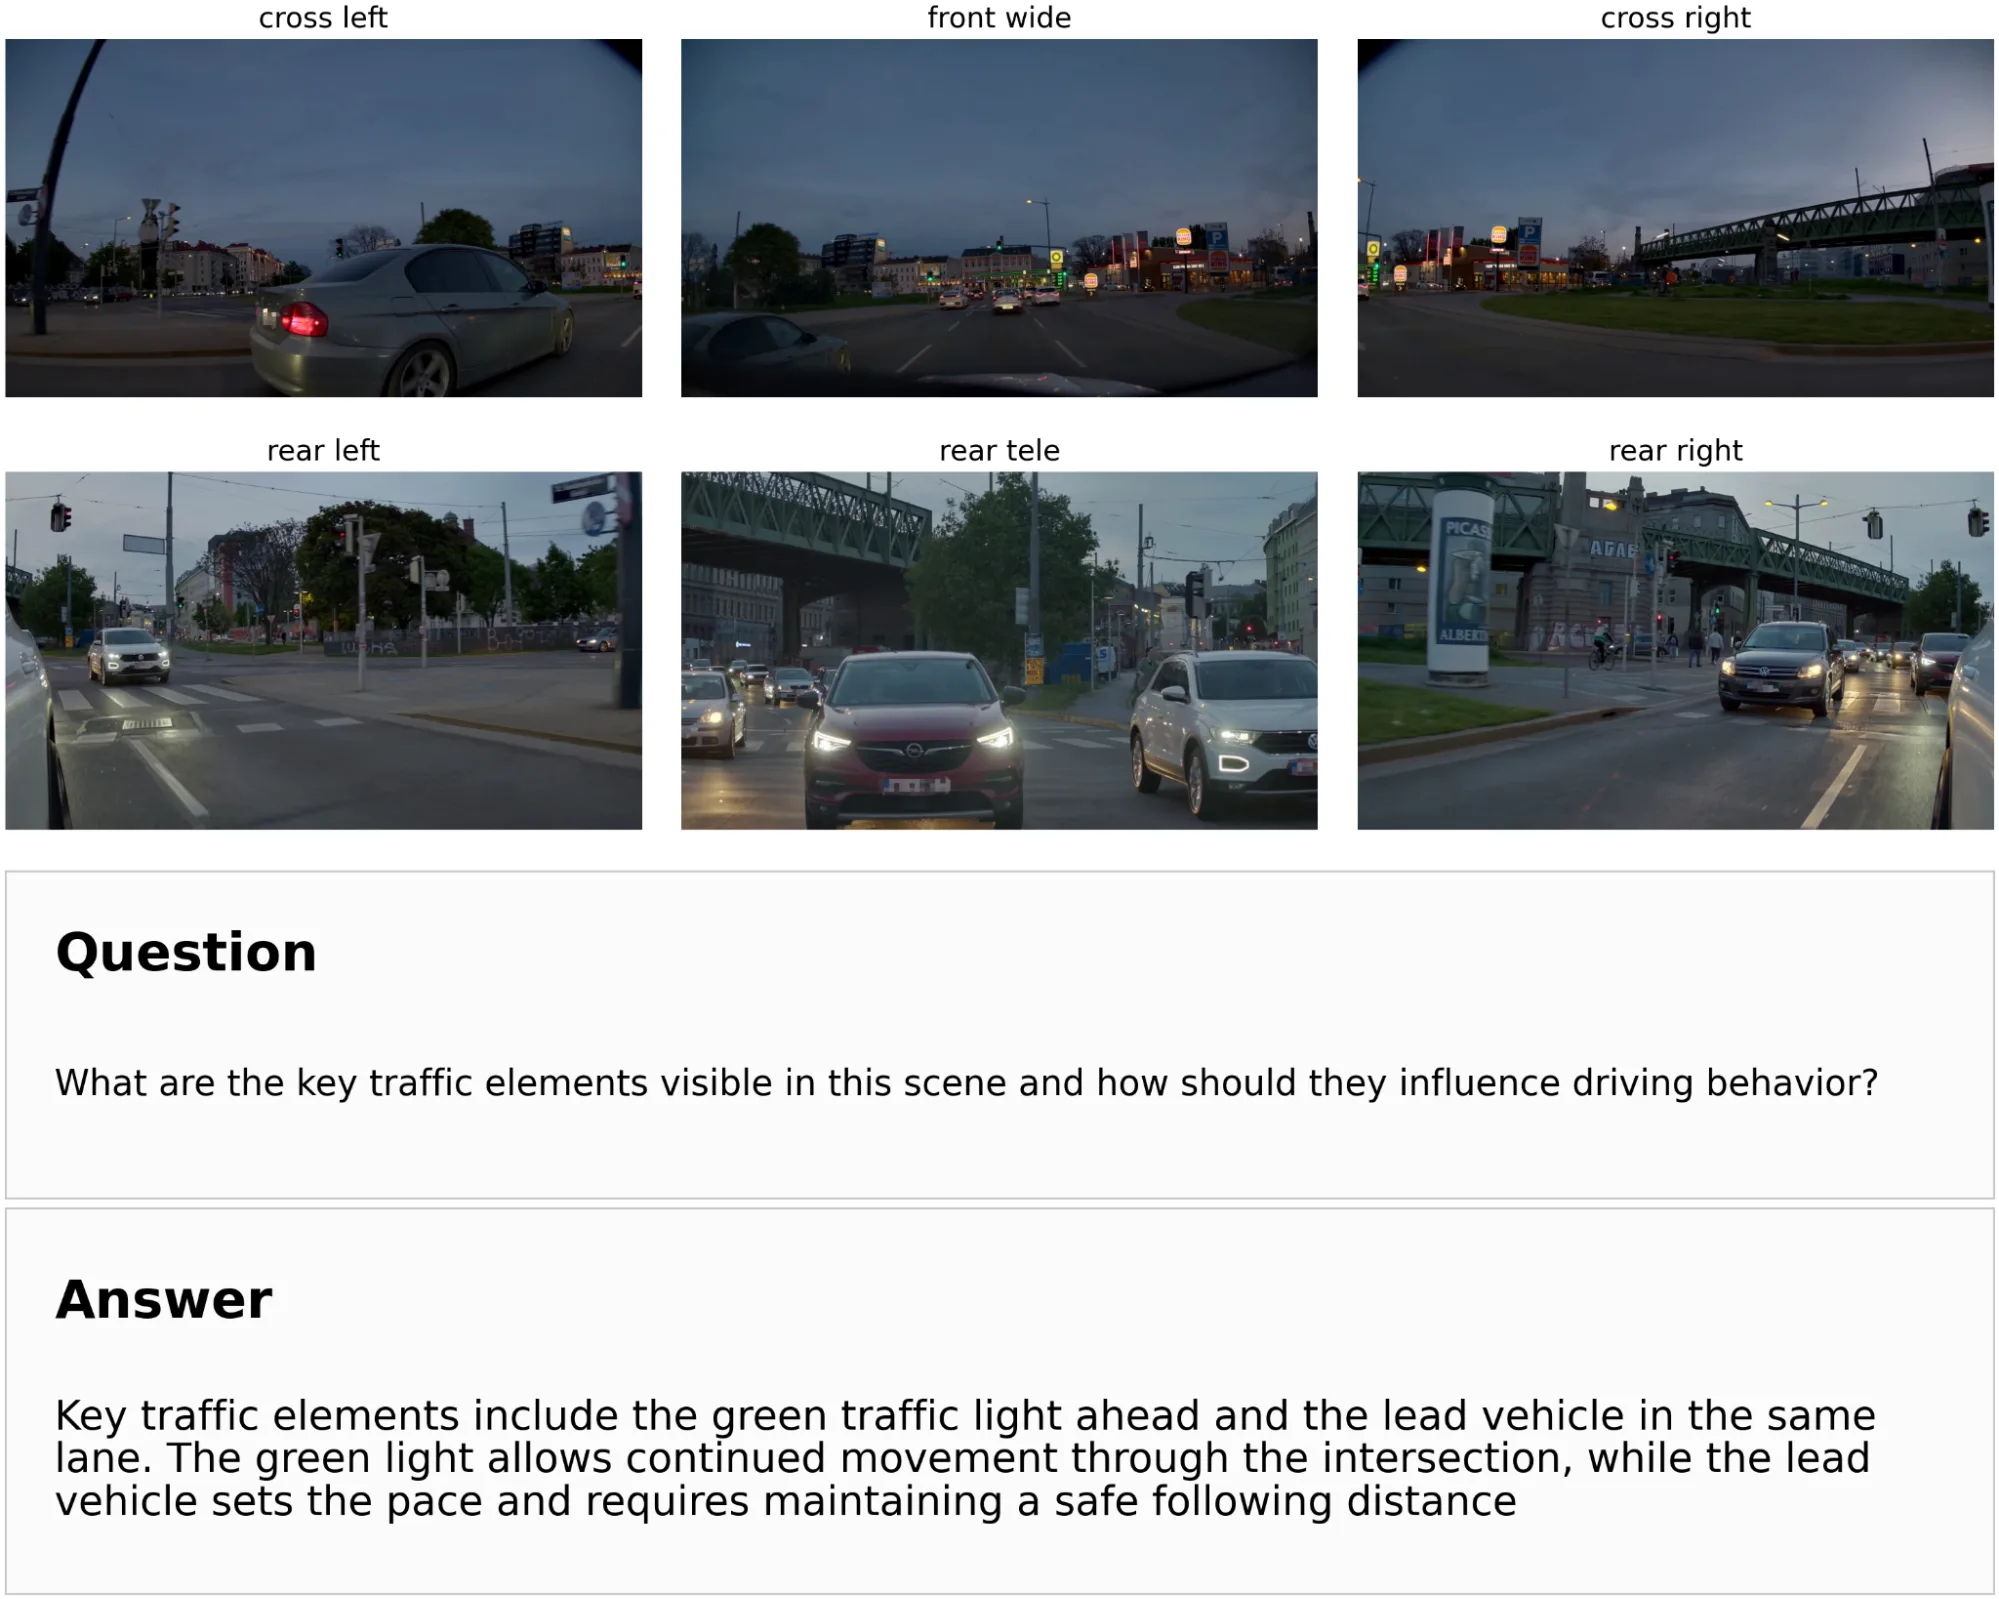 图 4. Alpamayo 2 Super 对观察到的场景问题回答示例
对于相同的输入,该模型可以返回两种类型的输出:上方的图 4 显示了场景的自然语言描述,而下方的图 5 显示了同一模型通过预测相关摄像头帧中的 2D 边界框,对引用对象进行空间定位。
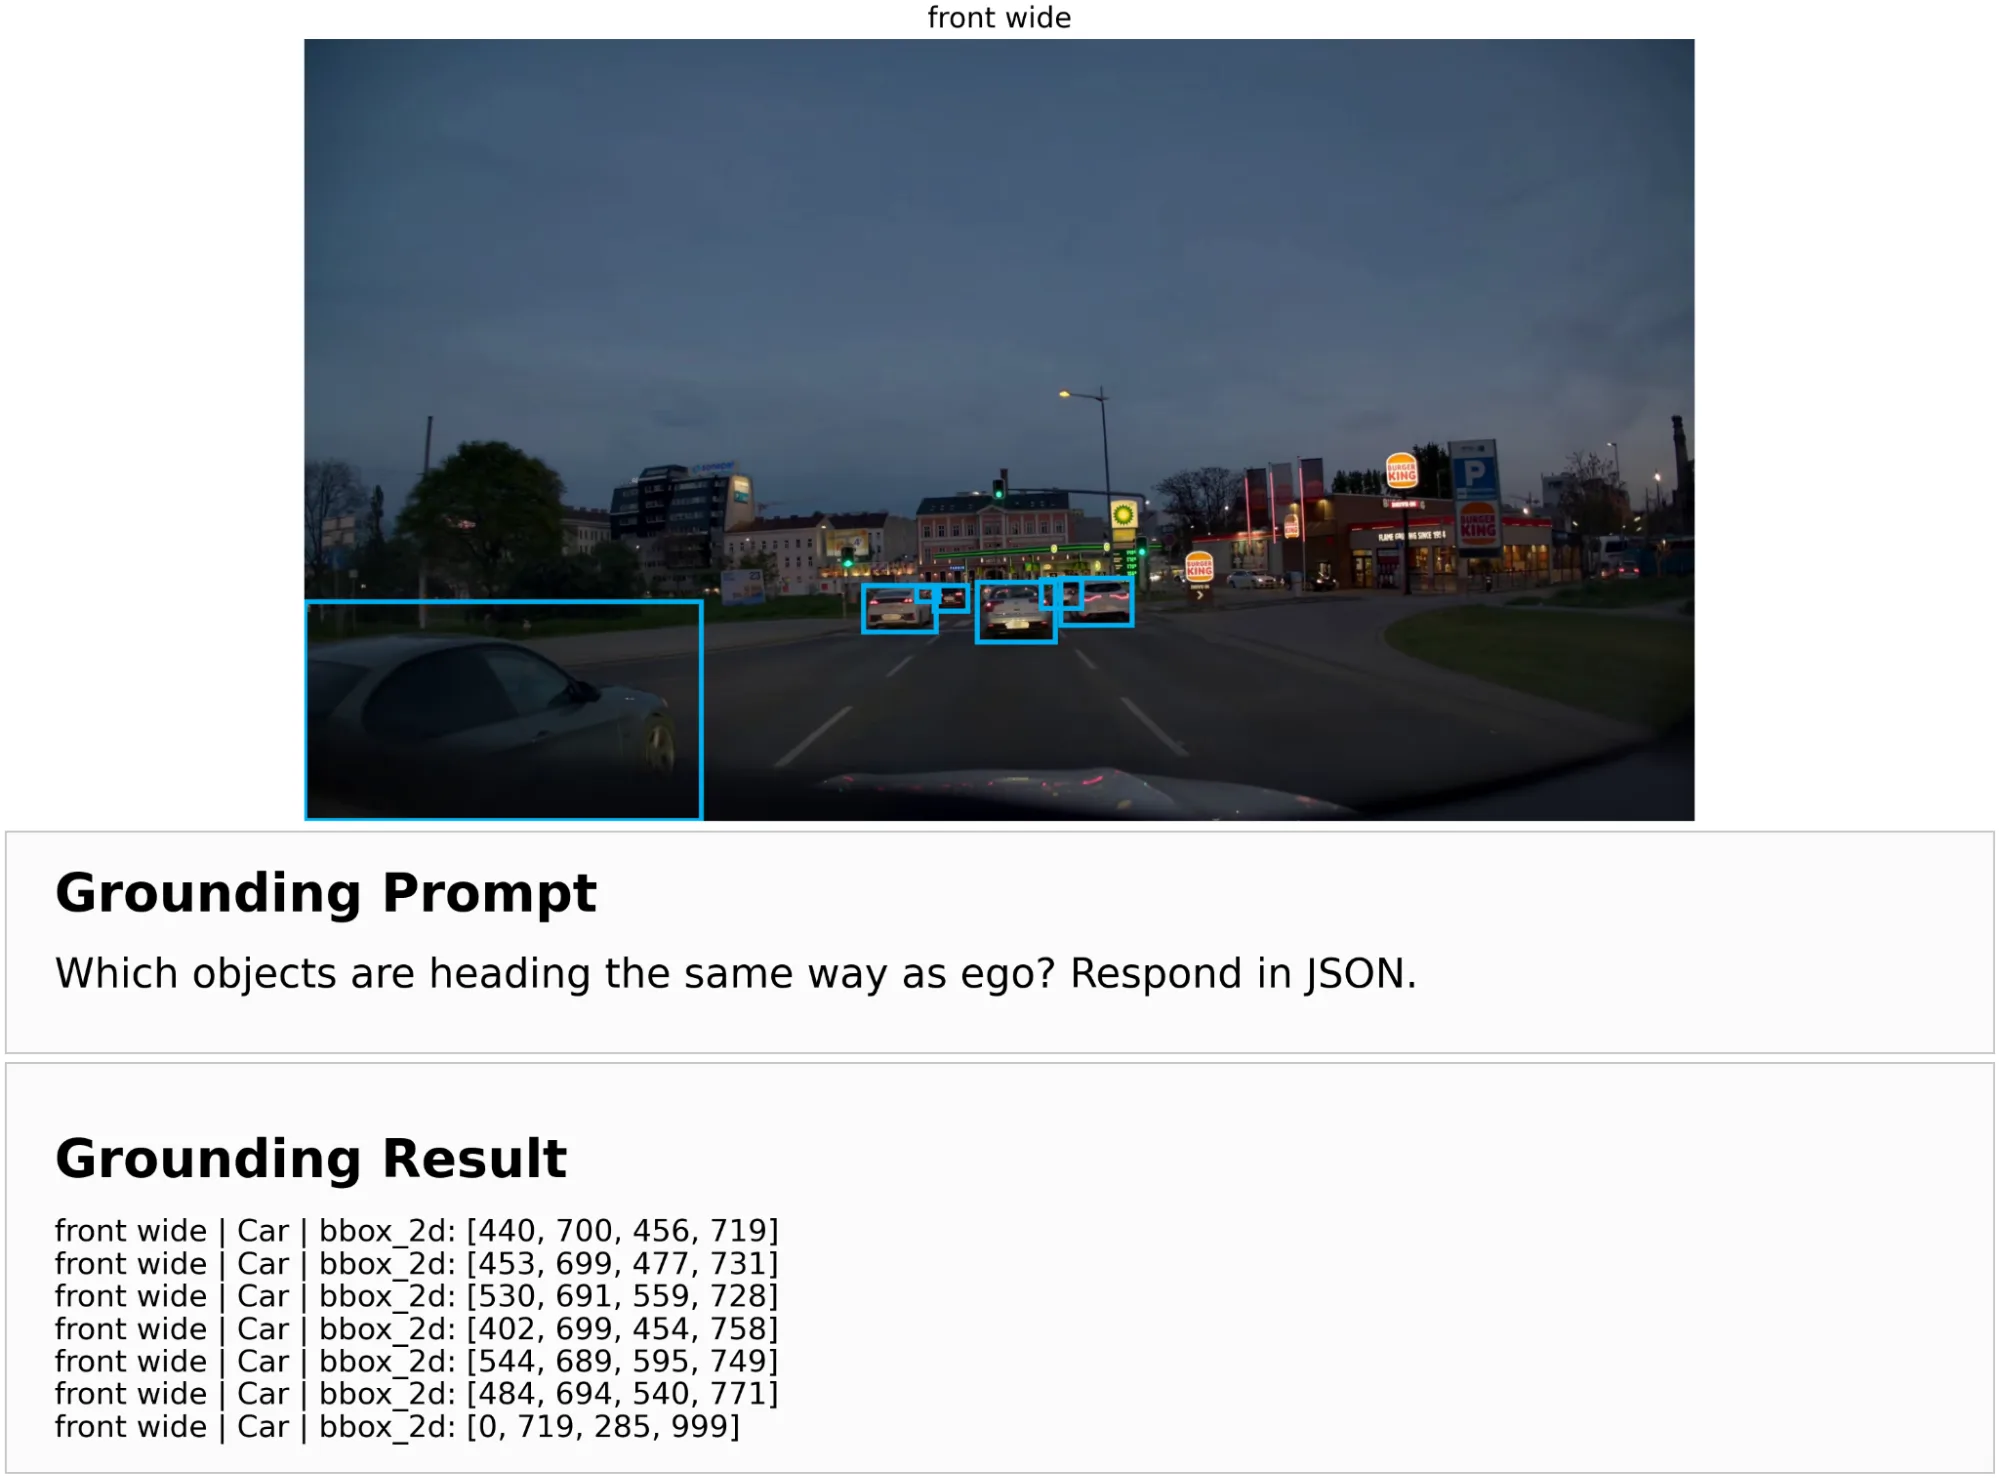
评估视觉问答和定位质量
为评估视觉问答性能,我们将 Alpamayo 2 Super 在内部 8,000 个问答对上的生成的回答与真实答案进行对比。结果显示,该模型的答案相似度达到 0.652(数值越高表示表现越好),相比之下,Qwen3-VL 32B 为 0.450。在 2D 定位方面,我们采用IoU将模型预测的边界框与真实标注进行对比,Alpamayo 2 Super 的IoU达到 0.71,而 Qwen3-VL 32B 为 0.17。综合来看,这两项指标用于评估模型是否既能准确回答问题,又能在环视相机画面中将回答与正确的视觉依据对应起来。
自动标注
推理模型依赖于与决策相关的高质量推理数据,但对长尾驾驶片段进行人工标注既成本高昂又效率低下。标注人员需要同时审视时间序列和多摄像头上下文,识别关键因果参与体,说明其对自车行为的影响,并确保标注结果与预期驾驶动作保持一致。Alpamayo 2 Super 可作为离线自动标注工具,在大规模数据上生成此类结构化标注。这可将标注周期从数月缩短至数天。
生成结构化因果链自动标注
因果链自动标注 Notebook 支持输入符合既定数据格式的片段,并针对选定的关键帧生成对应的结构化标注记录。
from alpamayo2_super import helper
from alpamayo2_super.load_physical_aiavdataset import load_physical_aiavdataset
from alpamayo2_super.models.alpamayo2_super import Alpamayo2Super
from alpamayo2_super.text_tasks import generate_text, prepare_text_generation_inputs

data = load_physical_aiavdataset(
  "b5f3756c-4f0e-4298-a1ff-cc92ed392ae0",
   t0_us=11000000,
)

model = Alpamayo2Super.from_pretrained("nvidia/Alpamayo2-Super", dtype=torch.bfloat16, device_map="cuda:0")

task_inputs = prepare_text_generation_inputs(
   data=data,
   model_config=model.config,
   tokenizer=model.tokenizer,
   task="auto_labeling",
)
task_inputs = helper.to_device(task_inputs, "cuda")

torch.cuda.manual_seed_all(42)
with torch.autocast("cuda", dtype=torch.bfloat16):
   result = generate_text(
       model,
       task_inputs,
       top_p=0.98,
       temperature=0.6,
       max_new_tokens=1024,
   )

auto_labeling_text = result["cot_auto_labeling"][0]
auto_labeling_json = result["cot_auto_labeling_json"][0]
print(json.dumps(auto_labeling_json, indent=2))
默认情况下,Alpamayo 2 Super 默认可以获取未来的自车轨迹信息;不过,它同样支持对不包含未来轨迹的数据进行自动标注。
# ... same imports and model loading as above ...

# Get the model to predict a future trajectory of its own, and use that in auto-labeling as the "observed" future motion.
trajectory_inputs = helper.prepare_model_inputs(data, model.config, model.tokenizer)
trajectory_inputs = helper.to_device(trajectory_inputs, "cuda")

torch.cuda.manual_seed_all(42)
with torch.autocast("cuda", dtype=torch.bfloat16):
   pred_xyz, pred_rot, _, extra = model.sample_trajectories_from_data(
        data=trajectory_inputs,
        top_p=0.98,
        temperature=0.6,
        num_traj_samples=1,
        diffusion_kwargs={"inference_step": 10},
        return_extra=True,
   )
   future_xyz = pred_xyz[:, 0, 0].detach().cpu()
   future_rot = pred_rot[:, 0, 0].detach().cpu()
   # In case you want to see the model's reasoning, uncomment these:
   # trajectory_cot = str(extra["cot"].reshape(-1)[0])
   # print("trajectory_cot:\n", trajectory_cot)

task_inputs = prepare_text_generation_inputs(
   data=data,
   model_config=model.config,
   tokenizer=model.tokenizer,
   task="auto_labeling",
   # This is where the predicted trajectories are passed in:
   future_xyz=future_xyz,
   future_rot=future_rot,
)
task_inputs = helper.to_device(task_inputs, "cuda")

torch.cuda.manual_seed_all(42)
with torch.autocast("cuda", dtype=torch.bfloat16):
   result = generate_text(
       model,
       task_inputs,
       top_p=0.98,
       temperature=0.6,
       max_new_tokens=1024,
   )

auto_labeling_text = result["cot_auto_labeling"][0]
auto_labeling_json = result["cot_auto_labeling_json"][0]
print(json.dumps(auto_labeling_json, indent=2))
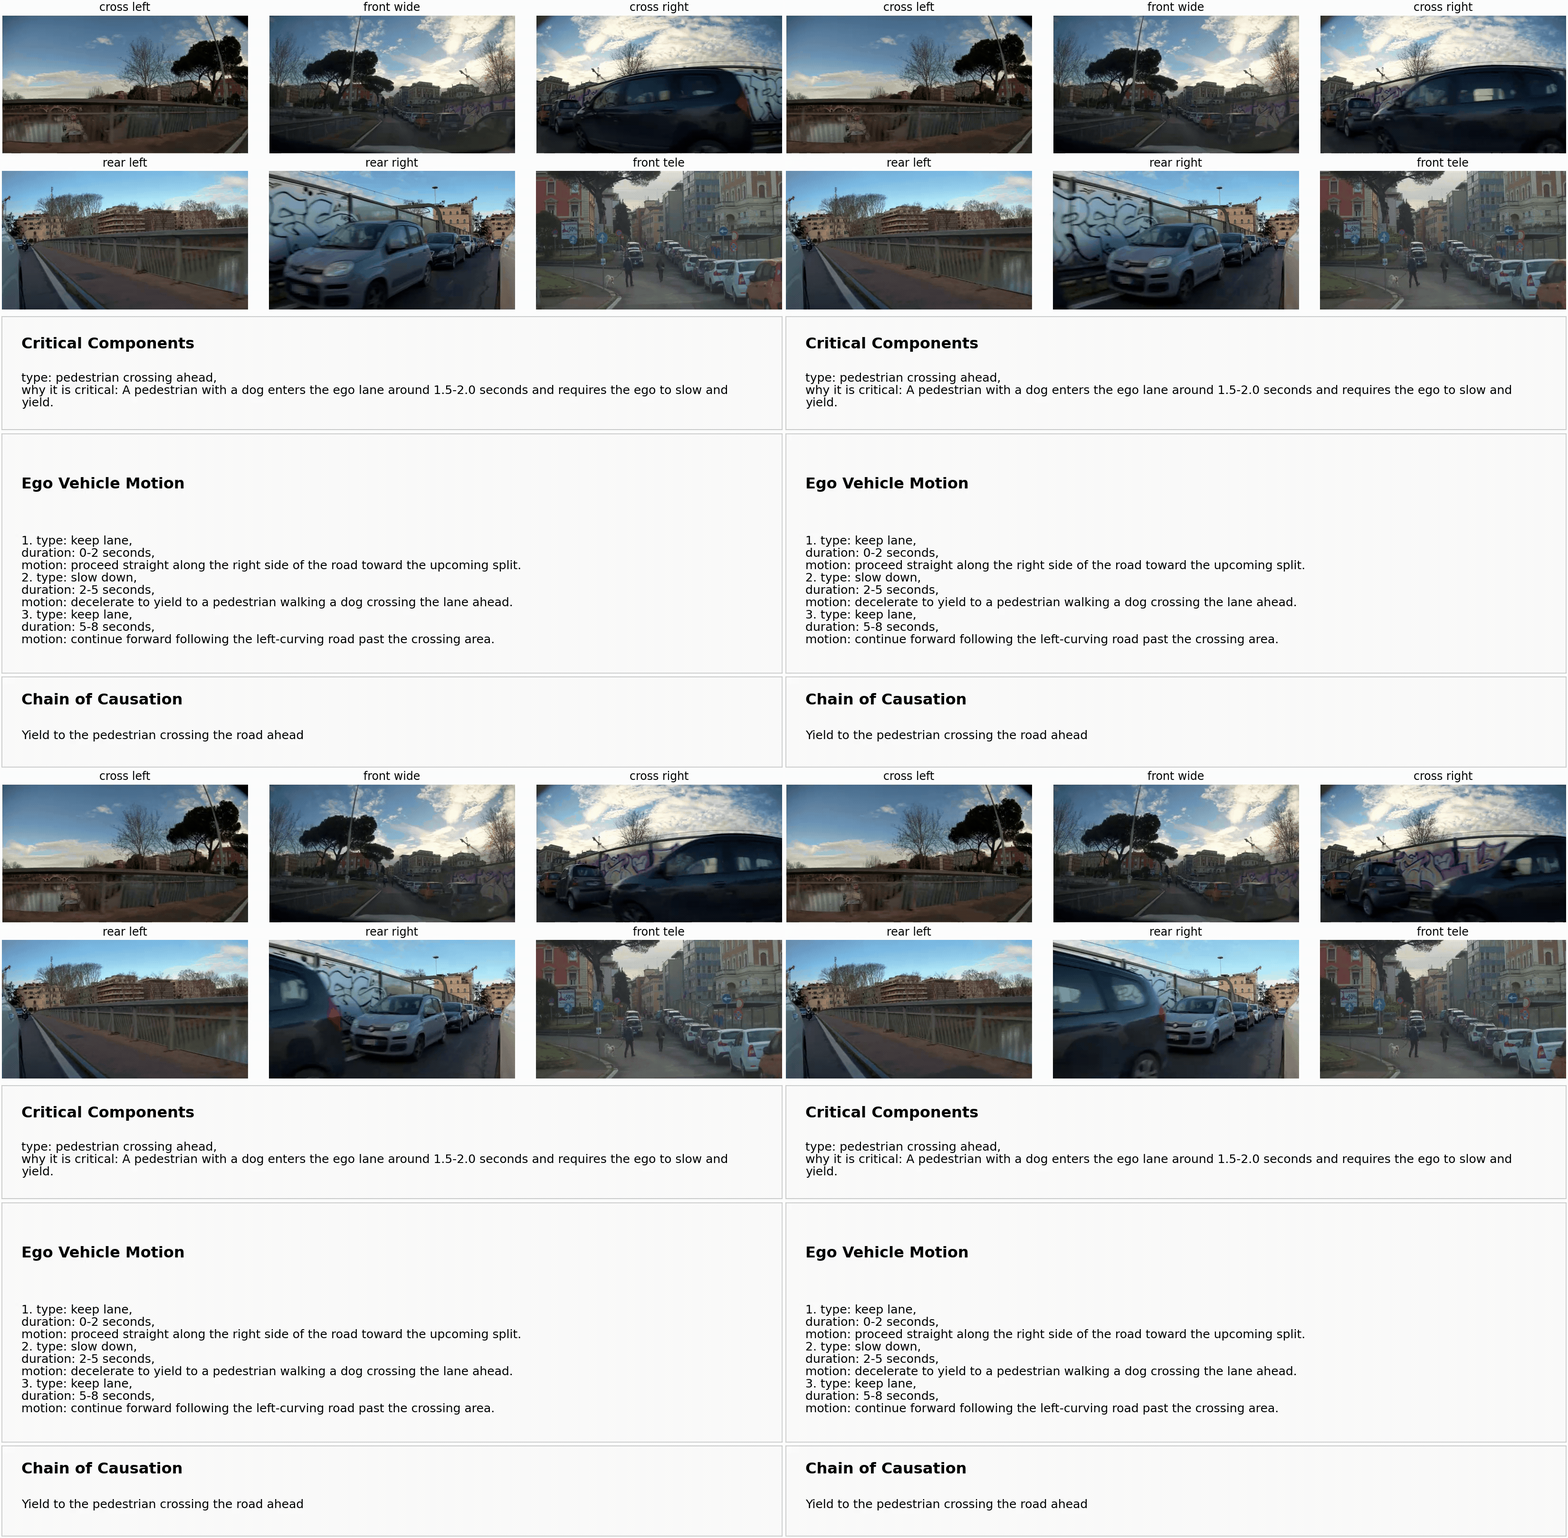
评估因果链自动标注质量
为评估因果链自动标注质量,我们将 Alpamayo 2 Super 在 8,000 个内部视频片段上生成的标注与专家标注进行对比,并使用内部评估模型对两者的相似度进行评估。结果显示,Alpamayo 2 Super 的相似度得分达到 0.652,相比之下,Qwen3-VL 32B 为 0.450。这些结果表明,Alpamayo 2 Super 有望实现大规模生成结构化因果链标注,同时保持与专家标注的一致性。
使用 Alpamayo 2 Super 构建应用
Alpamayo 2 Super 将环视感知、推理、规划、场景理解以及数据自动标注整合到统一的开放模型工作流中。这些能力为开发者提供了坚实的基础,可用于构建教师模型、挖掘长尾数据、分析策略决策,以及在超越单一开环轨迹指标的维度上评估辅助驾驶系统。作为教师模型,它可被蒸馏为能够在车端 NVIDIA DRIVE AGX Thor 平台上运行的轻量级模型。
欢迎在 Hugging Face 上探索该模型,运行推理 Notebook,并在 Alpamayo 开发者论坛分享实践成果。
有关 Alpamayo 2 的更多信息,请参阅相关的 Hugging Face 博客文章。